Manage Notifications
Note: Only Admin and Editor user roles can create/edit/delete notifications. (See User Roles.) For multi-site organizations: Users can only create/edit/delete notifications assigned to their site. Only the All Sites Admin can access all notifications.
Before You Begin
We recommend reading through the Notification Basics topic to get an idea of how notifications are set up and the different choices you can make. It's helpful to know what kind of notification you want to create, how you want it triggered, and what endpoints you want to receive it before you begin.
There are four basic tasks to creating a notification:
- General Settings – name, notification type, priority level, site assignment.
- Selecting what triggers the notification.
- Entering the notification content – images, audio, text, variables.
- Selecting the endpoints and contacts to receive the notification.
The step-by-step process of setting up a notification depends on what type of notification you want – text and image only, audio included, endpoints assigned or use dynamic endpoints, live broadcast – and how you want the notification triggered – by dialing a line number, clicking send in the Revolution interface, a scheduled date and time, clicking on a button or opening a door, or an incoming, third-party emergency alert. We've laid out the steps for each of these scenarios. Click on a link below:
- Text and images notification – This example shows you how to trigger a notification, which contains no audio, by dialing a line number.
- Stored audio notification – There are three examples provided. One that shows you how to trigger a notification by dialing an extension number. One that shows you how to trigger a notification by a pressing a panic button (IP device GPI), and the notification turns on a flashing light (IP device GPO) when triggered. Additionally, one of these shows you how to set up a notification using two triggers, either by dialing an extension number or by pressing a panic button (IP device GPI).
- Scheduled notification – This example shows you how to set up notifications triggered by scheduled events you create.
- Live broadcast/paging notification – This example shows you how to use a phone to live broadcast/page out to multiple endpoints.
- Recorded notification – This example shows you how to record a notification on the fly from a phone and then send it as an audio.
- Intercom notification – There are two examples provided, one for each of the ways to make two endpoints act as an intercom for live broadcast/paging.
- Answer notification – This example shows you how to start a notification to multiple endpoints that asks someone to answer the call. Once the Accept button is pressed, the other endpoints are dropped, at which point this becomes a one-to-one conversation.
- Conference notification– This example shows you how to use a notification to create a conference call between predefined users. You can also add users while the conference is in session, send a notification, and dial 9-1-1.
- Response Options notification – For most notification types, you can include response options to get feedback from your notification recipients. This example shows you how to use response options as a check-in from your end users in emergency scenarios.
- Push-to-Talk notification – This example shows you how to use two IP or wireless phones as a walkie-talkie.
- Mobile notification – There are three examples provided, one for creating a Mobile trigger that send static content, one for creating a Mobile trigger that allows end users to add text and image content on-the-fly, and one for creating a Mobile trigger that allows end users to add text, images, and audio content on-the-fly.
- CAP alert notification – This example shows you how to forward the contents from an incoming National Weather Service emergency alert to your endpoints.
- Report Notification – This example shows you how to send a report on Revolution information on a schedule.
- Text to speech – This example shows you how to create a notification that translates the text you've entered into digital speech at the time the notification is sent.
You are not limited to just these scenarios. Setting up notifications is very flexible.
There are basically four ways to send notifications:
- here on the Manage Notifications page
- from your dashboard
- by dialing a line number on a phone
- from within the Mitel Revolution Mobile Application app
You can manually trigger notifications from the Manage Notifications page.
- Go to Notification > Manage.
- Click
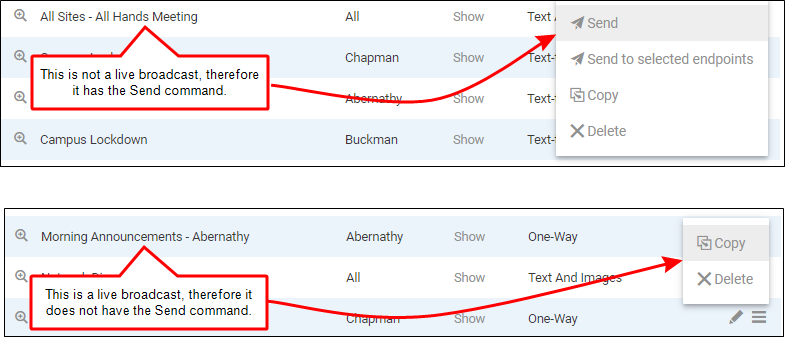
 Menu for a notification and click Send.
Tip: If you're creating a new notification, you can save it and send it at the same time.
You're taken to the Notification Details page where you can view which endpoints successfully received the notification and which encountered an error. If an error was encountered, the first troubleshooting step is to go to Status > Endpoints and see if the endpoint is Active or Inactive. If the endpoint shows as Inactive or with an Error, contact your system admin.
The exception is live broadcast notifications. These are triggered by dialing a line number and cannot be manually sent, and they cannot be added to a Dashboard.
Tip: Live broadcast notifications are those with either One-Way or Two-Way Notification Type.

Go to Notifications > Sent to view the status and details of sent notifications.
You can use an existing notification as the starting point for a new notification. This is particularly useful when creating notifications that are very similar.
- Go to Notification > Manage.
- Click
 Menu and click Copy. A new notification is created using the same name with Copy appended to it. For example, School Bell Schedule copies to School Bell Schedule - Copy 1.
 - Click
 Edit for the copied notification, change the name and any other elements.
 - Click Save & Close when you're done.
- Go to Notification > Manage.
- Click
 Edit for the notification you want to change.
 - Click on the section you want to edit. You can change any part of the notification. Keep in mind that changes to Notification Type, triggers, and endpoints may add or remove functionality elsewhere. For example, adding a SIP Activator line as a trigger adds the 'Allow user to add endpoints dynamically' function to the Select Tags & Endpoints section.
- Click Save & Close when you're done editing.
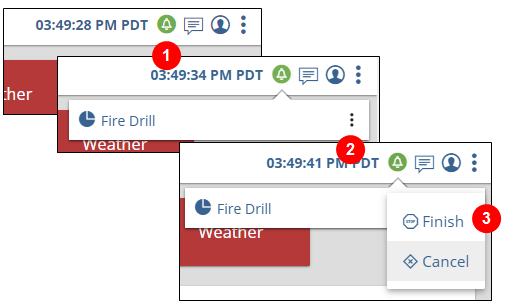
When a notification is sent, a status displays in the upper right corner of the screen. You can cancel a notification from here.
- Click the notification icon in the upper right corner of the user interface.
- Click the 3 dots next to the notification name.
- Click Finish or Cancel.
- If you started the notification by accident, click Cancel. The notification stops immediately.
- If the notification has multiple iterations or is a continuous notification, click Finish. The current iteration completes and then the notification stops.

Keep in mind that if the notification is short, it may move from active to sent before you have time to cancel it.
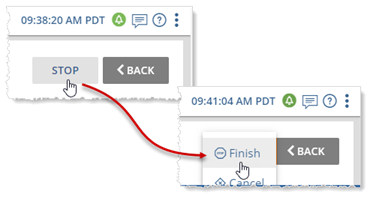
If you click on the notification name instead of the 3 dots, this opens the Notification Detail page where you can click Stop > Finish or Cancel.
From the Notification Detail Page
If the notification was sent from the Manage Notification page, once sent, the Notification Detail page automatically displays, and you can cancel the notification from here. (You can also get to the Notification Detail page by clicking the notification icon and then the notification name.)

Note: If for some reason Cancel does not make notification stop, a Kill option is presented. If you have to click Kill, please notify your system administrator. Using the Kill option may leave phones and speakers in a bad state requiring a reboot.
- Go to Notification > Manage.
- Click
 Menu and click Delete.
 - Confirm the delete. The UI refreshes.
