Stored Audio Notification
We're going to explore three examples here:
- a simple stored audio notification that you can trigger by dialing a line number on a phone or from the Revolution interface
- a more complex stored audio, emergency notification that incorporates audio, text, and turning on an emergency flashing light
- another complex stored audio, emergency notification that incorporates audio, text, and multiple triggers
These notifications can be assigned to end-user's Dashboards and triggered from the Revolution interface.
Go to Notifications > Manage and select New Notification.
For this example, the notification can be triggered by dialing a line number or through the Revolution interface. The notification plays a tone to get people's attention, followed by a prerecorded audio message. It includes text to help remind people this is a fire drill, not an emergency. The notification plays three times with a 60-second pause in between.
- Provide a descriptive name that's meaningful to your users.
- Select Stored Audio from the Notification Types drop-down list.
-
Change Iterations to 3. Leave the Repeat Interval at 60 seconds. This notification will repeat three times with a 60-seconds pause in between. You can set the notification to play once, multiple times, or continuously until it is stopped. Whereas Continuous notifications are stopped by sending the notification again. Please review the topic Notification Basics > General Settings - Understanding Activation Types for important information about iterative and continuous mode.
Regardless of your Activation Type, if you choose contact methods of any form (SMS, Email, or Mobile), Revolution will send only a single notification to the contacts you select.
- Select a Priority level for the notification. Not all endpoints support priority levels. Check the endpoint vendor documentation.
- (Optional) Select an icon to represent this notification if it is selected as a Quick Notification on the Dashboard.
-
For multi-site organizations, do one of the following:
- If you're an All Sites Admin or All Sites Editor – To assign this notification to a specific site, disable Available in All Sites and select a Site from the drop-down list. Alternatively, you can leave it Available to All Sites.
- If you're a Site Admin or Site Editor – This notification is automatically assigned to your default site. Each Site Admin will need to create their own triggers.
Note: This image is not sent with the notification. To send an image with the notification, select it in the Message Details section.
![]()
Note: The triggers available are determined by how your system administrator configured the application. You may or may not see all of these triggers listed.
Tip: See Notification Overview > Understanding Triggers for details about (and examples for) each of the trigger choices.
- For Activator, select SIP.
- For Trigger, select a line number.
- For Trigger Behavior, you would typically select Activate.
This allows you to trigger this notification by dialing a line number or you can trigger it using the Revolution interface.
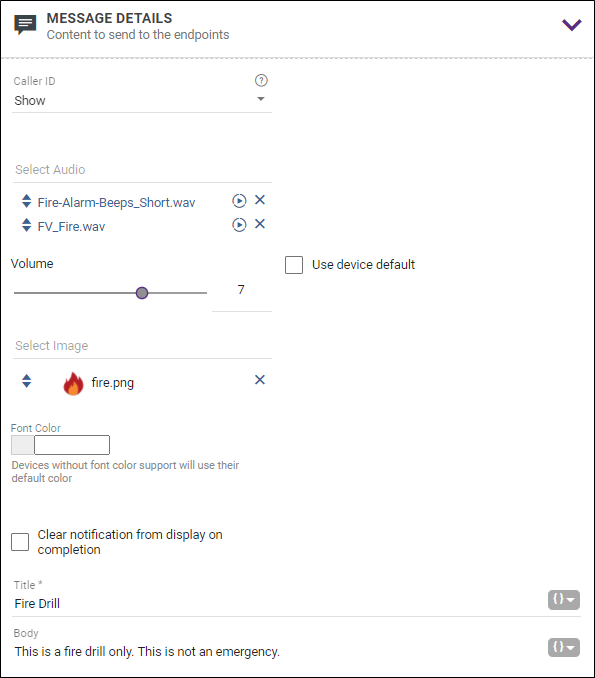
- Set Caller ID to Show.
- Select an audio tone or prerecorded message from the drop-down list.
- Repeat the process to select additional audio files, if necessary.
Audios play in the order listed. Drag and drop files to rearrange ( ) the order. For this example, I'm using a prerecorded fire evacuation audio, and I want a tone to play first to get people's attention before the message begins.
 -
For Volume, select a value for the notification. This volume overrides the volume set on the endpoint receiving the notification, such as a phone or speaker. Alternately, you can select Use device default instead of setting the volume in the notification, which means that the audio plays at 80% of the volume set for the speaker. See Endpoints > Volume for more information on where you can set the default volume for speakers.
For this example, I'm using a higher volume to ensure everyone hears the audio no matter where they are in the building.
- (Optional) Select and image from the drop-down list to send with the notification.
You can repeat this step to select an additional image. Best practice is to select no more than two images in order to support different endpoint screen sizes. If you do want to use more than two images, make sure the assigned endpoints are capable of displaying them. - (Optional) For Font Color, select color to be used for the text message. This is dependent on whether the endpoint receiving the notification accepts the font color command.
- Enter a Title for the notification.
- Enter the content of your notification in the Body.
For this example, I'm including a text message to help let people know this is not an emergency. The text displays on phone screens and scrolls across speakers at the same time the audio message is playing - Leave 'Clear notification...' unchecked. Enabling 'Clear notification...' removes the message content from a phone endpoint display once the selected audio files finish playing. For this example, I want the message to remain on display until the fire drill is over, which will be after the audio files finish playing.
You can use this section to create notification actions as part of the notification. See Add Endpoint Responses and Notification Action Types.
This example does not use any notification actions.
- Leave 'Allow users to add endpoints dynamically' at None. For this example, since this is a fire drill, I don't want to have to add endpoints on the fly. See Understanding Triggers for more information on dynamic endpoints.
-
Leave Contact Methods unchecked. While I'm not including contacts as recipients for this example, you could.
You can also send the notification to contacts' external communication methods such as email, mobile devices, SMS, etc.:- Click Contacts.
- Do one or both of the following:
- Select the contacts you want to receive this notification.
- Click User Tags and select the contact user tags you want to receive this notification. Tags are just a way of grouping contacts, so you don't have to select them individually. For example, I've created a dynamic contact tag for my engineering group.
- Check each communication method you want to use for the contacts selected for this notification.
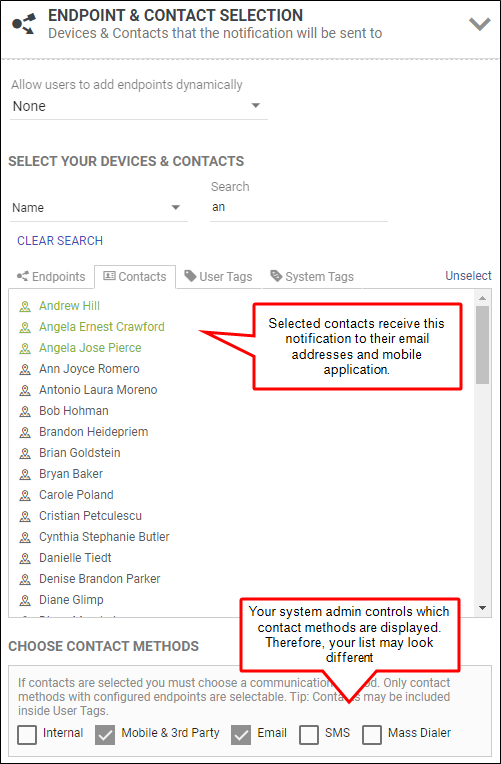
What's an Internal communication method? Contacts can have system endpoints associated with them. For example, employees may be imported into Revolution as contacts and their desk phones associated with their contact information. The desk phone is an internal endpoint. This allows you to send notifications to all available communication methods – work desk phone, cellphone (Mobile app, SMS) – without having to select contacts and IP phone endpoints separately.
- Select each endpoint, contact, or tag you want to receive the notification. Tags are groups of endpoints and/or contacts, where User Tags were created by your system administrator and System Tags were automatically created by the application.
- Do not select Mobile App Geofence Boundaries or a General Purpose Output Relay Mode. This doesn't apply to this example because we're not sending this notification to contacts via the Mobile app.
For this example, the fire drill is only for the Portland Office.
If you added a tag or endpoint by mistake, click the trashcan next to it to remove it from the selected list. - Click Save.
This notification is now ready to send by dialing the line number assigned or from the Revolution interface.
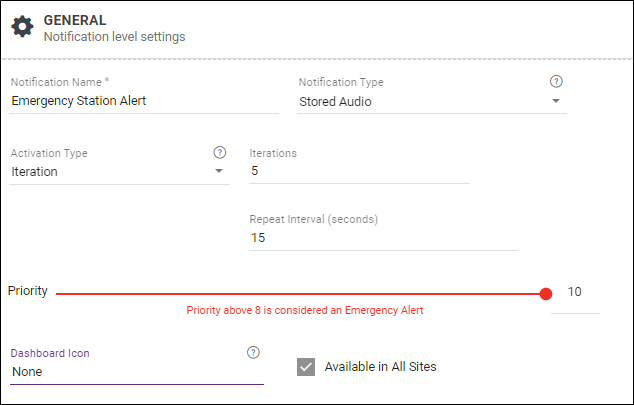
For this example, this notification is triggered when a panic button is pressed at one of the emergency alert stations set up on campus. The notification sends an audio and text message to the security office so campus police are dispatched and turns on a flashing light at the campus emergency station. To do this, the campus emergency station is equipped with a panic button (IP device as general purpose input) and a flashing light connected to a Paging Relay (general purpose output). This notification will play 5 times with a 15-second pause in between.
- Provide a descriptive name that's meaningful to your users.
- Select Stored Audio from the Notification Types drop-down list.
- Change Iterations to 5. Change Repeat Interval to 15 seconds. This notification will repeat five times with a 15-seconds pause in between.
- Select a Priority level for the notification. Not all endpoints support priority levels. Check the endpoint vendor documentation. For this example, because this is an emergency, I'm setting it to the highest priority level.
- Leave the Dashboard Icon field blank. For this example, this notification is triggered when a panic button is pressed at a campus emergency station. It should not be triggered through other means.
-
For multi-site organizations, do one of the following:
- If you're an All Sites Admin or All Sites Editor – To assign this notification to a specific site, disable Available in All Sites and select a Site from the drop-down list. Alternatively, you can leave it Available to All Sites.
- If you're a Site Admin or Site Editor – This notification is automatically assigned to your default site. Each Site Admin will need to create their own triggers.
Note: The triggers available are determined by how your system administrator configured the application. You may or may not see all of these triggers listed.
Tip: See Notification Overview > Understanding Triggers for details about (and examples for) each of the trigger choices.
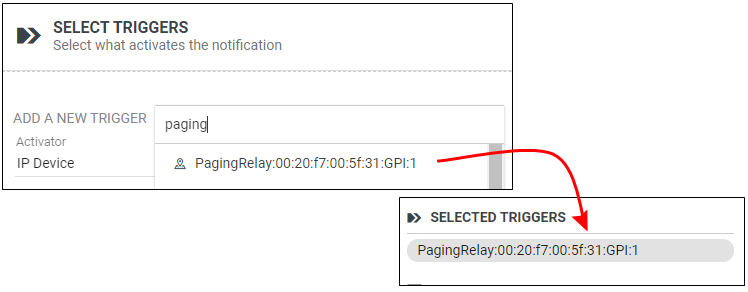
- For Activator, select IP Device.
-
For Trigger, select the IP Device GPI.
-
For Trigger Behavior, select Activate.
For this example, the notification is triggered when someone presses a panic button. The panic button is connected to a Paging Relay.
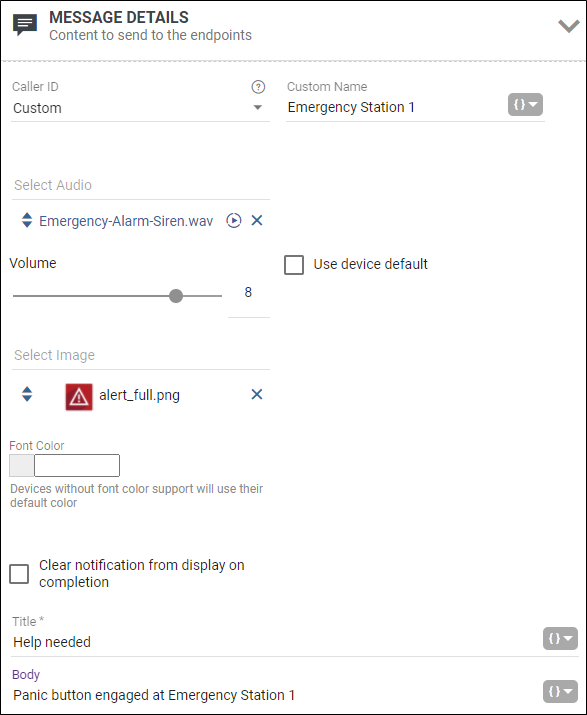
- Select Custom from the Caller ID drop-down list and enter a name. For this example, I'm using a name that identifies which emergency station has the active alert since we have multiple stations on campus.
- Select an audio file from the Stored Audio drop-down list. For this example, I'm using a siren to make sure I get campus police attention in the Security Office.
- For Volume, select a value for the notification. This volume overrides the volume set on the endpoint receiving the notification, such as a phone or speaker. Alternately, you can select Use device default instead of setting the volume in the notification, which means that the audio plays at 80% of the volume set for the speaker. See Endpoints > Volume for more information on where you can set the default volume for speakers. For this example, I'm using a high volume setting to make sure the whistle is heard.
- Select an image from the drop-down list to indicate this notification is important.
You can repeat this step to select an additional image. Best practice is to select no more than two images in order to support different endpoint screen sizes. If you do want to use more than two images, make sure the assigned endpoints are capable of displaying them. - (Optional) For Font Color, select color to be used for the text message. This is dependent on whether the endpoint receiving the notification accepts the font color command.
- Enter a Title for the notification.
- Enter the content of your notification in the Body.
- Leave 'Clear notification...' unchecked. For this example, it is important to leave 'Clear notification...' unchecked. If you check it, the message content is removed from display as soon as the audio file finishes playing. In this example, the sports whistle audio file is only 1.135 seconds long. If 'Clear notification...' is checked, the message text only displays for 1.135 seconds before it's removed. This is not the behavior you would want here. Typically, 'Clear notification...' is used with live broadcast notifications so that whatever text is displayed during the live broadcast is removed when you hang up to end the broadcast.
You can use this section to create notification actions as part of the notification. See Add Endpoint Responses and Notification Action Types.
This example does not use any notification actions.
- Do not select any Choose Contact Methods. For this example, we are only sending to endpoints.
- From Endpoints, click on the phone in the Security Office.
- Type relay in the Search field and click on the Paging Relay - Relay for the flashing light at Emergency Station 1. (This is the general purpose output.)
- Ignore Mobile Contact Geofence Boundary. This example isn't being sent to contacts via the Mobile app.
- Select Turn On from the General Purpose Output Relay Mode drop-down list. This keeps the flashing light on until another notification is sent to turn it off. For this example, I don't want the flashing light turned off until campus police have arrived and handled the incident.
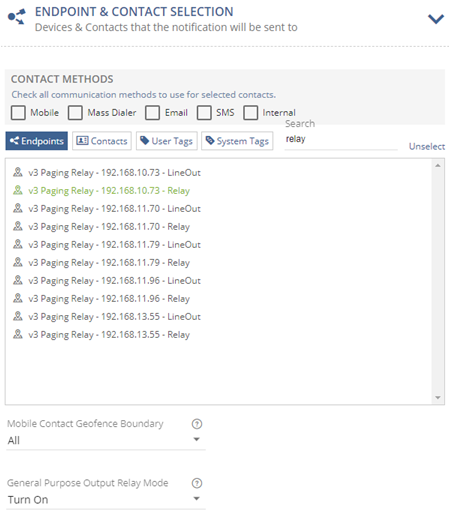
If you added the wrong endpoint by mistake, click the trashcan next to it to remove it from the selected list. - Click Save.
This notification is triggered whenever the panic button is pressed. This is not a notification you would want to add to the Dashboard because it's meant to be triggered at a campus emergency station. The flashing light turned on by this notification remains on until a second notification is sent that has the GPO Relay Mode set to Turn Off.
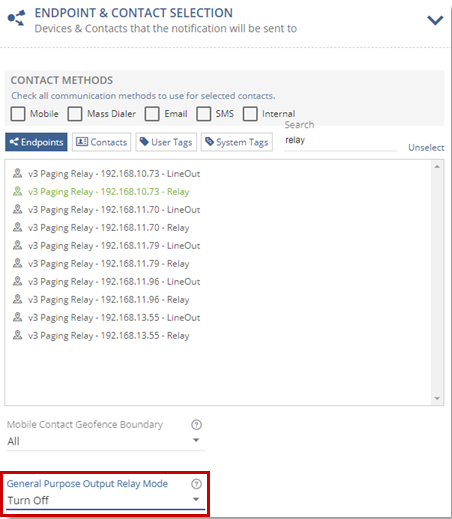
Tip: Notice that the notification to turn the Relay off, includes the same Paging Relay endpoint, but doesn't include the phone.
For this example, I'm creating a campus lockdown notification that I want to be to trigger by dialing a line number, by clicking send on the Dashboard, or by clicking a panic button. As the school district admin, I've created a campus lockdown notification for each one of my schools. This example uses Abernathy's notification.
- Provide a descriptive name that's meaningful to your users.
- Select Stored Audio from the Notification Types drop-down list.
- Change Activation Type to Continuous. This notification continues to play until it is sent again to stop it.
- Select a Priority level for the notification. Not all endpoints support priority levels. Check the endpoint vendor documentation. For this example, because this is an emergency, I'm setting it to the highest priority level.
- Select an image from the Dashboard Icon drop-down list. (For this example, I'm going to assign it to a button on the Dashboard, so I want an icon displayed.)
- Disable Available in All Sites and select Abernathy from the Site drop-down list.
Note: The triggers available are determined by how your system administrator configured the application. You may or may not see all of these triggers listed.
Tip: See Notification Overview > Understanding Triggers for details about (and examples for) each of the trigger choices.
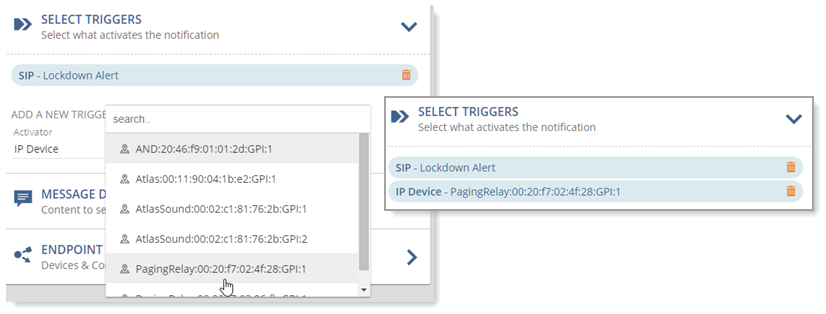
- For Activator, select IP Device.
- For Trigger, select the IP Device GPI. For this example, the notification can be triggered when someone presses a panic button.
- For Trigger Behavior, select Activate.
- Select SIP Activator from the Activator drop-down list.
- Select a line number from the Trigger drop-down list. For this example, the notification can also be triggered by dialing the line number from any phone in the network.
- For Trigger Behavior, select Activate.
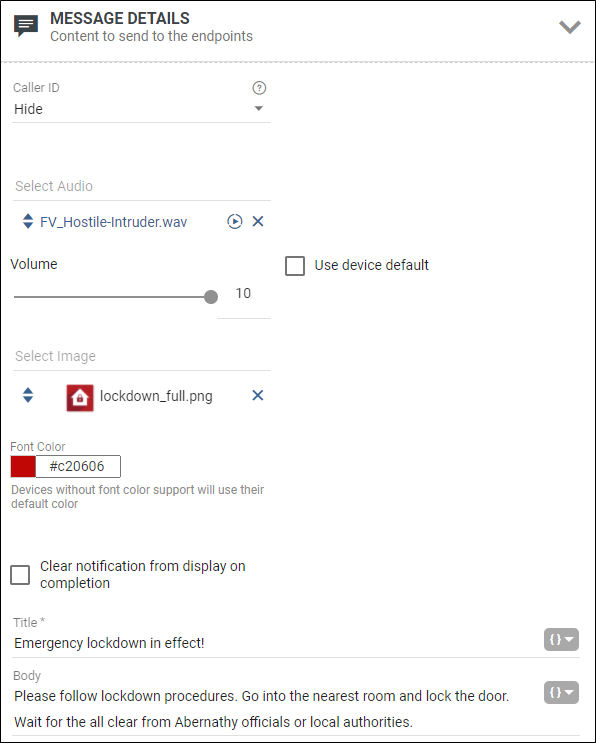
- Set Caller ID at Hide.
- Select an audio file from the Stored Audio drop-down list. For this example, I'm using a prerecorded audio message.
- For Volume, select a value for the notification. This volume overrides the volume set on the endpoint receiving the notification, such as a phone or speaker. Alternately, you can select Use device default instead of setting the volume in the notification, which means that the audio plays at 80% of the volume set for the speaker. See Endpoints > Volume for more information on where you can set the default volume for speakers. For this example, I'm using the maximum.
- Select and an image from the drop-down list to indicate this notification is important.
- Select red as the font color. For this example, I want to make sure the text is noticed.
- Enter a Title for the notification.
- Enter the content of your notification in the Body.
- Leave 'Clear notification...' unchecked. Enabling 'Clear notification...' removes the message content from a phone endpoint display once the selected audio files finish playing.
Note: Not all devices support font colors. Those that don't display the notification text in the device's default color, which is typically black.
You can use this section to create notification actions as part of the notification. See Add Endpoint Responses and Notification Action Types.
This example does not use any notification actions.
- Leave 'Allow users to add endpoints dynamically' at None. For this example, since this is an emergency, I don't want users to have to enter endpoints on the fly. See Understanding Triggers for more information on dynamic endpoints.
- Select each endpoint, contact, or tag you want to receive the notification. Tags are groups of endpoints and/or contacts, where User Tags were created by your system administrator and System Tags were automatically created by the application. For this example, I created two user tags. One is a dynamic contacts tag that includes all my Abernathy staff who have been entered as contacts. The second is a dynamic endpoints tag that includes all the phones and speakers at Abernathy school.
- Check Mobile, Email, and SMS as Contact Methods. For this example, I want the notification to go to all communication methods for my Abernathy school staff – their personal email, SMS message to their mobile phones, and the Mobile app for those who have that.
- Leave Mobile Contact Geofence Boundary at All. For this example, I want to reach all contacts using the Mobile app regardless of whether they are inside or outside the geographic boundaries defined in my Mobile Notifier.
- Ignore General Purpose Output Relay Mode.
- Click Save.
- Go to Dashboard.
- Click Edit
 .
. - Select Edit User Buttons. For this example, you are creating a button for your own use.
- Select Create New Button.
- Enter Lockdown for the Button Label.
- Select Campus Lockdown - Abernathy from the Notification to Trigger drop-down list.
- Click Add Button.
- Click Save.
This emergency notification can now be triggered by:
- clicking the Lockdown button on the Dashboard
- dialing the assigned line number from any phone on the network
- pressing the panic button
- clicking Send from the menu for Campus Lockdown - Abernathy on the Notifications > Manage page
The notification continues to play until it is triggered again to stop it.
Review the Notification Basics topic for information on the other notification types, and to learn more about using variables in the Message Details section.
