Scheduled Notification
These are notifications automatically sent according to the date and time specified in a calendar event.
Have you set up your event(s)? If not, follow the instructions in the Scheduler topic. Once you have created events, you can then assign them as triggers to notifications.
For this example, I've already set up three calendars in Scheduler, one for each of my schools – Abernathy, Buckman, and Chapman Elementary. Each calendar has four events – one for each time I want a bell audio file to play over speakers – First Bell, Tardy Bell, Lunch, and Dismissal. Now I just need to create one notification with the school bell audio and assign all three calendars as triggers. Each time a calendar event occurs, the notification is triggered to play the school bell.
Tip: Additional options are described after this example.
Go to Notifications > Manage and select New Notification.
- Provide a descriptive Notification Name that is meaningful to your users.
- For Notification Types select Stored Audio.
-
For Activation Type select Iteration and for Iterations select 1.
You can set the notification to play once, multiple times, or continuously until it is stopped. Whereas Continuous notifications are stopped by sending the notification again. Please review the topic Notification Basics > General Settings - Understanding Activation Types for important information about iterative and continuous mode.
-
Select a Priority level for the notification.
Not all endpoints support priority levels. Check the endpoint vendor documentation.
-
Do not select a Dashboard Icon.
For this example, this notification is automatically triggered by the event , so we don't really need a Dashboard icon. However, because this is a Stored Audio notification, it will be available to assign to end users' Dashboards.
- For multi-site organizations: I'm leaving this at Available in All Sites. Each of my schools has their own calendar and events for their bell schedule. Since I'm using the same audio file for my bell, all my school sites can trigger the same notification.
Note: The Scheduler Activator isn't available until at least one event has been scheduled.
Tip: See Notification Overview > Understanding Triggers for details about (and examples for) each of the trigger choices.
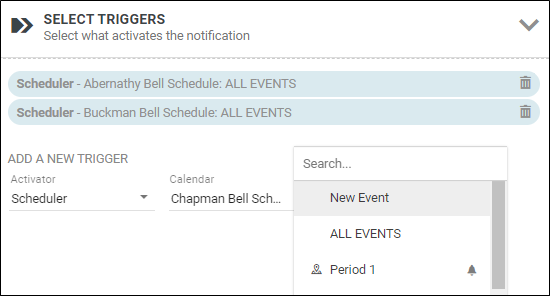
- For Activator select Scheduler.
- Select a Calendar (Abernathy Elementary).
- For Trigger, select an event (ALL EVENTS).
- For Trigger Behavior, select Activate.
- Repeat this process for the Buckman and Chapman calenders.

-
For Caller ID select Hide.
For this example, I'm just sending audio to speakers and don't need a caller ID.
- For Select Audio select an audio file (SchoolBell).
- For Volume, select a value for the notification. This volume overrides the volume set on the endpoint receiving the notification, such as a phone or speaker. Alternately, you can select Use device default instead of setting the volume in the notification, which means that the audio plays at 80% of the volume set for the speaker. See Endpoints > Volume for more information on where you can set the default volume for speakers.
- For this example, leave all other elements as their default.
You can use this section to create notification actions as part of the notification. See Add Endpoint Responses and Notification Action Types.
This example does not use any notification actions.
-
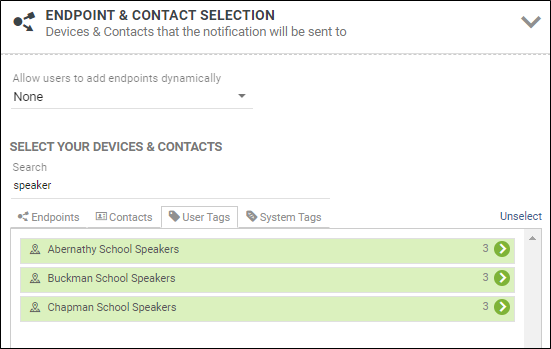
Select each endpoint, contact, or tag you want to receive the notification. Tags are groups of endpoints and/or contacts, where User Tags were created by your system administrator and System Tags were automatically created by the application.
For this example, I'm assigning all three school speakers, which I've already created User Tags for.

If you added a tag or endpoint by mistake, click the trashcan next to it to remove it from the selected list.
- Do not select or set any other fields in this pane for this example.
- Select Save from Notification Details.
This notification is triggered to play the school bell audio at the date and time specified in each calendar event. This notification can also be sent manually through the Revolution interface.
When you create your own notifications for scheduled events, you may decide to include an image. You can repeat this step to select an additional image. Best practice is to select no more than two images in order to support different endpoint screen sizes. If you do want to use more than two images, make sure the assigned endpoints are capable of displaying them.
If I want each school to have a different bell audio file, then I would need to create three notifications, one for each school with its school bell audio, assign the specific site, and assign the appropriate calendar as the trigger. However, for this example, all schools use the same bell audio file, so we only need one notification.
What if I just wanted my Tardy sound to be different from my bell sounds? To do that, I would create two bell notifications.
Setup would look like this:
- For the Bell Schedule notification, instead of selecting Abernathy Elementary: ALL Events as the trigger, select First Bell - Abernathy. Then add another trigger for Lunch - Abernathy and a third trigger for Dismissal - Abernathy.
- Repeat these steps to add the Buckman and Chapman First Bell, Lunch, and Dismissal events.
Now, to create the Tardy Bell notification:
- Create a new notification and name it Tardy Bell.
- Select Scheduler as the Activator, Abernathy calendar, and Tardy Bell - Abernathy as the trigger. Repeat to Add Tardy Bell - Buckman and Tardy Bell - Chapman.
- Select Sports_Whistle.mp3 as the Stored Audio.
- Select the Abernathy School Speakers, Buckman School Speakers, and Chapman School Speakers user tags as endpoints.
- Save.
With this setup, SchoolBell_Long.wav plays for the First Bell, Lunch, and Dismissal scheduled events and Sports_Whistle.mp3 plays for the Tardy Bell scheduled events.
Review the Notification Basics topic for information on the other notification types, and to learn more about using variables in the Message Details section.
