Recorded Notification
This type of notification is used when you want to record an announcement on the fly from a phone, instead of using prerecorded audio, to send to other phones and speakers. Recorded notifications are initiated by dialing a line number. You can preview and re-record your announcement before sending it. You can have the recorded announcement play multiple times, or continuously until you stop it. Multiple endpoints can receive your announcement.
Note: If your application is not configured to use line numbers to trigger notifications, you cannot use this notification type.
Go to Notifications > Manage and select New Notification.
- For Name, enter a descriptive name that is meaningful to your users.
- For Notification Type, select Recorded.
-
Leave Activation Type set to Iteration, and Iterations set to 1.
Regardless of your Activation Type, if you choose contact methods of any form (SMS, Email, or Mobile), Revolution will send only a single notification to the contacts you select.
Tip: If you select Continuous from this drop-down list, once you dial the assigned line number to trigger the notification, it continues to play until you dial the line number again and press asterisks (*) on your phone.
- For Priority, select a priority level for the notification. Not all endpoints support priority levels. Check the endpoint vendor documentation.
- Do not select a Dashboard Icon, because you cannot assign Recorded notifications to the Dashboard.
-
For Available in All Sites:
- Enable to ensure all your site locations have access.
- Disable and select a Site to limit which site has access.
- For Activator, select SIP.
- For Trigger, select a line number.
-
Select the Trigger Behavior. In most cases it should be Activate.
Note: Recorded notifications can only be triggered by dialing a line number, therefore SIP is the only option available.
Note: You cannot select the same line number for multiple recorded and live broadcasts notifications. The bell icons next to line numbers indicate those already assigned to a notification.
-
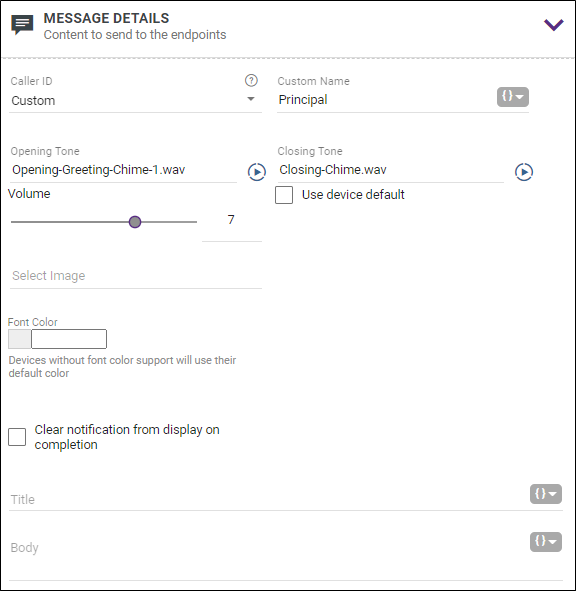
For Caller ID, select Custom and for Custom Name enter a descriptive name.
For this example, morning announcements always come from the Principal.
- (Optional) For Opening Tone and Closing Tone, select audio files. This gets people's attention before your recording plays and lets people know when the recording is complete.
- For Volume, select a value for the notification. This volume overrides the volume set on the endpoint receiving the notification, such as a phone or speaker. Alternately, you can select Use device default instead of setting the volume in the notification, which means that the audio plays at 80% of the volume set for the speaker. See Endpoints > Volume for more information on where you can set the default volume for speakers.
- Leave Select Image blank. For this example, my announcement goes to speakers, so I don't need an image.
- Leave Title and Body blank. For this example, since this is a recorded announcement to speakers, I'm not including text.
- Do not enable Clear notification from display on completion. For this example, there is no text included, and thus nothing to clear.

You can use this section to create notification actions as part of the notification. See Add Endpoint Responses and Notification Action Types.
This example does not use any notification actions.
-
Leave Allow users to add endpoints dynamically set to None.
For this example, morning announcements always go to all the speakers so there is no need to enter them on the fly.
See Understanding Triggers for more information on dynamic endpoints.
-
Select each endpoint, contact, or tag you want to receive the notification. Tags are groups of endpoints and/or contacts, where User Tags were created by your system administrator and System Tags were automatically created by the application.
If you added a tag or endpoint by mistake, click the trashcan next to it to remove it from the selected list.
- Leave Contact Methods unchecked unless you're assigning contacts as recipients. See Adding Contacts as Recipients.
- Select Save.
-
Someone dials the assigned line number from any phone in the network
-
They listen to the Recorded notification introduction.
They can hit the pound key (#) to skip the introduction.
Note: An admin can disable the introduction for all Recorded notifications in the SIP settings. Go to Configuration > Phone Systems > SIP > Settings and enable Quick Record. When enabled, after dialing the number, you will hear a single beep and can begin recording; upon hanging up, the notification will activate.
- They then record their message.
Revolution records this notification and saves it for a designated length of time defined by your system administrator in Global Settings > Notification Status > Notification Status Media Expiration.
The purpose of this recording is for you to know what was sent. The recording is not saved where you can then assign it to other notifications.
To listen to the recording:
- Go to Notifications > Sent.
- Select the notification to open it.
- Select View Notification to play the recordings. See Sent Notifications.
Review the Notification Basics topic for information on the other notification types, and to learn more about using variables in the Message Details section.
