Mobile Client Notification
Sending notifications to the Mitel Revolution Mobile Application app is simple – assign contacts to the notification in the Select Endpoints and Contacts section and then check Mobile as the Contact Method. Triggering notifications from the Mobile app is also easy, however it requires you to put a bit more thought into deciding whether you want to allow Revolution users and contacts to trigger preconfigured notifications or add content on the fly.
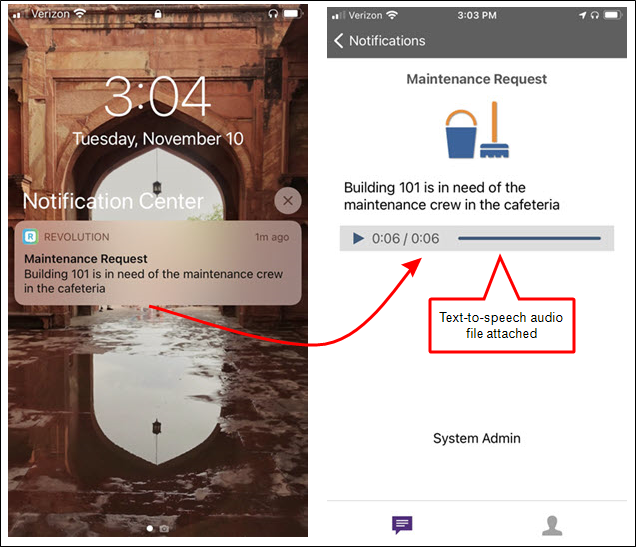
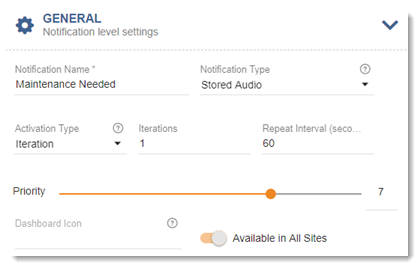
We'll create a simple notification to request maintenance. When triggered, the notification is received in the Mitel Revolution Mobile Application app on mobile devices.
Go to Notifications > Manage and select New Notification.
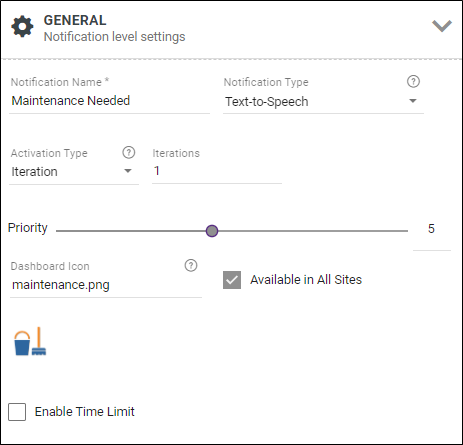
- For Notification Name, enter a descriptive name that's meaningful to your users.
-
For Notification Type, select Text-to-Speech.
This allows an audible version of the notification to play on the speakers we'll assign. (You can select a different notification type; we're just using this one for this particular example.)
-
For Activation Type, retain the default value of Iteration and the Iterations value of 1. The system ignores the repeat interval since there's only one iteration.
Regardless of your Activation Type, if you choose contact methods of any form (SMS, Email, or Mobile), Revolution will send only a single notification to the contacts you select.
Note: You can set the notification to play once, multiple times, or continuously until it is stopped. Whereas Continuous notifications are stopped by sending the notification again. Please review the topic Notification Basics > General Settings - Understanding Activation Types for important information about iterative and continuous mode.
-
Select a Priority level for the notification.
Note: Not all endpoints support priority levels. Check the endpoint vendor documentation.
-
For Dashboard icon, select an image to represent this notification as a Quick Notification on the Dashboard. Users can then quickly modify the notification content from their Dashboard before sending it.
Note: This image is not sent with the notification. To send an image with the notification, select it in the Message Details section.
- Select or clear Available in All Sites to define site access for this notification
Note: The triggers available are determined by how your system administrator configured the application. You may or may not see all of these triggers listed.
Since the content for this notification changes each time it is sent, I'm not assigning any triggers. This notification will be sent just from the Revolution user interface.
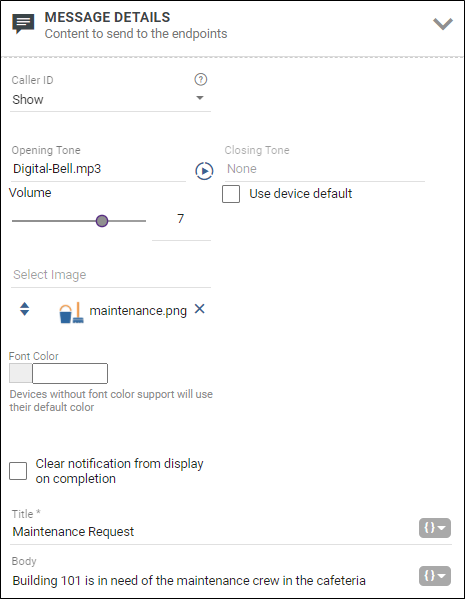
- For Caller ID leave the default value Show.
-
For Opening Tone, select a sound file.
Since this notification will play on speakers, I want to alert people that a message is about to be announced.
- For Closing Tone, do not select a file.
- For Volume, select a value for the notification. This volume overrides the volume set on the endpoint receiving the notification, such as a phone or speaker. Alternately, you can select Use device default instead of setting the volume in the notification, which means that the audio plays at 80% of the volume set for the speaker. See Endpoints > Volume for more information on where you can set the default volume for speakers.
- (Optional) For Select image, select a graphic to send with the notification.
- (Optional) For Font Color, select color to be used for the text message. This is dependent on whether the endpoint receiving the notification accepts the font color command.
- For Title, enter a title value for the notification.
- For Body, enter the content of your notification.
Tip: You can repeat this step to select an additional image. Best practice is to select no more than two images in order to support different endpoint screen sizes. If you do want to use more than two images, make sure the assigned endpoints are capable of displaying them.
You can use this section to create notification actions as part of the notification. See Add Endpoint Responses and Notification Action Types.
This example does not use any notification actions.
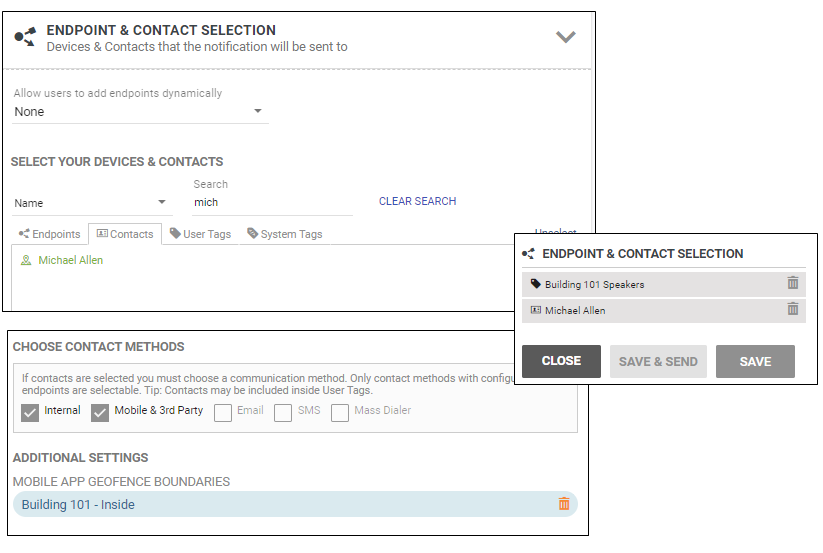
Note: Select each endpoint, contact, or tag you want to receive the notification. Tags are groups of endpoints and/or contacts, where User Tags were created by your system administrator and System Tags were automatically created by the application.
For this notification, I want the content played on my speakers and sent to the mobile phones of my two maintenance crew members.
- For Endpoints, search for and select your speaker endpoints. Alternatively, you can select your speakers using any User Tags, if you have one defined. I have a user tag called Building 1 Speakers that has all the speakers in that building assigned.
- For Contacts. select each contact as recipients of this notification.
- For Choose Contact Methods, select Mobile & 3rd Party. This notification will be sent to the Mitel Revolution Mobile Application app.
-
For Mobile App Geofence Boundaries, select a predefined Area, and then for Boundary, select Inside.
Using a geofence area means that my maintenance crew only receives the notification if they're within the geographic area defined. When they're off site, they won't receive the notification.
- Click Save.
(For more information about assigning contacts, see the Text and Images Notification example.)
This notification is ready to send to Building 1 speakers and to the Mitel Revolution Mobile Application app installed on the mobile devices for the assigned contacts.
See the Text and Images Notification example for an example of including contacts in a user tag to send the notification to the Mobile app. The Stored Audio Notification > Multiple Triggers example also includes sending to the Mobile app.
See the Response Options Notification example for an example of receiving a notification to the Mobile app that requests a response from contacts.
Notifications can be triggered from the Mitel Revolution Mobile Application app on mobile devices such as smart phones and tablets.
-
There are two types of Mobile Activator triggers – trigger and assistance. The Revolution admin creates them from Configuration > Mobile.
- Mobile Triggers – Notifications assigned a Mobile trigger are only available to Revolution users logged into the Mobile app Sending Account.
- Mobile Assistance triggers – Notifications assigned a Mobile assistance trigger are available to all contacts logged into the Mobile app Receiving Account.
Your Revolution admin can create Mobile Triggers and Mobile Assistance triggers that
- only send the message content in the notification. In this case, the content is predefined in the notification and can't be changed.
- allows Revolution users and contacts to create the message content on the fly from the Mobile app.
- allows Revolution users and contacts to record audio on their mobile device and send that to Revolution with the notification.
- allows Revolution users and contacts to include images from their mobile device and send that to Revolution with the notification.
- The admin can choose any combination of text, image, and audio for a trigger.
Here's what your admin needs to let you know:
-
How triggers were setup so you can set the notification up correctly.
- If the Mobile Activator trigger allows audio to be recorded on the mobile device, then the trigger must be assigned to either a Stored Audio or Recorded notification type. Otherwise, you can assign the trigger to any notification type except two-way.
- Everyone using the Mobile app must be entered as Revolution contacts and sent a mobile invite so they can register their mobile device with Revolution in order to receive notifications. See the Mobile Client App topic for details.
We'll go over four scenarios for creating notifications that use Mobile Activator triggers:
As the Revolution admin, I've created a Mobile Trigger called Fire. This trigger does not allow content to be created on-the-fly from the Mobile app, so the content must come from the notification.
Go to Notifications > Manage and select New Notification.
- Provide a descriptive name that's meaningful to your users. Our example uses Fire.
- Select Stored Audio from the Notification Types drop-down list. I'm choosing Stored Audio so I can select an opening tone to get people's attention for this emergency alert.
-
Change Iterations to 5. Leave the Repeat Interval at 60 seconds. This notification will repeat three times with a 60-seconds pause in between. You can set the notification to play once, multiple times, or continuously until it is stopped. Whereas Continuous notifications are stopped by sending the notification again. Please review the topic Notification Basics > General Settings - Understanding Activation Types for important information about iterative and continuous mode.
Regardless of your Activation Type, if you choose contact methods of any form (SMS, Email, or Mobile), Revolution will send only a single notification to the contacts you select.
- Select a Priority level for the notification. Our example sets this to 10 because it's an emergency alert. Not all endpoints support priority levels. Check the endpoint vendor documentation.
- Select an image to display on end-user's dashboard. Your Revolution users can choose to add this notification to their dashboard so it can be quickly sent from the Revolution website as well as being able to send it from their device using the Mobile app.
-
For multi-site organizations, do one of the following:
- If you're an All Sites Admin or All Sites Editor – To assign this notification to a specific site, disable Available in All Sites and select a Site from the drop-down list. Alternatively, you can leave it Available to All Sites.
- If you're a Site Admin or Site Editor – This notification is automatically assigned to your default site. Each Site Admin will need to create their own triggers.
Tip: An admin can add a new trigger on-the-fly. New Trigger isn't visible when logged in as an Editor.
-
Select Mobile & 3rd Party from the Activator drop-down list.
-
Select the Fire trigger from the Trigger drop-down list.
-
Select the Trigger Behavior. In most cases it should be Activate.
This allows this notification to be sent from the Mitel Revolution Mobile Application app by Revolution users only.
- Set Caller ID to Show.
- Select an audio tone or prerecorded message from the drop-down list.
Repeat the process to select additional audio files, if necessary. For this example, I have an opening tone to get people's attention, followed by a prerecorded fire evacuation audio. I've also included the audio message in text. - For Volume, select a value for the notification. This volume overrides the volume set on the endpoint receiving the notification, such as a phone or speaker. Alternately, you can select Use device default instead of setting the volume in the notification, which means that the audio plays at 80% of the volume set for the speaker. See Endpoints > Volume for more information on where you can set the default volume for speakers. For this example, I'm using a higher volume to ensure everyone hears the audio no matter where they are in the building.
- (Optional) Select an image from the drop-down list to send with the notification. For this example, I decided not to use one.
- Enter a Title for the notification.
- Enter the content of your notification in the Body.
- Leave 'Clear notification...' unchecked. Enabling 'Clear notification...' removes the message content from a phone endpoint display once the selected audio files finish playing. For this example, I want the message to remain on display until the fire drill is over, which will be after the audio files finish playing.
Tip: Audios play in the order listed. Drag and drop files to rearrange the order.
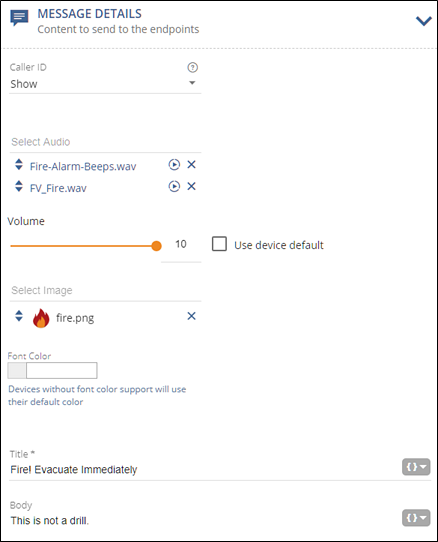
You can use this section to create notification actions as part of the notification. See Add Endpoint Responses and Notification Action Types.This example does not use any notification actions.
- Select each endpoint, contact, or tag you want to receive the notification. Tags are groups of endpoints and/or contacts, where User Tags were created by your system administrator and System Tags were automatically created by the application.
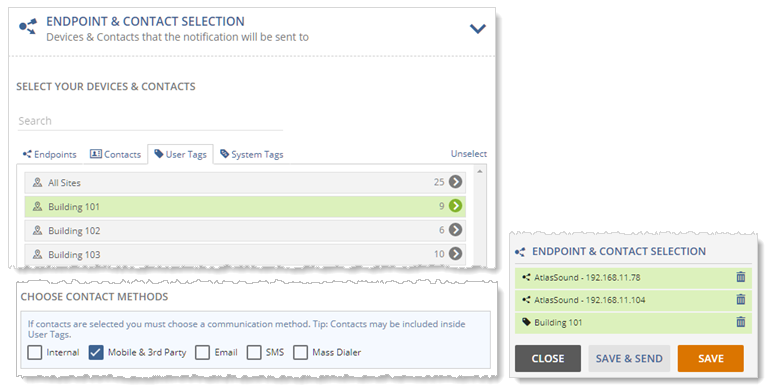
For this example, the fire emergency alert is going to everyone in Building 101 plus two additional speakers. You could click Contacts and select individuals to receive this notification. I have my contacts for Building 101 included in my user tag.
If you added a tag or endpoint by mistake, click the trashcan next to it to remove it from the selected list. - Check Mobile & 3rd Party.
- Do not select Mobile App Geofence Boundaries or a General Purpose Output Relay Mode.
- Select Save.
Note: We do not send notifications to 3rd parties at this time.
Revolution users logged into the Mitel Revolution Mobile Application app Sending Account can now send this notification by tapping the Fire trigger button in the Mobile app on their device or by sending it from the Revolution UI.
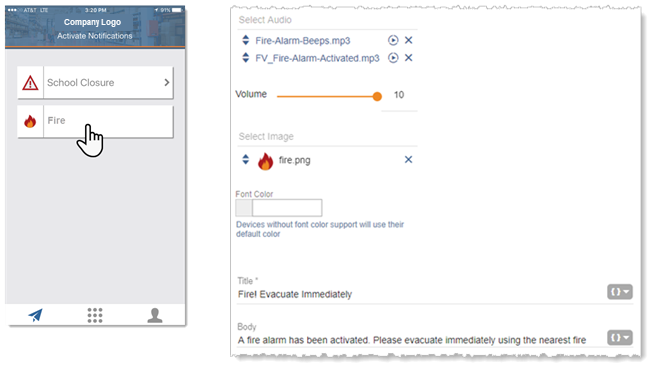
As the Revolution admin, I've created a Mobile trigger called School Closure. This trigger allows content to be created on-the-fly from the Mitel Revolution Mobile Application app, so we want to make sure that content is pulled in from the Mobile app.
Go to Notifications > Manage and select New Notification.
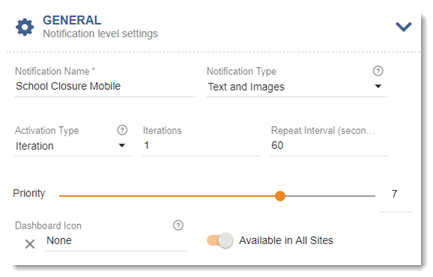
- Provide a descriptive name that's meaningful to your users. Our example uses School Closure Mobile. I'm calling this one mobile because I have another notification called School Closure that my users can add to their Dashboard as a Quick Notification and add content on-the-fly from the Revolution interface.
- Select Text and Images from the Notification Types drop-down list.
-
Leave Activation Type at 1 iteration. You can set the notification to play once, multiple times, or continuously until it is stopped. Whereas Continuous notifications are stopped by sending the notification again. Please review the topic Notification Basics > General Settings - Understanding Activation Types for important information about iterative and continuous mode.
Regardless of your Activation Type, if you choose contact methods of any form (SMS, Email, or Mobile), Revolution will send only a single notification to the contacts you select.
- Select a Priority level for the notification. Not all endpoints support priority levels. Check the endpoint vendor documentation.
- Leave the Dashboard Icon blank. I'm instructing my users to use the School Closure notification on the Dashboard not the School Closure Mobile notification.
-
For multi-site organizations, do one of the following:
- If you're an All Sites Admin or All Sites Editor – To assign this notification to a specific site, disable Available in All Sites and select a Site from the drop-down list. Alternatively, you can leave it Available to All Sites.
- If you're a Site Admin or Site Editor – This notification is automatically assigned to your default site. Each Site Admin will need to create their own triggers.
Tip: An admin can add a new trigger on-the-fly. New Trigger isn't visible when logged in as an Editor.
- Select Mobile & 3rd Party from the Activator drop-down list.
- Select the School Closure trigger from the Trigger drop-down list.
-
Select the Trigger Behavior. In most cases it should be Activate.

This allows this notification to be sent from the Mitel Revolution Mobile Application app by Revolution users only.
- Set Caller ID to Show.
- (Optional) Select an image from the drop-down list to send with the notification.
- (Optional) For Font Color, select color to be used for the text message. This is dependent on whether the endpoint receiving the notification accepts the font color command.
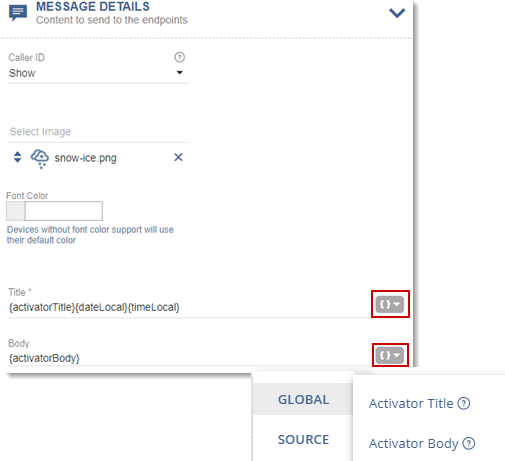
- Click the brackets { } to the right of the Title field and select Global > Activator Title. This pulls in the Title entered when the user creates the notification on-the-fly in their Mobile app.
(Optional) Click the brackets again and select {dateLocal}. Repeat to select {timeLocal}. These variables automatically include the date and time the notification is sent from the Mobile app. - Click the brackets { } to the right of the Body field and select Global > Activator Body.
You can use this section to create notification actions as part of the notification. See Add Endpoint Responses and Notification Action Types.This example does not use any notification actions.
- Select each endpoint, contact, or tag you want to receive the notification. Tags are groups of endpoints and/or contacts, where User Tags were created by your system administrator and System Tags were automatically created by the application.

For this example, the School Closure Mobile notification is going to everyone in Building 101 plus two additional speakers. You could click Contacts and select individuals to receive this notification. I have my contacts for Building 101 included in my user tag.
If you added a tag or endpoint by mistake, click the trashcan next to it to remove it from the selected list. - Check Mobile & 3rd Party.
- Do not select Mobile App Geofence Boundaries or a General Purpose Output Relay Mode.
- Select Save.
Note: We do not send notifications to 3rd parties at this time.
Revolution users logged into the Mitel Revolution Mobile Application app Sending Account can now send this notification by tapping the School Closure trigger in the Mobile app on their device, entering content, and tapping Send.

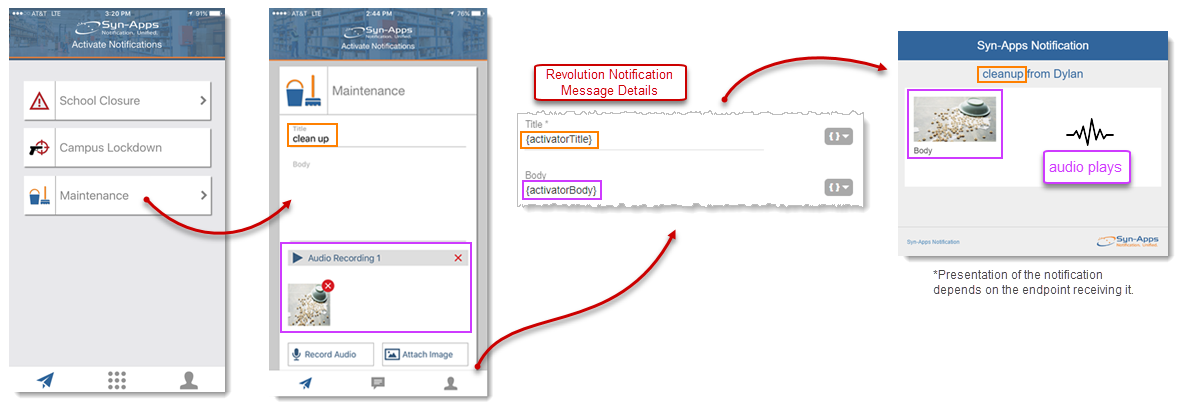
As the Revolution admin, I've created a Mobile trigger called Maintenance Needed. This trigger allows content, images, and audio to be created on-the-fly from the Mitel Revolution Mobile Application app, so we want to make sure that content is pulled in from the Mobile app.
Go to Notifications > Manage and select New Notification.
- Provide a descriptive name that's meaningful to your users. Our example uses Maintenance Needed Mobile. This helps me distinguish that this notification will pull in content from the Mobile app.
- Select Stored Audio or Recorded from the Notification Types drop-down list. One of these notification types must be selected when audio is allowed from the Mobile app.
-
Leave Activation Type at 1 iteration. You can set the notification to play once, multiple times, or continuously until it is stopped. Whereas Continuous notifications are stopped by sending the notification again. Please review the topic Notification Basics > General Settings - Understanding Activation Types for important information about iterative and continuous mode.
Regardless of your Activation Type, if you choose contact methods of any form (SMS, Email, or Mobile), Revolution will send only a single notification to the contacts you select.
- Select a Priority level for the notification. Not all endpoints support priority levels. Check the endpoint vendor documentation.
- Leave the Dashboard Icon blank. I'm instructing my users not to use the Maintenance Needed Mobile notification on the Dashboard.
-
For multi-site organizations, do one of the following:
- If you're an All Sites Admin or All Sites Editor – To assign this notification to a specific site, disable Available in All Sites and select a Site from the drop-down list. Alternatively, you can leave it Available to All Sites.
- If you're a Site Admin or Site Editor – This notification is automatically assigned to your default site. Each Site Admin will need to create their own triggers.
Tip: An admin can add a new trigger on-the-fly. New Trigger isn't visible when logged in as an Editor.
- Select Mobile Activator trigger from the Activator drop-down list.
- Select the Maintenance trigger from the Trigger drop-down list.
-
Select the Trigger Behavior. In most cases it should be Activate.

This allows this notification to be sent from the Mitel Revolution Mobile Application app by Revolution users only.
- Set Caller ID to Show.
- Leave Select Audio blank. The audio recorded in the Mobile app will be used.
- For Volume, select a value for the notification. This volume overrides the volume set on the endpoint receiving the notification, such as a phone or speaker. Alternately, you can select Use device default instead of setting the volume in the notification, which means that the audio plays at 80% of the volume set for the speaker. See Endpoints > Volume for more information on where you can set the default volume for speakers. For this example, I'm using a higher volume to ensure everyone hears the audio no matter where they are in the building.
- (Optional) Select an image drop-down list to send with the notification.
- (Optional) For Font Color, select color to be used for the text message. This is dependent on whether the endpoint receiving the notification accepts the font color command.
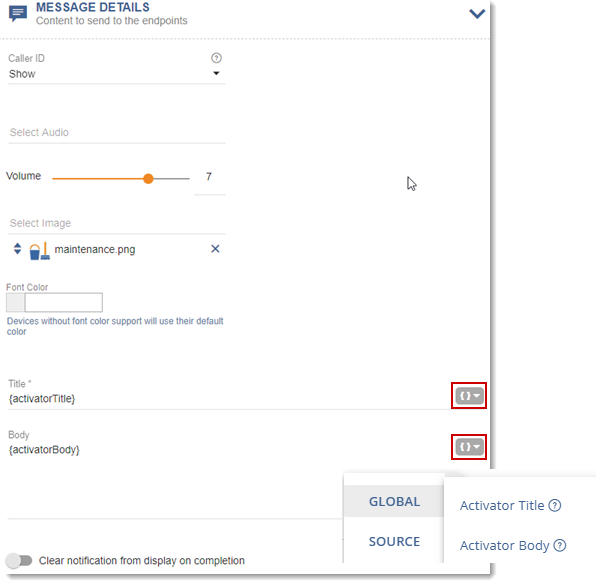
- Click the brackets { } to the right of the Title field and select Global > Activator Title. This pulls in the Title entered when the user creates the notification on-the-fly in their Mobile app.
- Click the brackets { } to the right of the Body field and select Global > Activator Body.
- Leave 'Clear notification...' unchecked. Enabling 'Clear notification...' removes the message content from a phone endpoint display once the selected audio files finish playing.
You can use this section to create notification actions as part of the notification. See Add Endpoint Responses and Notification Action Types.This example does not use any notification actions.
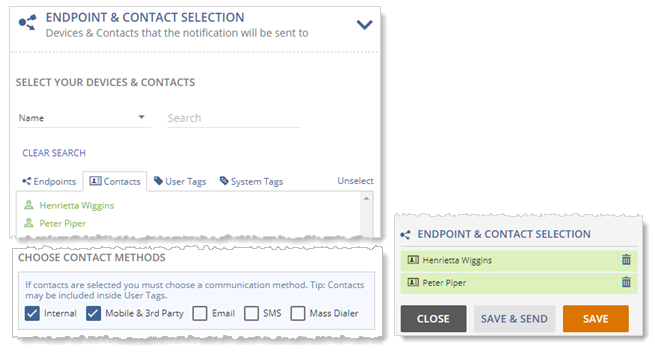
- Click Contacts and select your recipients.
- Check Internal and Mobile & 3rd Party. I only want these notifications going to my two maintenance folks. I have these two people entered as contacts. I'm sending the notifications to their mobile phones and desk phones (Internal).
- Do not select Mobile App Geofence Boundaries or a General Purpose Output Relay Mode.
- Click Save.
Note: We do not send notifications to 3rd parties at this time.
Revolution users logged into the Mobile app Sending Account can now send this notification by tapping the Maintenance trigger in the Mobile app on their device. They can type in text to send, record a message to send, and take a picture to include.
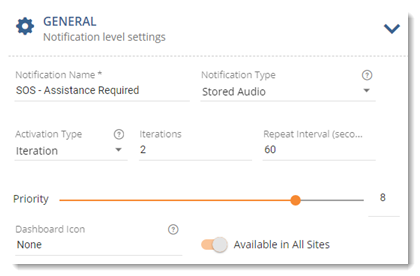
As the Revolution admin, I've created a Mobile Activator Assistance Button called SOS - Assistance Required. I'm setting this one up to allow contacts to add content on the fly from the Mitel Revolution Mobile Application app. (The same setup options are available for the Trigger buttons – no content-on-the-fly, content on-the-fly, content on-the-fly with audio. See Trigger Buttons above.)
Go to Notifications > Manage and select New Notification.
For multi-site organizations: You can assign assistance buttons to individual sites or leave them available to All Sites. When assigned to an individual site, only app users assigned to the same site or All Sites will have these buttons available in their Mobile app.
- Provide a descriptive name that's meaningful to your contacts. Our example uses SOS - Assistance Required.
- Select Stored Audio from the Notification Types drop-down list. I'm choosing Stored Audio so app contacts can add audio if they choose.
-
Set Iterations to 2 and leave the Repeat Interval at 60. Since this is a distress notification, I want it to play twice.
Regardless of your Activation Type, if you choose contact methods of any form (SMS, Email, or Mobile), Revolution will send only a single notification to the contacts you select.
- Set the Priority to 8.
- Leave Dashboard Icon at None. I'm instructing my Revolution users not to assign this notification to their dashboard because it's intended for the Mobile app.
- Leave Available in All Sites enabled.
Tip: An Admin can add a new trigger on the fly. New Trigger isn't visible when logged in as an Editor.
- Select Mobile & 3rd Party from the Activator drop-down list.
- Select the SOS - Assistance Required trigger from the Trigger drop-down list.
-
Select the Trigger Behavior. In most cases it should be Activate.

This allows this notification to be sent from the Mobile app.
- Set Caller ID to Show.
- Select an audio tone or prerecorded message from the Select Audio drop-down list.
Repeat the process to select additional audio files, if necessary. For this example, I have an opening tone to get people's attention. This will play before any recorded audio sent with the notification.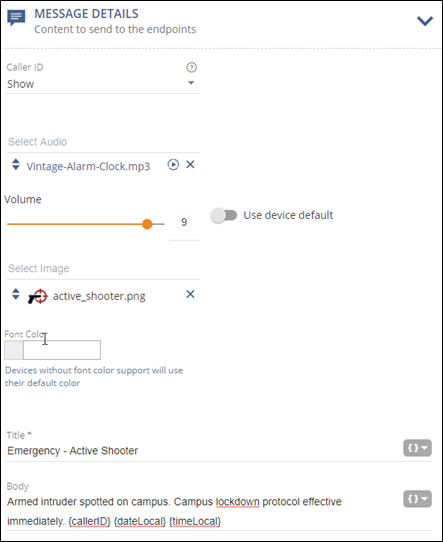
- For Volume, select a value for the notification. This volume overrides the volume set on the endpoint receiving the notification, such as a phone or speaker. Alternately, you can select Use device default instead of setting the volume in the notification, which means that the audio plays at 80% of the volume set for the speaker. See Endpoints > Volume for more information on where you can set the default volume for speakers. For this example, I'm using a higher volume to ensure everyone hears the audio no matter where they are in the building.
- (Optional) Select and image from the drop-down list to send with the notification.
- Enter a Title for the notification.
- Enter the content of your notification in the Body.
Click the Variable drop-down and select the{activatingContact.Coordinates}variable (Mobile Only > Activating Contact Coordinates).
Click the Variable drop-down again and select the{activatingContact.Address}variable (Mobile Only > Address).
Adding these variables provides a location of the person who sent the request. - Leave 'Clear notification...' unchecked. Enabling 'Clear notification...' removes the message content from a phone endpoint display once the selected audio files finish playing. For this example, I want the message to remain on display until the fire drill is over, which will be after the audio files finish playing.
You can use this section to create notification actions as part of the notification. See Add Endpoint Responses and Notification Action Types.This example does not use any notification actions.
- Select each endpoint, contact, or tag you want to receive the notification. Tags are groups of endpoints and/or contacts, where User Tags were created by your system administrator and System Tags were automatically created by the application.

For this example, the SOS - Assistance Requested alert is going to everyone in Building 101 plus two additional speakers. You could click Contacts and select individuals to receive this notification. I have my contacts for Building 101 included in my user tag.
If you added a tag or endpoint by mistake, click the trashcan next to it to remove it from the selected list. - Check Mobile & 3rd Party.
- Do not select Mobile App Geofence Boundaries or a General Purpose Output Relay Mode.
- Select Save.
Note: We do not send notifications to 3rd parties at this time.
Review Notification Basics for details about (and examples for) each of the notification types.
