Dashboard
The Dashboard provides a place to quickly
- send emergency and frequently used notifications
- view scheduled events that trigger notifications
- check the status of notifications that have been sent
- send notifications to endpoints based on location data
The dashboard automatically updates when notifications are activated and completed.
Tip: The time shown in the Revolution user interface is the Revolution server time, not the desktop client time.
Each user account has its own Dashboard. Users can edit their Dashboard to assign notifications to buttons and create their own Quick Notification list, except for user accounts assigned the Viewer user role. Viewers only see the calendar and sent notifications.
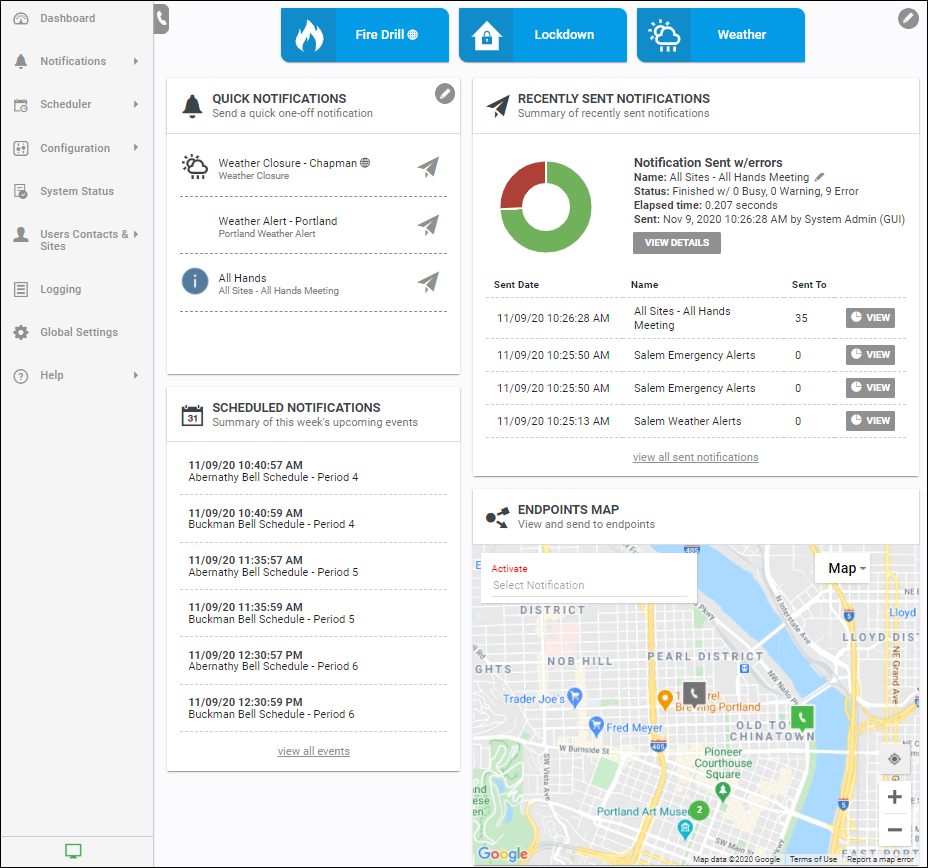
Note: Your system administrator will have already created notifications that you can assign, and may have already assigned notifications to buttons and the quick list. Thus, your Dashboard may already be populated.
Line Numbers
The Dashboard also provides a list of Line Numbers that can be used to trigger notifications. Dial the number listed from a phone to trigger the notification.
Note: Line Numbers doesn't display until the numbers to dial have been configured. Line Numbers is not available to user accounts with the Viewer user role since that role doesn't allow sending notifications.
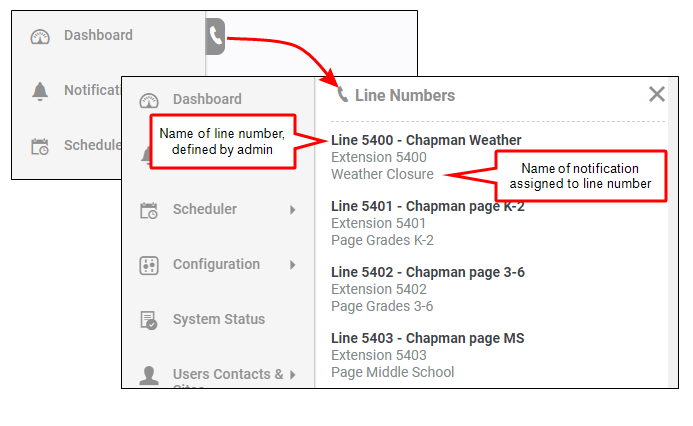
For example, to trigger the Morning Announcements live broadcast notification, dial 12001 on your phone (or any phone) and begin speaking.
System Status
The Dashboard also provides a quick visual of the system status. Clicking the System Status text opens the System Status page.
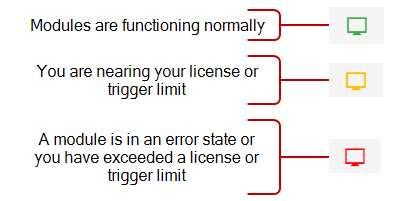
If you see System Status: Error or Warning, contact your system administrator.
You can customize the dashboard to display the following:
-
User-created Buttons at the top of the Dashboard. These are in addition to any global Buttons created by an Admin. See Buttons.
Buttons are used for notifications you want to send quickly without changing the notification information.
-
User-created Quick Notifications. These are in addition to any global Quick Notifications created by an Admin. See Quick notifications.
Quick Notifications are used for when you may want to alter the information before sending.
Important: Each user has his or her own Dashboard. Therefore, the Buttons and Quick Notifications you configure only display for you, no one else. Users with the Viewer User Role cannot send notifications. Therefore, Buttons and Quick Notifications are hidden from view, so there's nothing to customize on their Dashboard. They see the Scheduled Alerts calendar and Recently Sent Notifications.
The top portion of the Dashboard contains any buttons, created by a user or admin, which are for notifications you need to send quickly without any changes.
- User-created buttons – These are visible only to the user who created them. The user can edit, move, and delete these buttons as needed.
- Global buttons
 – These were created by an Admin and appear in the section for all users. Only admins can edit these buttons, but individual users can move them on their dashboard.
Creating buttons
- Select
 Edit.
Edit. - Select Edit User Buttons (or, as an admin, select Edit Global Buttons).
- Select Create New Button.
- For Button Label, enter a descriptive name that is meaningful to you.
- For Notification to Trigger, select the notification to send when the button is clicked.
-
For Available in All Sites:
- Enable to ensure all your site locations have access.
- Disable and select a Site to limit which site has access.
This option is only available for Global buttons.
- Select Save Button.
- (Optional) Repeat the above steps to create additional buttons.
Note: Notifications that require dialing a line number to trigger them are not available for selection here; only notifications that contain stored audio or text are available. (You cannot assign the following notification types to the dashboard: Live broadcast or paging, recorded, two-way, answer, or conference.)
Editing Buttons
You can edit, add, or remove User Buttons any time you want.
- Moving a button – Click and drag the "arrow" portion of the button, left or right, to rearrange them.
- Deleting a button – Click the X portion of the button; there is no confirmation window
- Editing a button – Click the pencil icon to make any changes to a button.
You can create any number of notifications on your Dashboard that you frequently send. With Quick Notifications, you have the opportunity to change the notification title and body text before sending it.
- User-created quick notifications – These are visible only to the user who created them. The user can edit, move, and delete them as needed.
- Global quick notifications
 – These were created by an Admin and appear in the section for all users. Only admins can edit them, but individual users can move them on their dashboard.
Creating Quick Notifications
- Select
 Edit.
Edit. -
Select Edit User Quick Notifications (or, as an admin, select Edit Global Quick Notifications).
- Select Add New Notification.
- For Notification Label, add a descriptive name that's meaningful to you.
- For Notification to Trigger, select your notification.
-
For Available in All Sites:
- Enable to ensure all your site locations have access.
- Disable and select a Site to limit which site has access.
This option is only available for Global quick notifications.
- Select Save Notification
- (Optional) Repeat the above steps to create additional quick notifications.
- Select Save
Note: Live broadcast notifications are not available for selection here, only notifications that contain stored audio and/or text are available. You cannot start a live broadcast/page from the application interface. You would do that by dialing a line number on a phone or using an Intercom notification type.
Editing Quick Notifications
You add or remove quick notifications any time you want.
- Moving notifications– Click and drag the "arrow" portion of the notification, up or down, to rearrange them.
- Deleting notifications– Click the X; there is no confirmation window.
- Changing a notification – Click the pencil icon to make any changes to the quick notification.
Click a Button (click again to confirm sending) and that notification is sent.
Click ![]() for a notification in your Quick Notification list. Then you can change the notification message and send it.
for a notification in your Quick Notification list. Then you can change the notification message and send it.
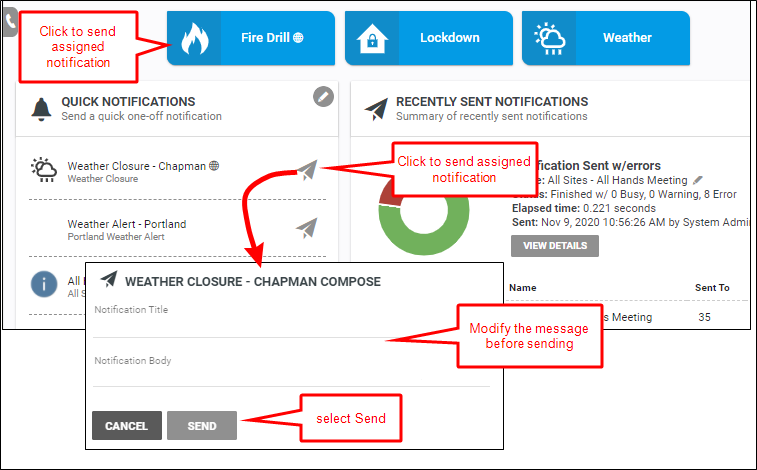
Any changes to the notification message you make here is not saved when you click Send. Changes made on the Dashboard are meant to be temporary. To save a change to the notification message, go to Manage Notifications and click the Edit icon for the notification. Once you're done editing the notification, you can send it from the Manage Notifications page. (See Manage Notifications for details.)
After sending the notification, the Dashboard provides a status report of the sent notification.

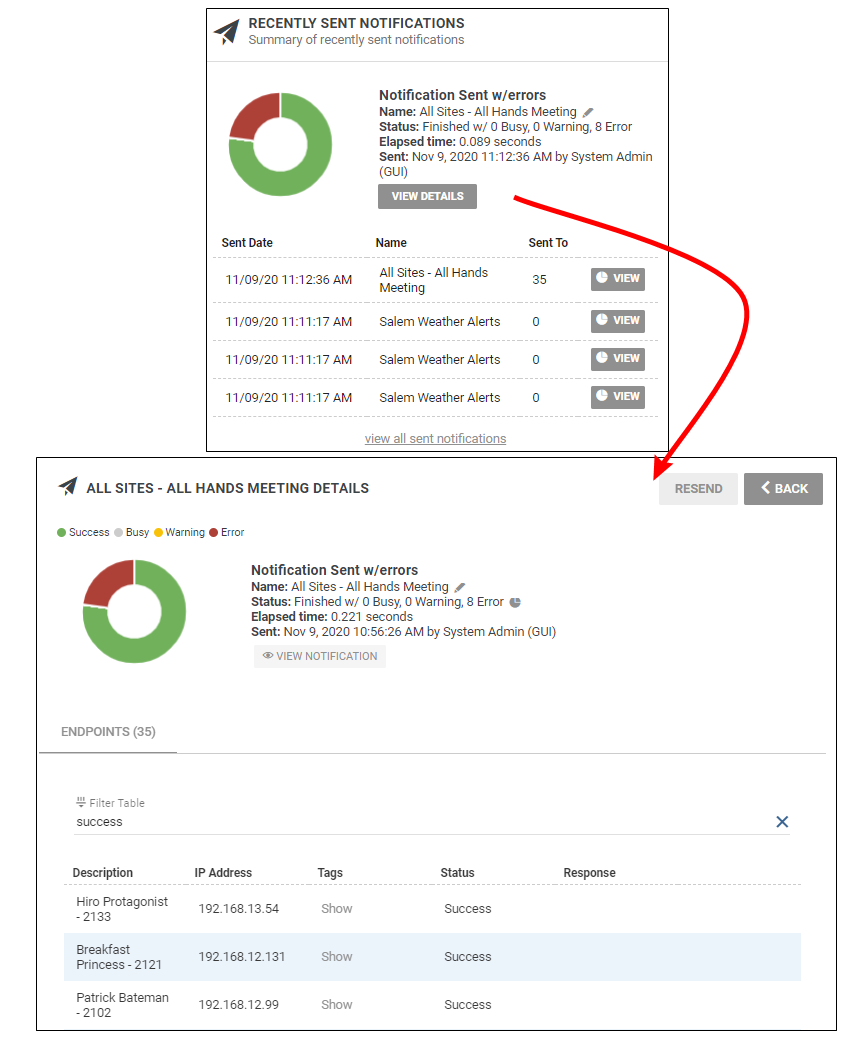
Click View Details to open the Details page and see the error message. (See View Sent Notifications below.) When you click Back to return to the Dashboard, or click Close, the status window is closed and the notification appears in the Recently Sent Notifications section.
Note: If you need to see the endpoints assigned to the notification or make changes to the assigned endpoints, go to Manage Notifications and click the Edit icon for the notification you want to send. Once you're done editing the notification, you can send it from the Manage Notifications page. (See Manage Notifications for details.)
Scheduled events trigger notifications on a particular day at a particular time. Events and calendars are created in the Scheduler. User accounts with the Admin and Editor User Roles have permission to the Scheduler.
Scheduled Notifications shows you upcoming events, scheduled across all your company's calendars, so you have a quick view of what's scheduled. You cannot change scheduled events from this calendar. That's done in the Scheduler.
Click view all events to jump to the Schedule window.
The five most recently sent notifications are displayed, with the last sent notification including a more detailed summary.
Click View for a notification to see a list of the endpoints the notification was sent to, which endpoints received the notification, and which encountered an error. Click view all sent notifications to jump to the Sent Notifications page containing information about all sent notifications stored in the log. You can filter the list by keywords, and you can print out the list of notifications currently displayed on the page.
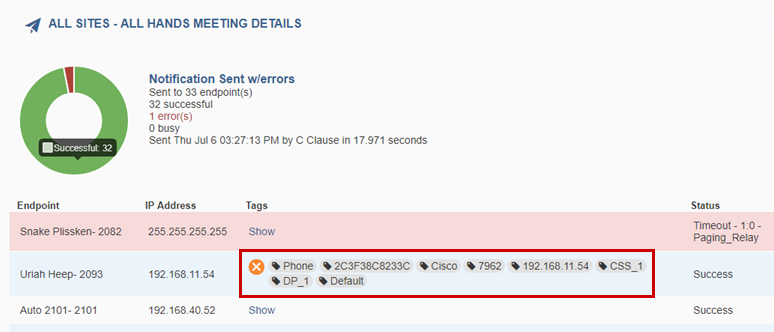
Click Show on a Sent Notification detail page to list all the device tags associated with the endpoint, for information purposes only. These are not necessarily the tags assigned to the notification.
From the Endpoints Map, you can send a notification to a group of selected endpoints.
-
For Activate, select the notification you want to send. Begin typing in the name of the notification and it will filter your options.
This displays the Compose dialog box.
- (Optional) For Notification Title and Notification Body, alter the prepopulated fields as needed.
- Select the Move Map (
 ) icon to refine the map view to narrow down the information to the endpoints you want to receive the notification by performing any of the following
 - Zoom the map to the area – Use the plus (+) or minus (-) icons or ctrl-scroll within the map.
- Show or hide endpoint types – Enable or disable the Phone, Speaker, and Computer icons.
- Change the appearance – Select between Map or Satellite view, and optionally, enable Terrain information or location Labels, respectively.
- Select the endpoints to receive the notification
Select the Drawing Tools icon (
 ) and then a shape type icon (circle, polygon, or polygon).
- Circle – Click in the center of the area you want to select and drag outwards to define your area. Upon releasing the mouse button, any endpoints in the area will be added to the Selected Endpoints box.
- Polygon – Click once to begin the polygon shape, continue selecting locations to outline the area, then click a final time at the original point (the cursor will change to a hand icon) to complete the shape. Upon completing the polygon, any endpoints in the area will be added to the Selected Endpoints box.
- Rectangle – Click in a corner around the endpoints you want to select and drag the rectangle to define your area. Upon releasing the mouse button, any endpoints in the area will be added to the Selected Endpoints box.
- (Optional) Individually select endpoints by clicking on their icons in the map.
- Repeat the selection process for any other endpoints.
- (Optional) Select the Deselect All icon to remove endpoints from the Selected Endpoints box.
- (Optional) Individually remove an endpoint from the Selected Endpoints box by selecting the X icon.
- Select Send.
Here's what else you need to know
If you can't remember your login password, contact your Admin to have your password changed.
Click the User Profile icon in the upper right corner of the user interface and select Edit Profile to change your password.
Passwords must:
- be at least 8 characters in length
- contain at least 1 lowercase and 1 uppercase letter
- contain at least 1 number (0-9)
- contains at least 1 special character (! @ # $ % ^ * ~)
Passwords don't expire. However, you should change your password according to your organization's security policy.
