Two-Way Notification
This type of notification is used when you want to create an intercom between two endpoints. There are two notification types you can use to create an intercom – Two-Way and Direct Two-Way. Examples are provided for both.
Two-Way allows you to create an intercom between a phone and another endpoint (such as a talk-back speaker).
Note: If your application is not configured to use line numbers to trigger notifications, you cannot use this notification type.
For this example, all of the classrooms are equipped with a talk-back speaker. I want to trigger an two-way notification from my phone to a classroom speaker of my choosing or to another administrative phone.
Go to Notifications > Manage and select New Notification.
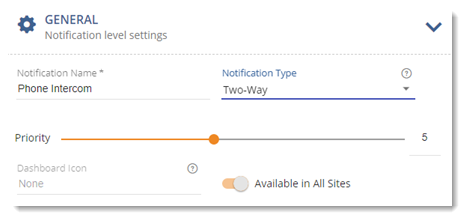
- Provide a descriptive name that's meaningful to your users.
- Select Two-Way from the Notification Types drop-down list.
- Select a Priority level for the notification. Not all endpoints support priority levels. Check the endpoint vendor documentation.
- Leave the Dashboard Icon field blank. Two-Way notifications are a type of live broadcast and are not available for assignment to the Dashboard.
-
For multi-site organizations, do one of the following:
- If you're an All Sites Admin or All Sites Editor – To assign this notification to a specific site, disable Available in All Sites and select a Site from the drop-down list. Alternatively, you can leave it Available to All Sites.
- If you're a Site Admin or Site Editor – This notification is automatically assigned to your default site. Each Site Admin will need to create their own triggers.
Tip: See Notification Overview > Understanding Triggers for details about (and examples for) each of the trigger choices.
-
Select SIP Activator from the Activator drop-down list.
Note: Two-Way notifications can only be triggered by dialing a line number, therefore SIP Activator is the only option available.
-
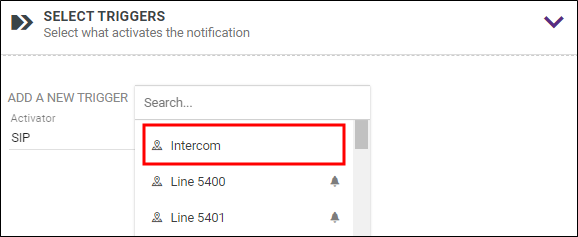
Select a line number from the Trigger drop-down list.
In this example, the line number was named Intercom by the administrator.
-
Select the Trigger Behavior. In most cases it should be Activate.
Live broadcasts are initiated by dialing the assigned line number from any phone in the network.
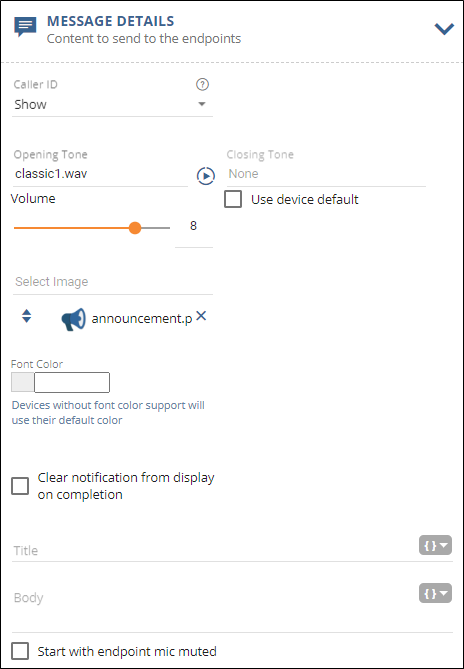
- (Optional) Select Show or Custom Caller ID, alternatively leave it at Hide.
- (Optional) Select an audio tone from the Opening Tone drop-down list. This gets the attention of the person you're trying to reach.
- (Optional) Select an audio tone from the Closing tone drop-down list. This lets the person know the two-way notification is over. For this example, I'm just using an opening tone.
- For Volume, select a value for the notification. This volume overrides the volume set on the endpoint receiving the notification, such as a phone or speaker. Alternately, you can select Use device default instead of setting the volume in the notification, which means that the audio plays at 80% of the volume set for the speaker. See Endpoints > Volume for more information on where you can set the default volume for speakers.
- (Optional) Select an image from the drop-down list. For this example, my talk-back speakers can't display the image, but phones I'll be initiating the notification from can, so I chose to include an image.
- Leave Font Color as is. It's not needed for this example.
- Leave Title blank. For this example, since this is a live conversation between two endpoints, I'm not including text.
- Leave Body blank. For this example, since this is a live conversation between two endpoints, I'm not including text.
- Leave 'Clear notification...' unchecked. Enabling 'Clear notification...' removes the message content from a phone endpoint display once the selected audio files finish playing. For this example, no text is included, thus there's nothing to clear.
-
Leave 'Start with endpoint mic muted' unchecked. This option is used when you're using two phones as your intercom. Intercom opens up the mic on the two phones.
If you enable this, the phone that's being called is muted until the person receiving the call unmutes it. Checking this feature prevents the caller from hearing what's being said in the room of the receiving phone while waiting for the intercom call to be answered. For this example, I'm dialing a talk-back speaker, which doesn't have mute capability.
You can use this section to create notification actions as part of the notification. See Add Endpoint Responses and Notification Action Types.
This example does not use any notification actions.
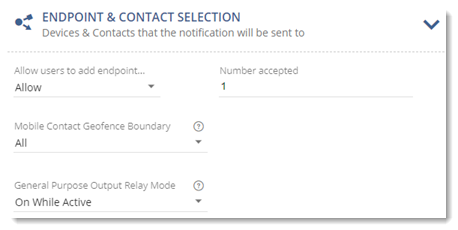
- Leave Contact Methods unchecked. Two-way notifications cannot be forwarded to contacts.
- Select Allow from the Allow users to add endpoints dynamically drop-down list. Two-way notifications only support two endpoints, the one triggering the notification and the one receiving the notification. Therefore, the endpoint selection area is hidden when Allow is selected. See Understanding Triggers for more information on dynamic endpoints.
- Do not select Mobile App Geofence Boundaries or a General Purpose Output Relay Mode. They don't apply to this notification type.
- Click Save.
Dial the assigned line number from any phone on the network.
You are prompted to enter an extension number followed by the # pound sign. You can enter a phone extension number (such as 4321#) or the destination code assigned to a speaker (such as 10#).
The opening tone then plays on the designated endpoint, then you can begin speaking. The opening tone will also play for the caller if you enable the global setting found at Global Settings > Notification > Play opening tone back to the caller.
Here are a few things to know when triggering a Two-Way notification:
- Destination codes are assigned to endpoints by your system administrator. Your admin should provide you with a list of codes to use. You cannot use a speaker as the dynamic endpoint unless it has a destination code assigned to it. (Admins, see Destination Codes for more information.)
- When using a phone as the other end of the intercom, the notification engages the phone's speaker. If the phone is in Do Not Disturb mode, you will not be connected to it, you receive a busy message, and the notification ends.
- If you are using Avaya phones and your intercom endpoint is another phone, that phone must also be an Avaya phone. In other words, you can have an intercom between two Avaya phones. You cannot have an intercom between an Avaya phone and a Cisco phone. You can have an intercom between an Avaya phone and an IP device, such as a talk-back speaker.
Revolution records this notification and saves it for a designated length of time defined by your system administrator in Global Settings > Notification Status > Notification Status Media Expiration.
To listen to the recording:
- Go to Notifications > Sent.
- Select the notification to open it.
- Select View Notification to play the recordings. See Sent Notifications.
Direct Two-Way allows you to create an intercom between two IP devices (such as two talk-back speakers).
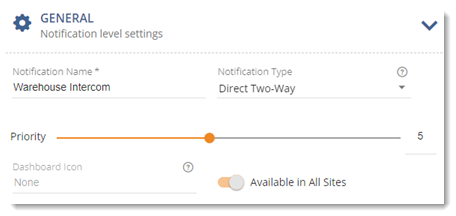
For this example, my manufacturing floor manager has a talk-back speaker in his office and there's a talk-back speaker in the warehouse. My manager wants to be able to call the warehouse and whoever is available can answer.
Go to Notifications > Manage and select New Notification.
- Provide a descriptive name that's meaningful to your users.
- Select Direct Two-Way from the Notification Types drop-down list.
- Select a Priority level for the notification. Not all endpoints support priority levels. Check the endpoint vendor documentation.
- Leave the Dashboard Icon field blank. Two-Way notifications are a type of live broadcast and are not available for assignment to the Dashboard.
-
For multi-site organizations, do one of the following:
- If you're an All Sites Admin or All Sites Editor – To assign this notification to a specific site, disable Available in All Sites and select a Site from the drop-down list. Alternatively, you can leave it Available to All Sites.
- If you're a Site Admin or Site Editor – This notification is automatically assigned to your default site. Each Site Admin will need to create their own triggers.
Note: This type of notification does not support being triggered by dialing a line number.
Tip: See Notification Overview > Understanding Triggers for details about (and examples for) each of the trigger choices.
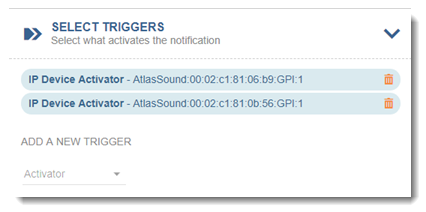
- Select IP Device Activator from the Activator drop-down list.
- Select the GPI input for the speaker in the manager's office from the Trigger drop-down list. This is just the button on the speaker that allows you to begin speaking into it.
- Select the GPI input for the warehouse speaker. This is just the button on the speaker that allows you to begin speaking into it.
- For both triggers, select Activate for the Trigger Behavior.
- Click Next.
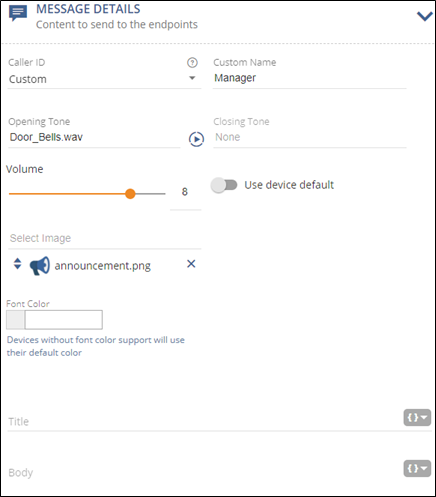
- (Optional) Select Custom from the Caller ID drop-down list and enter a descriptive name. For this example, this identifies on the warehouse speaker who's trying to reach them.
- (Optional) Select an audio tone from the Opening Tone drop-down list. For this example, since the speaker is in a warehouse, I want to play a loud audio tone to get their attention.
- (Optional) Select an audio tone from the Closing tone drop-down list. This lets the person know the intercom notification is over. For this example, I'm just using an opening tone.
- For Volume, select a value for the notification. This volume overrides the volume set on the endpoint receiving the notification, such as a phone or speaker. Alternately, you can select Use device default instead of setting the volume in the notification, which means that the audio plays at 80% of the volume set for the speaker. See Endpoints > Volume for more information on where you can set the default volume for speakers. For this example, I'm setting the volume to 8 because the speaker is in a warehouse where it's noisy.
- (Optional) Select an image from the drop-down list. For this example, my talk-back speakers can display images, so I'm including one to indicate this is an intercom connection. You can repeat this step to select an additional image. Best practice is to select no more than two images in order to support different endpoint screen sizes. If you do want to use more than two images, make sure the assigned endpoints are capable of displaying them.
- Ignore Font Color.
- Leave Title blank. For this example, since this is a live conversation between two talk-back speakers, I'm not including text.
- Leave Body blank. For this example, since this is a live conversation between two talk-back speakers, I'm not including text.
- Leave 'Clear notification...' unchecked. Enabling 'Clear notification...' removes the message content from a phone endpoint display once the selected audio files finish playing. For this example, no text is included, thus there's nothing to clear.
You can use this section to create notification actions as part of the notification. See Add Endpoint Responses and Notification Action Types.
This example does not use any notification actions.
Tip: Poly IP phones and X-618 speakers do not support two-way audio. SIP-compliant IP phones using SIP Notifier do not support direct two-way audio. Do not assign these endpoints to this notification type.
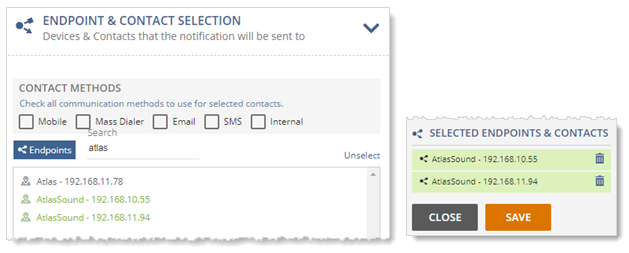
- To narrow your endpoint selection, search for the speaker model you selected as your triggers.
- Click on the speaker in the manager's office that you selected as the trigger. (Under Select Trigger, I selected button1 on the manager's speaker. Here I'm selecting the speaker itself as the endpoint.)
- Click on the speaker in the warehouse that you selected as the trigger. (Under Select Trigger, I selected the button1 on the warehouse speaker. Here I'm selecting the speaker itself as the other endpoint.)
- Do not select Mobile App Geofence Boundaries or a General Purpose Output Relay Mode. These don't apply to this notification type.
- Leave Contact Methods unchecked. Direct two-way notifications cannot be forwarded to contacts.
- Click Save.
Tip: To streamline the endpoint select, Contacts, User Tags, and System Tags don't display for this notification type.
Press button1 on either the manager's speaker or the warehouse speaker. The audio tone plays to get someone's attention. Then you can begin speaking. The opening tone will also play for the caller if you enable the global setting found at Global Settings > Notification > Play opening tone back to the caller.
Revolution records this notification and saves it for a designated length of time defined by your system administrator in Global Settings > Notification Status > Notification Status Media Expiration.
To listen to the recording:
- Go to Notifications > Sent.
- Select the notification to open it.
- Select View Notification to play the recordings. See Sent Notifications.
Review the Notification Basics topic for information on the other notification types, and to learn more about using variables in the Message Details section.
