CAP Alert Notification
This type of notification allows you to forward content you received from a CAP alert, such National Weather Service, on to your endpoints. The CAP alert service must be set up in Revolution before you can assign it to a notification.
Go to Notifications > Manage and select New Notification.
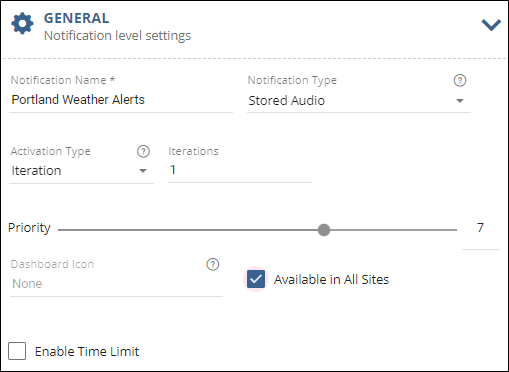
- Provide a descriptive name that's meaningful to your users.
- Select Stored Audio from the Notification Types drop-down list.
- Leave Iteration Activation Type at 1. The system ignores the repeat interval since there's only one iteration.
- Select a Priority level for the notification. I'm using priority 10 because this is for weather emergencies. Not all endpoints support priority levels. Check the endpoint vendor documentation.
- Leave the Dashboard Icon field blank. For this example, I don't want this notification manually triggered so I will let my users know not to assign it to their Dashboard.
-
For multi-site organizations, do one of the following:
- If you're an All Sites Admin or All Sites Editor – To assign this notification to a specific site, disable Available in All Sites and select a Site from the drop-down list. Alternatively, you can leave it Available to All Sites.
- If you're a Site Admin or Site Editor – This notification is automatically assigned to your default site. Each Site Admin will need to create their own triggers.
Note: CAP Activator is not available as a trigger until your system admin has set up a CAP service.
Tip: See Notification Overview > Understanding Triggers for details about (and examples for) each of the trigger choices.
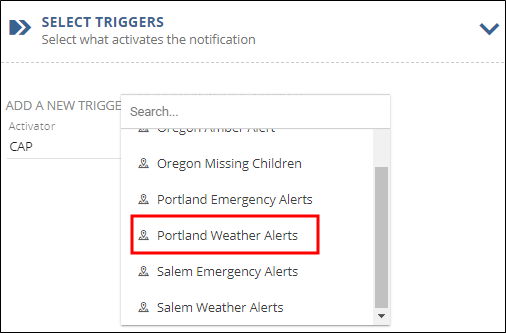
- Select CAP Activator from the Activator drop-down list. For this example, I've configured the National Weather Service CAP service to monitor my area.
-
Select a CAP service from the Trigger drop-down list.
-
Select the Trigger Behavior. In most cases it should be Activate.
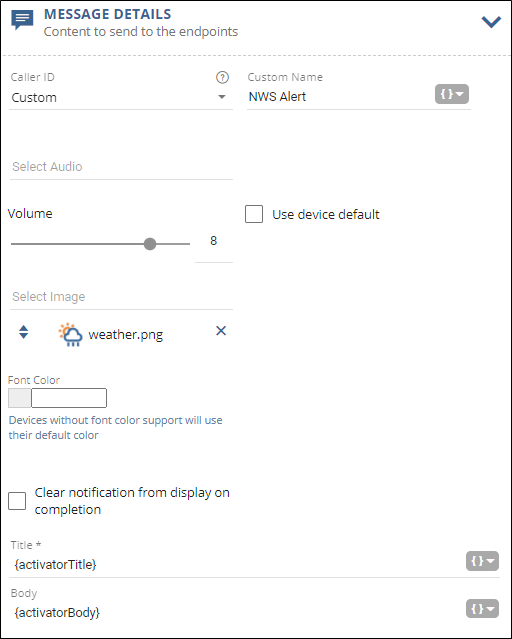
- (Optional) Select Custom from the Caller ID drop-down list and enter a descriptive name. For this example, I want my users to know this message came from the National Weather Service (NWS).
- (Optional) Select an audio tone from the drop-down list. For this example, I want to get my users' attention since this is an emergency notification.
- For Volume, select a value for the notification. This volume overrides the volume set on the endpoint receiving the notification, such as a phone or speaker. Alternately, you can select Use device default instead of setting the volume in the notification, which means that the audio plays at 80% of the volume set for the speaker. See Endpoints > Volume for more information on where you can set the default volume for speakers. For this example, I'm using a higher volume to ensure I get my users' attention.
- (Optional) Select an image from the drop-down list. For this example, I want my users to know this is an important message. You can repeat this step to select an additional image. Best practice is to select no more than two images in order to support different endpoint screen sizes. If you do want to use more than two images, make sure the assigned endpoints are capable of displaying them.
- Click the brackets { } to the right of the Title and Body fields and select the appropriate variables.
- Leave 'Clear notification...' unchecked. Enabling 'Clear notification...' removes the message content from a phone endpoint display once the selected audio files finish playing.
Note: {activatingContact.Coordinates} and {activatingContact.Address} are only used by the Mobile Client to include geofencing location of the end user triggering a notification.
You can use this section to create notification actions as part of the notification. See Add Endpoint Responses and Notification Action Types.
This example does not use any notification actions.
- Select each endpoint, contact, or tag you want to receive the notification. Tags are groups of endpoints and/or contacts, where User Tags were created by your system administrator and System Tags were automatically created by the application.
- Leave Contact Methods unchecked unless you're assigning contacts as recipients. See Adding Contacts as Recipients.
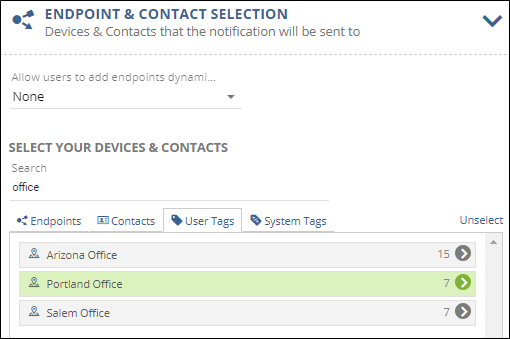
For this example, I want this notification to go to all my Portland office phones and overhead speakers.
If you added a tag or endpoint by mistake, click the trashcan next to it to remove it from the selected list. - Click Contacts.
- Do one or both of the following:
- Select the contacts you want to receive this notification.
- Click User Tags and select the contact user tags you want to receive this notification. Tags are just a way of grouping contacts, so you don't have to select them individually. For example, I've created a dynamic contact tag for my engineering group.
- Check each communication method you want to use for the contacts selected for this notification.
- Select Save.
You can also send the notification to contacts' external communication methods such as email, mobile devices, SMS, etc.:
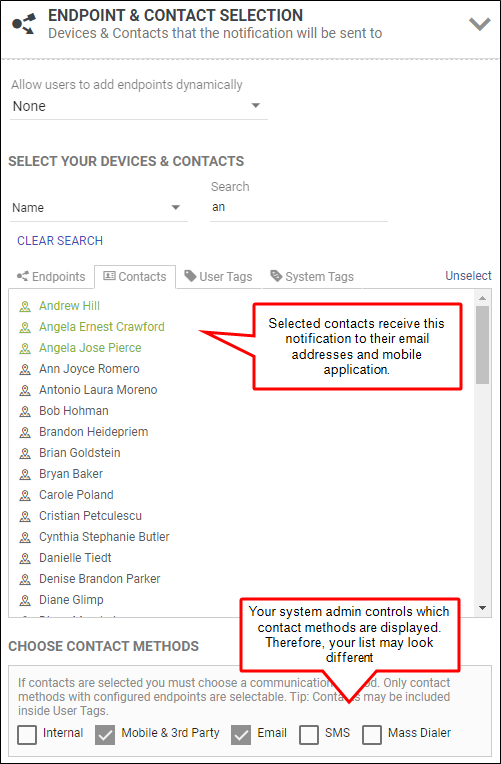
What's an Internal communication method? Contacts can have system endpoints associated with them. For example, employees may be imported into Revolution as contacts and their desk phones associated with their contact information. The desk phone is an internal endpoint. This allows you to send notifications to all available communication methods – work desk phone, cellphone (Mobile app, SMS) – without having to select contacts and IP phone endpoints separately.
This notification is triggered when an emergency weather alert is received from NWS for the Greater Portland area.
Note: Because this notification type is Stored Audio, it is available for assignment to end-users' Dashboards and can be manually triggered.
To view details about the status of this notification, go to Notifications > Sent. Click on the notification to open it. See the Sending Notifications topic for details on navigating this page.
Review the Notification Basics topic for information on the other notification types, and to learn more about using variables in the Message Details section.
