Redundancy
Server redundancy facilitates the following behavior:
-
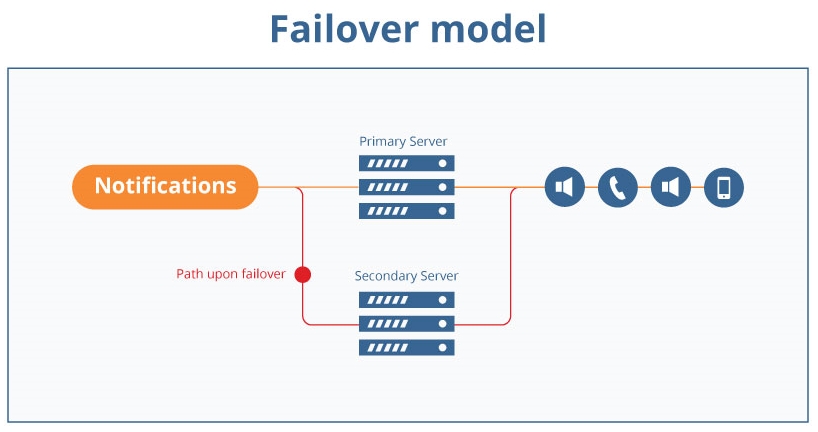
Automatic failover of OneAlert provides high-availability and resiliency for your notification platform. Failover is also referred to as active/passive.
OneAlertkeeps the secondary servers in sync with the primary server. Therefore, In the case of a server failover, Revolution provides continued service from a the secondary server until the primary server is back online.
Traffic intended for a failed server is passed to the next priority server, as defined by your Priority Groups.
-
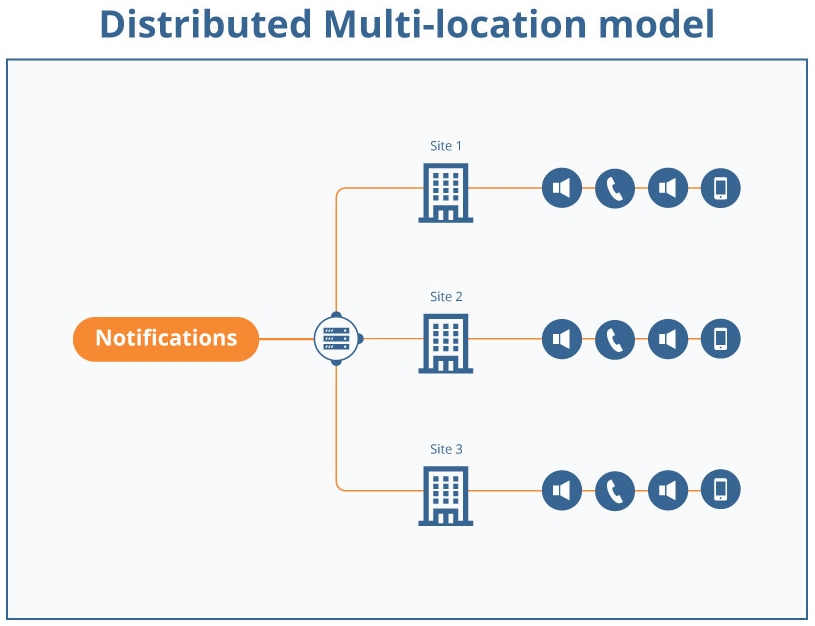
Distributed redundancy provides you with the ability to specify, through the use of priority groups, which notifications are sent through which servers. This is also referred to as active/active.
The priority groups also allow for failover redundancy by defining the order in which servers should migrate when one of the servers is down.
Redundancy is a licensed feature. If your license is not authorized for redundancy, you will not be able to install OneAlert on any secondary servers.
When set up for redundancy, OneAlert maintains a primary and secondary relationship that provides data replication between servers. The primary server maintains the publisher database and the secondary servers maintain subscriber databases.
You enable redundancy during installation of OneAlert on any secondary server.
Use Models
This section describes use models for how you can set up redundancy in your OneAlert environment.
Use this model, also referred to active/passive, to ensure your notifications will continue if your primary server goes down.
How to set this up?
- Redundancy requires a minimum of two servers. See Build your primary server for instructions
- Set your default Priority Groups to define the failover order.
- You do not need to adjust any triggers, as they automatically use the default Priority Group. Therefore, upon failover, your notifications will continue on the next available server.
What happens?
- Your primary OneAlert server creates a publisher database.
- OneAlert regularly synchronizes your publisher database with the subscriber databases on your secondary servers
- A trigger occurs, where the default Priority Group defines which server should send the notifications.
- OneAlert sends the notification to the defined endpoints.
- In a failover situation, OneAlert routes the notification through the next server listed in the Priority Group.
Use this model to distribute notifications such that they are sent through a server local to a location and to ensure your notifications will continue if the a server in your priority group goes down.
For example, you run a school district and you want notifications specific to a school to be sent through a server located at the same location as the endpoints receiving them.
How would you set this up?
-
Redundancy requires a minimum of two servers. See Build your primary server for instructions.
For example: DistrictOffice (Primary), Elementary (Secondary), HighSchool (Secondary)
- For this example, set up three Priority Groups:
- DEFAULT: DistrictOffice, Elementary, HighSchool
- ElementaryGroup: Elementary, DistrictOffice, HighSchool
- HighSchoolGroup: HighSchool, DistrictOffice, Elementary
-
You will want to create triggers that are specific to the various sites (sometimes creating multiple variations of the same trigger) such that the priority groups are defined to have the proper server listed first.
For example, you might set your bell schedules to always use the server located on site. In this case you would set the Priority Groups field for the location-specific calendars to use either the Elementary or High School priority groups.
- You will then create notifications that match the location-specific trigger to the endpoints at the specific location.
What happens?
-
Your Primary OneAlert server creates a Publisher database.
-
OneAlertregularly syncs your Publisher database with the subscriber databases on your secondary servers.
-
A trigger occurs, where the trigger's Priority Group defines which server should carry the notifications
In our example, Elementary school notifications go to the Elementary server. High School notifications go to the HighSchool server, and all other notifications go to DistrictOffice server.
-
OneAlert sends the notification to the defined endpoints.
-
In a failover situation, OneAlert sends the notification through whichever remaining server has the highest priority.
For example, in the above scenario, the Elementary and High School notifications would fail over to the District Office server.
Redundancy Setup
-
All servers must meet the standard OneAlert System Requirements. Paying special attention to the firewall settings to enable communication.
-
Your primary and secondary servers must run the same Windows OS.
-
Primary and secondary servers must run the same version of OneAlert.
-
Time must be synchronized between the primary and secondary servers. This can be achieved by pulling the time from the same source, such as Active Directory or Network Time Protocol (NTP).
-
Your SQL database must be on the same server as your OneAlert primary server. By default, OneAlert installs and configures SQL Express.
Primary and secondary servers must run the same SQL version. Also ensure your SQL server has TCP/IP protocol enabled, which allows remote connections.
Remote database setup is not supported when OneAlert is set up for redundancy.
-
Your IP devices, such as AND, Algo, CyberData, and Valcom, can register with all OneAlert servers via DHCP option 72. The same is true for the OneAlert DNC and Paging Relays.
You set up your primary server just as you would a single server in a non-redundancy environment. You must Perform Installation and configuration on the primary server first. All servers will use the same license and system keys.
-
Install OneAlert on your primary server following the instructions in Installation Steps.
If you already have OneAlert installed on a server, you should upgrade your server. See Product Upgrade and Licensing Updates.
Note: During install, do not enable Is this a Redundant Subscriber Setup. You will enable this on the secondary servers.
-
For new installs, review the Configuration Overview topic for a list of the basic configuration steps, features you can configure, advanced configurations, and links to creating notifications.
Tip: You don't necessarily need to configure everything on the primary server before installing on the secondary server, but the basics should done so that syncing can occur after you install on the secondary server.
- Test your setup and notifications to ensure everything is working as desired.
Before you begin, you will need the following information from your OneAlert installation on the primary server:
- Account and Authorization IDs
- Admin login and password you created when installing OneAlert on the primary server
- If this is an offline installation, a copy of the OneAlert license.
The following steps outline key points of the installation process:
- Run the installer as an administrator, either logged in as one or by right-clicking on the executable and selecting Run as administrator.:
- If you are performing an offline installation, you will be asked to browse for the license file you copied from your primary server. Online installations will download the required information.
- You will be asked for your Account ID and Authorization ID, which will be the same as you used for your primary server.
- Enable Is this a Redundant Subscriber Server Setup to identify this server as a secondary server.
- For Redundancy Settings, Enter the IP address of the OneAlert primary server and the OneAlert admin login credentials you created when you installed on the primary server. (Admin login on the primary server is Admin Username on the subscriber server.)
- Click Install. The installer may display that it's skipping parts of the installation. This occurs when the installer detects that the proper .NET or SQL is already installed.
-
Reboot the server when install completes. Windows Services default to using delayed start and will take a few minutes to come up.
Your OneAlert redundancy setup is now in active/passive mode.
Note: OneAlert version and SQL instance, along with SQL read/write passwords, are automatically read from the primary server install.
The following sections are not required, but may fit your environment.
For CUCM users, you can configure a load balancer to direct authorization requests from the CUCM Authentication URL to the active OneAlert server.
Some examples of software capable of HTTP load balancing are HAProxy, Nginx, and Varnish. However, there are many load balancing applications available. Your company network specialist should determine which one is appropriate for your environment.
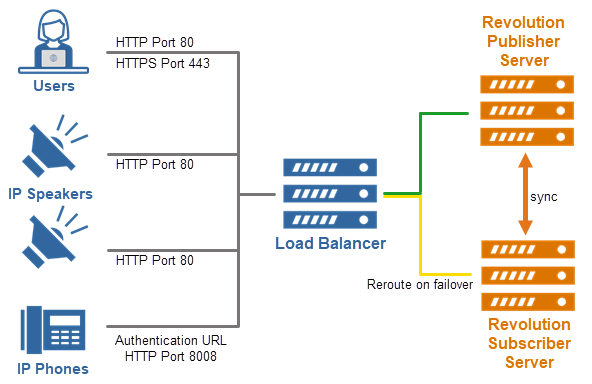
If your load balancer needs to check the status of OneAlert to determine when the primary is down. Use a GET command to this URL:
http://<Revolution ip address>/SA-Announce/RevolutionStatus
You can optionally configure your load balancer software to automatically redirect users to the OneAlert Web UI of the secondary server when failover occurs.Configure your load balancer with the URL for each OneAlert server.
Though rarely used, a load balancer can also route incoming web requests used for registration, authentication, and GPI triggers to the correct server. When OneAlert servers are included in a load balanced environment, and the primary OneAlert server fails, the load balancer redirects incoming web requests to the OneAlert subscriber server until the primary server takes over again.
Our lab uses HAProxy. As an example, here's the code we added to the HAProxy configuration file to configure redirecting HTTP and HTTPS web requests:
frontend http
        bind 192.168.11.59:80
        option forwardfor
        default_backend bk_http
backend bk_http
 option httpchk GET /SA-Announce/RevolutionStatus
 http-check disable-on-404
 http-check expect status 200
 server s1_http 192.168.11.51:80 check
 server s2_http 192.168.11.251:80 check backup
frontend https
        bind 192.168.11.59:443
        option forwardfor
        option tcplog
        mode tcp
        default_backend bk_https
backend bk_https
 mode tcp
 option ssl-hello-chk
 server s1_https 192.168.11.51:443 check
 server s2_https 192.168.11.251:443 check backup
You should configure your SIP trunks in your PBX to reach all your redundant OneAlert servers. This allows your PBX to redirect SIP calls to a secondary server on failover. Without SIP trunk failover, notifications that use a SIP trigger cannot be activated; notifications that don't use a SIP trigger continue to be triggered from a secondary server. Some PBX systems have native support for configuring SIP trunk failover (Cisco, for example).
In all cases, consult your PBX vendor documentation.
CUCM supports native failover. Refer to the Cisco SIP Trunk Setup section. Consult your Cisco documentation for complete instructions.
- MiVoice Business – Go to Configuration > Phone Systems > SIP; go to Settings; enable Disable Reinvites.
- MiVoice Connect – Follow the steps for creating a SIP trunk.
- ShoreTel Director – Consult your ShoreTel documentation.
High-level steps are:
- Create a new line and set ITPS Domain Name to the OneAlert primary server. Use the defaults for everything else. Make sure you leave Check OOS enabled. Create another new line and set ITPS Domain Name to the secondary server.
- Create a new ARS – Delete the short codes added by default. Add a new short code and set the Line Group ID to the line number assigned to the secondary server when you created the new line above. Create another ARS, same as you did the first one, but this time set the Line Group ID to the line number assigned to the primary server and set the Alternate Route Priority level to the ARS you just created for the secondary servers.
- Create a new Short Code for the SIP line pattern you assigned to the ARS.
- After you save, apply the changes immediately.
Consult your Avaya documentation for step-by-step instructions.
If your OneAlert environment also uses redundancy for the distributed model, you can configure your phone system such that DN ranges are routed through different servers. For example DN range 55xx is at site A and DN range 44xx is at Site B.
Within OneAlert, you can specify server priority, via Priority Groups, to distribute tasks across your redundant servers. Perform this configuration for a distributed multi-location model (active/active).
This is most commonly used for SIP Lines, but can be used with other triggers, such as CAP alerts (NWS and Amber Alerts, for example), or with bell schedules (selecting a priority group on the Calendar.
To test your two-server, failover-only setup,
-
Remotely connect to the primary OneAlert server, such as with RDP, and Use the Microsoft Service Manager tool (services.msc) to stop the OneAlert service.
- Log in to the secondary (subscriber) server, open the OneAlert UI, and verify the system status is secondary.
- Send a couple of test notifications from the secondary server oneAlert UI and check your Sent Notifications to make sure they were successful.
- Log back in to the primary server and start the OneAlert service using Windows Services.
- Open the primary server OneAlert UI and check the system status is primary.
- Go to Sent Notifications and verify the notifications sent from the secondary server are displayed on the Secondary tab.
- Send a couple of test notifications from the primary server OneAlert UI and go to Sent Notifications to verify they were successful.
Managing your redundancy environment
-
Configure OneAlert only on the primary server
This includes configuration changes, creating/editing/deleting triggers, notifications, user accounts, contact records and so on.
OneAlert syncs changes from the primary server to the secondary servers. The secondary servers are used for continuing to send notifications in the case of failover or when set as the first server in a priority group, see Use Models.
If you log into the secondary server with an admin user role, you can only view configuration settings.
-
Limited configurations on the secondary servers
For Global Settings on a secondary server, an admin can make changes only to the following fields: Multicast (Multicast IP Address) and Network (Network Interface Select).
-
Restart OneAlert while in redundancy
Always restart the primary server first.
-
Password resets cannot occur if the primary server is down
If a OneAlert user forgets his or her login password while in failover, they cannot reset until the primary server is back online.
-
Sent Notifications page
This page has a Server column that shows which server the notification was sent through.
If you log into a secondary server, this page will only show notifications sent from this server.
-
System Status page
Viewing this page from the primary server, you will see multiple tabs, one for each server. This allows you to review the status of each server.
-
Contact creation and modification cannot occur if the primary server is down
People cannot create or modify their contact accounts through the Self-Management Portal or register their mobile devices when the primary OneAlert server is down. However, users and contacts can continue to send notifications from their already registered mobile devices.
In a case where something happens with your primary server, you can recover the publisher database from a backup of one of your secondary servers.
- Back up a subscriber database on one of your secondary servers. See Back up your environment.
- Repair your primary server, as needed.
- Restore the database on your primary server using the secondary backup. See Restore your environment.
- Update your Registry:
- Open the Registry Editor.
- Go to HKEY_LOCAL_MACHINE/Software/Wow6432Node/Syn-Apps
- Update IPAddress to contain the IP Address of the new primary server.
- Remove the IsRedundant entry (right-click, then select Delete.)
- Save your changes.
- Restart OneAlert on your primary server.
We recommend powering down the VMs used for redundancy when taking snapshot or backup of the primary OneAlert server so that synchronization remains intact.
There are two scenarios for deprovisioning redundancy:
- You need to replace your secondary server.
- You are switching from a redundancy environment to a standalone environment.
- Go to Status > System Status on the primary server.
- Scroll down to the Redundancy Server section.
- Select one of the secondary servers.
- Click Advanced Settings.
- Click Deprovision.
This breaks the redundancy setup and OneAlert will no longer sync between the servers. OneAlert on the primary server continues to be fully functional, however it is no longer functional on the secondary server.
Once deprovisioning is complete, the Redundancy Server section no longer displays the secondary server on the System Status page. You no longer have access to view notifications sent from the secondary server. (The same occurs if choose to stop renewing redundancy in your OneAlert license.)
Deprovisioning is not a temporary pause. Even though OneAlert is still installed on the secondary server, no activations can occur. It is recommended to turn off all OneAlert services through the Services app or uninstall OneAlert from the secondary server to prevent future network communication between OneAlert modules of the primary and secondary server.
If after deprovisioning you want to put redundancy in place again, you must uninstall OneAlert from the secondary (subscriber) server, then rerun the OneAlert installer for a clean install.
Important: Do not use deprovision on the System Status page in the OneAlert UI. Deprovision is not a temporary halt to redundancy. Deprovision is used to revert OneAlert from a redundancy environment back to a standalone environment.
Tip: You may want to make a backup of the primary server or take a snapshot of the primary server VM before upgrading.
-
Open the OneAlert web interface on your primary server.
-
Select the submenu in the upper-right corner and then Download OneAlert Installer to ensure you have the most recent.
-
Close the OneAlert UI.
-
On the primary server, double-click the executable file.
Once the installer starts, failover occurs, switching OneAlert to the secondary server.
-
Select Upgrade and go through the prompts.
-
Once the primary server restarts after the upgrade is complete, OneAlert is back to running on the primary server.
Syncing to the secondary servers will not start because there is now an expected OneAlert version mismatch. Proceed with upgrading a secondary server.
Important: If you mistakenly updated a secondary server before the primary, or if the primary server took longer than expected and did not finish upgrading and rebooting until after a secondary, you will need to restart the OneAlert service on the affected secondary server.
- Do one of the following:
- Copy the OneAlert installer to the secondary server.
- Log in to the OneAlert UI on the secondary server, download the latest installer from the submenu, and then close the UI.
- Double-click the executable file.
- Select Upgrade and go through the prompts.
-
Log in to OneAlert and go to the System Status page to verify OneAlert is syncing between the primary and secondary servers.
- Redundancy information is logged in SyncLog. If you are having issues with the primary and a secondary server syncing, see Contacting Support to receive help and to walk you through using the reconfigure function available in Status > System Status > Redundancy Servers > Advanced Settings.
- Verify that Global Settings > Network is set to Auto-Select.
-
You cannot install OneAlert on more secondary servers than allowed in your license. If you attempt to install onto an additional server, the installation will end with an error.
After you update your license to support additional servers, you should do the following:
- Refresh your license on the primary server
- Exit the installer on the secondary server that issued the error and restart the installation.
