Mitel MiVoice Connect SIP Trunk Setup
This topic provides information about setting up your SIP Trunk for Mitel MiVoice Connect.
Note: Where the instructions refer to MiVoice connect, your installed software interface may be named: Mitel Connect Director or the older ShoreTel Connect Director. There are separate instructions for the legacy software named ShoreTel Director.
The following sections guide you through the setup process. The first three sections walk you through the setup and include some instructions specific to redundancy. The final two sections are specific instructions for setting up redundancy.
- Configure SIP settings
- Configure switch settings
- Configure SIP trunk group and trunk(s)
- Redundancy-specific: MiVoice Connect redundancy customers
- Redundancy-specific: Redundancy customers – tell MiVoice Connect to use the Sub when the Pub is offline
Make sure you have at least one site created. You'll need to assign a site to the SIP server, trunk group, and individual trunks.
- MiVoice Connect - Click Administration
 > System > Sites.
 - ShoreTel Director - Click Administration > Sites.
The standard DTMF/RFC-2833 payload type value is 101. Verify this setting in Mitel Connect Director.
- Do one of the following:
- MiVoice Connect - Click Administration > Features > Call Control > Options.
- ShoreTel Director - Click Administration > Call Control > Options.
- Set to DTMF/RFC-2833 payload type to 101 if necessary.

- Do one of the following:
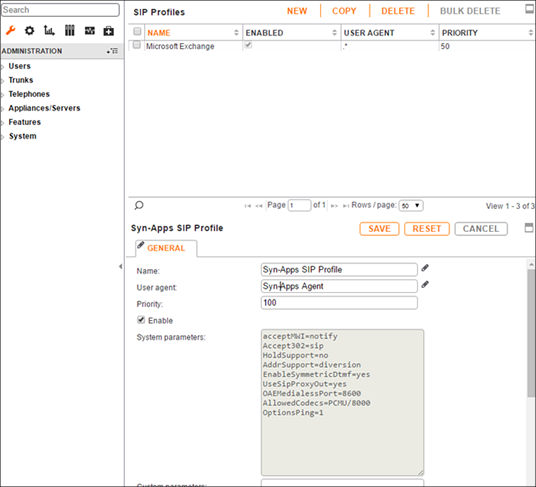
- MiVoice Connect - Click Administration > Appliances/Servers > Integrated Servers > SIP Profiles.
- ShoreTel Director - Click Administration > SIP Servers > SIP Profiles.
- Click New to create a new SIP Profile.
- Enter the following settings and then click Save.
| Setting | Value |
|---|---|
| Name | Enter a descriptive name for the profile. |
| User agent | Used to identify devices covered by this profile. Is not used by SIP servers. |
| Priority | Enter 100 |
| Enable | Check to make profile available for use. |
| System parameters | List of device characteristics and their default settings. |
| Custom parameters | (Optional) Additional device settings or overrides for default settings listed in System parameters field. |
Redundancy customers: You'll create two servers – one for Revolution publisher and one for the subscriber. You'll create the Pub first.
- Do one of the following:
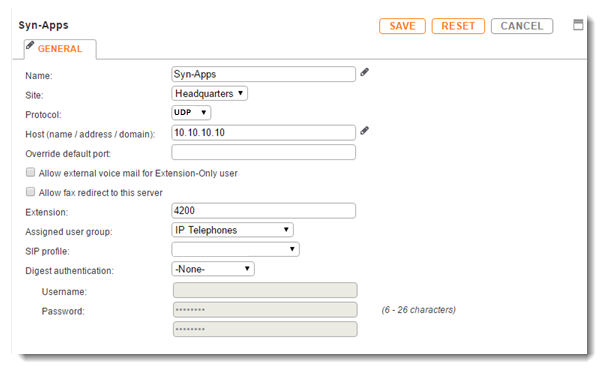
- MiVoice Connect - Click Administration > Appliances/Servers > Integrated Servers > SIP Servers.
- ShoreTel Director - Click Administration > SIP Servers > SIP Servers.
- Click New.
- Enter the following settings and then click Save.
- (Redundancy environments only) Repeat these steps to create a SIP server for the Sub.
| Setting | Value |
|---|---|
| Name | Enter a descriptive name for the server. |
| Site | Select appropriate site location. |
| Protocol | Our labs use UDP, but TCP is also acceptable. |
| Host (name / address / domain) | Enter the Revolution server IP address. |
| Override default port | Leave blank. |
| Allow external voice mail for Extension-Only user | Leave unchecked. |
| Allow fax redirect to this server | Leave unchecked. |
| Extension | System automatically assigns next available number. You can enter a different extension. |
| Assigned user group | Select appropriate group that has access to the necessary trunks. Our example uses IP Telephones. |
| SIP Profile | This is the profile you just created. Our example used Syn-Apps SIP Profile. |
| Digest Authentication | Leave at default None.* |
| Username | Leave blank.* |
| Password | Leave blank.* |
| *If your organization requires additional security measures, you can configure SIP trunk authentication from the user agent (in this case Revolution). This is not a typical scenario. See SIP trunk authentication below. | |
Note: You only need to configure this if your organization's security policies require SIP trunk authentication from a user agent (in this case Revolution).
In Revolution:
- Go to Configuration > Phone Systems > SIP.
- Leave Inbound Digest Realm blank.
- Enter a name of your choosing for Inbound Username and Inbound Password.
- Click Save.
In MiVoice Connect or ShoreTel Director, when configuring your SIP server,
- Set Digest Authentication to Outbound-Only.
- Enter the Revolution Username and Password in the Username and Password fields here.
- Click Save.
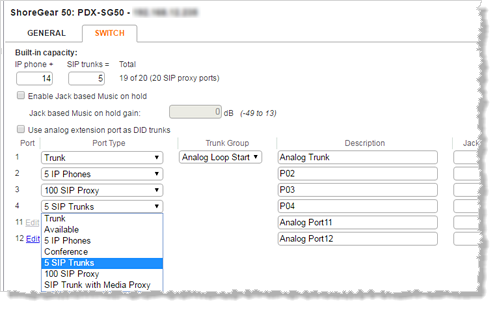
This allocates the SIP proxy ports and sets the number of SIP trunks per port.
- Do one of the following:
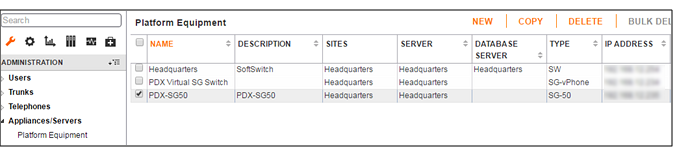
- MiVoice Connect - Click Administration > Appliances/Servers > Platform Equipment.
- ShoreTel Director - Click Administration > Platform Hardware... > Voice Switches / Service Appliances … > Primary.
- Click the Name of the switch to configure.
- Select the Switch tab in MiVoice Connect or go to the bottom of the page in ShoreTel Director.
- Define one of the Port Type settings from the available ports to 100 SIP Proxy, and then click Save.
- Select the desired number of SIP trunks from the ports available and click Save.
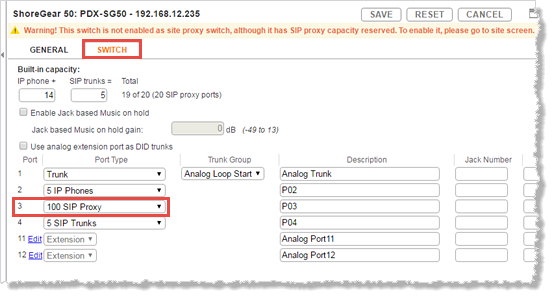
Each port designated as a SIP trunk port type supports up to 5 individual SIP trunks.
- SIP trunks are utilized to call analog paging systems.
- Trunks cannot be used for inter-site calls.
- Each site must have its own trunk group configured with at least one SIP trunk, or as many trunks as the desired number of simultaneous calls to the Revolution Server. For example: If there are two trunks in a trunk group for a specific site, then two groups can be called at the same time.
- Allocating SIP trunk ports on ShoreTel switches also requires valid Mitel SIP trunk licenses. Contact your Mitel representative for details.
- Mitel trunk groups only support static IP addresses for individual trunks.
There are two basic steps for SIP trunk groups and trunks:
Redundancy customers: You'll create two trunk groups – one for Revolution publisher (Pub) and one for the subscriber (SUB). You'll use the same Off System Extension range for both. It is suggested you create both from new and not copy one to the other.
For MiVoice Connect:
- Click Administration > Trunks > Trunk Groups > Trunk Groups.
- Click New.

For ShoreTel Director:
- Click Administration > Trunks > Trunk Groups.
- Select the site from the site drop-down list.
- Select SIP from the type drop-down list.
- Click Go.
You will be updating three different tabs of information: General, Inbound and Outbound, and then complete the OSE setup.
| Setting | Value |
|---|---|
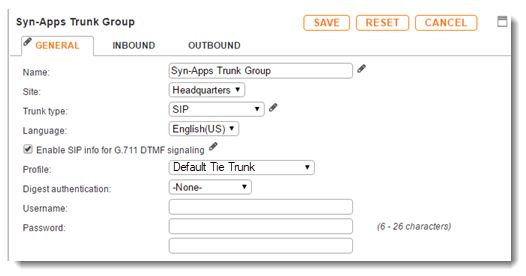
| Name | Enter a descriptive name for the trunk. Our example uses Syn-Apps Trunk Group. |
| Site |
In MiVoice Connect - select the appropriate site. In ShoreTel Director - you selected this when you created the trunk. |
| Trunk type |
In MiVoice Connect - select SIP. In ShoreTel Director - you selected this when you created the trunk. |
| Enable SIP info for G.711 DTMF Signaling | Check to enable. |
| Profile | Use Default Tie Trunk. |
| Digest Authentication | Keep default of None. |
| Username | Leave blank. |
| Password | Leave blank. |
MiVoice Connect:
| Setting | Value |
|---|---|
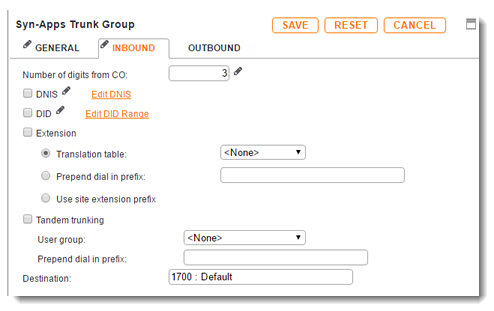
| Number of digits from CO | Enter a number that matches your system extension length.
Revolution does not use this setting. |
| DNIS | Clear to disable. |
| DID | Clear to disable. |
| Extension | Check to enable. Select Translation Table and keep default of None. |
| Tandem trunking | Leave disabled. This needs to be enabled for external dialer support. |
| User group | Select group that contains analog paging system lines, if applicable. |
| Prepend dial in prefix | Leave blank. |
| Destination | Use the prepopulated value or select one of your choice. |
MiVoice Connect:
| Setting | Value |
|---|---|
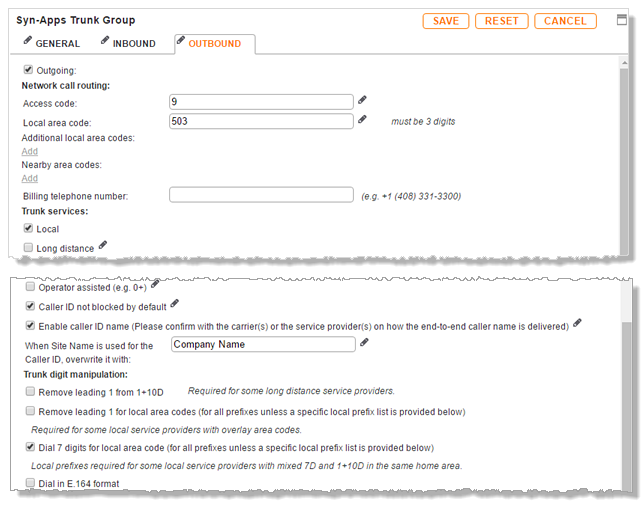
| Outgoing | Check to enable. |
| Network call routing | Specify appropriate access code and local area code. |
| Trunk services |
Access to the Revolution server is via Off System Extensions (OSE). Therefore, most trunk services can be disabled EXCEPT:
|
MiVoice Connect:
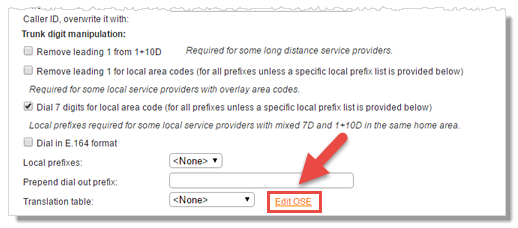
Off System Extensions (OSE) define the SIP extension range that can be configured as SIP lines in Revolution SIP Activator. This can be any extension that is not currently in use on the Mitel system.
Redundancy customers: Create the same OSE range for both the Revolution Pub and Sub trunk groups.
For MiVoice Connect:
- Ensure you are in the Outbound tab of the Trunk Group.
- Click Save before proceeding to set OSE to ensure any edits are retained.
- Click the Edit OSE link in the Trunk digit manipulation section, to the right of the Translation table field.
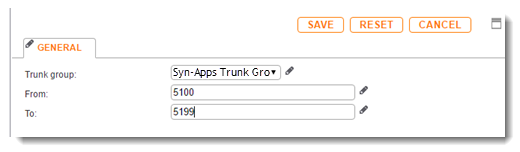
- Click New to create a new OSE
- Select the trunk group you previously created and define an extension range within your Mitel PBX extensions.
- Click Save.

For ShoreTel Director:
- Click Save before proceeding to set OSE.
- Click Cancel in the prompt window asking to give all existing User Groups access to this new trunk group. You don't need to grant existing user groups access to the new trunk group because access is via OSE.
- Click Edit (located to the right of Off System Extension).
- Click New to create a new OSE.
- Define an extension range within your Mitel PBX extensions and click OK.
You only see this tab for a trunk group after you save the group, and you are logged in as Support Entry (see MiVoice Connect redundancy customers).
Custom Rules allow you to prioritize the trunk groups.
- Select the Revolution Pub trunk group you created in the list of Trunk Groups.
- Select the Custom Rules tab.
-
For Custom, enter
;-10Athen click Save.The "10" is important. This number should be higher than any of the numbers you use for secondary servers in the following steps.
- Select the Revolution Sub trunk group for a secondary server you want to be in priority just behind the primary server.
- Select the Custom Rules tab.
-
For Custom, enter
;-9Athen click Save.By using "9", you are indicating that this server is second in priority
- Continue the above steps for any remaining secondary servers. For the Custom field of those servers, decrease the number (8, 7, 6, etc.) for each server based on your priority order.
These values tell MiVoice Connect to use the Pub trunks before trying to use the Sub trunks.
Did you create a SIP trunk group? If not, follow the Create SIP Trunk Group steps above.
Redundancy customers: Create the same number of trunks for the Pub and the Sub.
For MiVoice Connect:
- Click Administration > Trunks > Trunks.
- Click New.

For ShoreTel Director:
You have to get to the Edit Trunk page in order to add a new trunk.
- Click Administration > Trunks > Individual Trunks. The Trunks by Group page displays.
- Select a site from the Add new trunk at site drop-down list.
- Select a trunk group from the drop-down list.
- Click Go.
- Click on an existing trunk to open the Edit Trunk page where you can click New to create a new trunk.
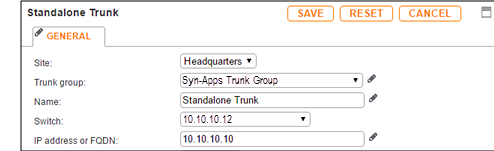
Configure Trunk
| Setting | Value |
|---|---|
| Site |
In MiVoice Connect - select the appropriate site. In ShoreTel Director - you selected this in order to get to the Edit Trunk page. |
| Trunk group |
In MiVoice Connect - select the appropriate group. In ShoreTel Director - you selected this in order to get to the Edit Trunk page. |
| Name | Enter a descriptive name for the trunk. Our example uses Standalone Trunk. |
| Switch | Select a switch that's configured for this site. |
| IP address or FQDN |
Enter the Revolution server IP address. Redundancy customers: Make sure you use the Revolution Pub server IP address for Pub trunks and the Sub server IP address for Sub trunks. |
MiVoice Connect:
To perform some actions related to redundancy, you must log into MiVoice Connect in Support Entry mode.
Note: Redundancy is not available for ShoreTel Director.
-
Hold Ctrl+Shift and click on the Username label, not in the field, to change the login page to Support Entry.
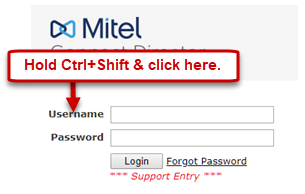
- Now log in with your standard credentials.
Follow the same steps in the following sections, with the following exceptions:
- You'll create two trunk groups using the same OSE. All trunk groups are associated with the same Connect site and use the same ShoreGear Switch, ShoreTel switch, or Virtual Trunk Switch.
- If you want the ability to call 4 different DNs simultaneously, you'll need to configure 4 trunks to the Revolution publisher and 4 to the subscriber for failover.
- Any differences in configuration for a redundancy environment are called out in the individual steps below.
There are two steps:
- Click Trunks > SIP Profiles.
- Select Default Tie Trunk.
- Click Copy.
- Change the name from 'Copy of the Default Tie Trunk' to a name that identifies this as the Revolution redundancy profile.
- Enter these custom parameters:
- Click Save.
OptionsPing=1
OptionsPeriod=15
- Click Trunks > Trunk Groups > Trunk Groups.
- Click the Revolution Pub trunk group you created in the section Add a new trunk group.
- Change the Profile to the one you just created for redundancy.
- Click Save.
- Repeat to make the same change to the Sub trunk group you created.
- Did you already configure Mitel to communicate with Revolution? See Configure Your Mitel Phone System.
- Create SIP lines in Revolution SIP Activator for the extension range you defined in the Mitel SIP Trunk Group. In our example, we're using 5100-5199. So, in Revolution, I'll create the SIP Lines I need in that range. See SIP Activator.
-
Assign the SIP Activator and SIP lines as notification triggers. See the Live Broadcast Notification example.
- Redundancy customers: Revolution was setup for redundancy mode during the installation. To review how failover works, see the Redundancy topic.
