Cisco SIP Trunk Setup
Note: The following steps use Cisco Call Manager 10 to create a SIP trunk. The exact steps for your Cisco Call Manager may be slightly different.
These are basic steps:
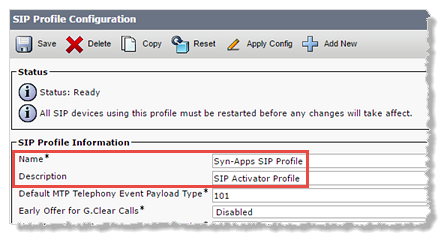
- Navigate to Device > Device Settings > SIP Profile.
- Click Add New.
- Enter a Name and Description. Our example uses Syn-Apps SIP Profile.
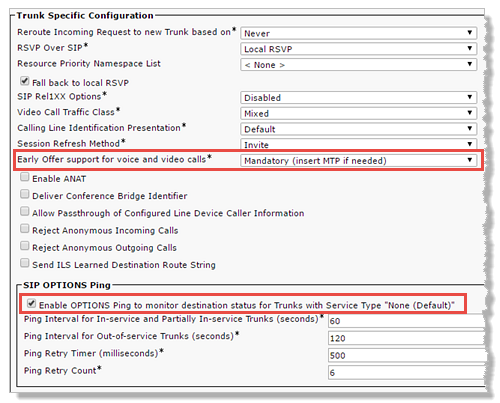
- Under Trunk Specific Configuration, select Mandatory... from the Early Offer support for voice and video calls drop-down list.
- Under SIP OPTIONS Ping, check Enable OPTIONS Ping... and keep the default settings.
- Click Save.
- Navigate to System > Security > SIP Trunk Security Profile.
- Click Find.
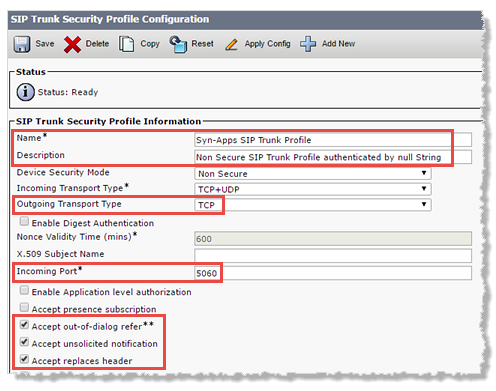
- Select the Non-Secure SIP Trunk Profile and click the Copy icon.
- Change the Name to something descriptive. Our example uses Syn-Apps SIP Trunk Profile.
- Set the following:
- Outgoing Transport Type = TCP. We recommend TCP, but UDP is also acceptable.
- Incoming Port = 5060
- Check Accept out-of-dialog refer
- Check Accept unsolicited notification
- Check Accept replaces header
- (Optional - not common) If your company security policies require SIP trunk authentication from the user agent (in this case OneAlert), check Enable Digest Authentication. You'll also need to configure SIP Realm. See SIP trunk authentication below.
- Click Save.
Note: You only need to configure this if your organization's security policies require SIP trunk authentication from a user agent (in this case Revolution).
In OneAlert:
- Go to Configuration > Phone Systems > SIP.
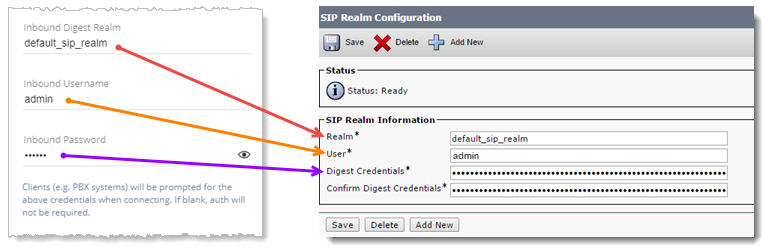
- Enter a name of your choosing for the Inbound Digest Realm, Inbound Username, and Inbound Password.
- Click Save.
In CUCM,
- Navigate to User Management > SIP Realm.
- Enter this information from OneAlert:
- Inbound Digest Realm name in the Realm field
- Inbound Username in the User field
- Inbound Password in the Digest Credentials field, and confirm credentials
- Click Save.
Is OneAlert configured for redundancy? You'll need to create two SIP trunks, one for the primary server and one for the secondary server.
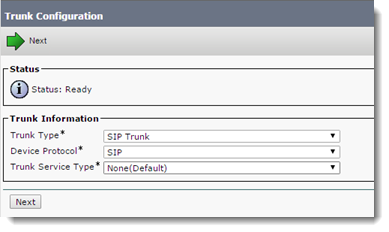
- Navigate to Device > Trunk.
- Click Add New.
- From the Trunk Type drop-down list, select SIP Trunk and click Next.
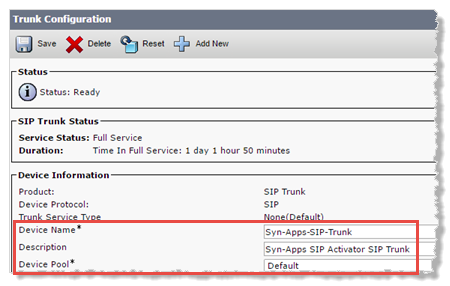
- Device Information section:
- Enter a Device Name and Description for this trunk. Our example uses Syn-Apps-SIP-Trunk.
- Select a Device Pool that will give OneAlert the required G711 audio codec.
-
Inbound Calls section:
Select the Calling Search Space that contains the partitions that the phone numbers and devices (IP and/or analog systems) you want to reach are assigned to. (For our example, our phones and analog speakers are assigned to Partition_1. Partition_1 is assigned to CSS_1.)

If a OneAlert call is placed to devices outside of CUCM, such as home phones or cell phones, you may want to use the same Calling Search Space value (CSS_1, for this example) in the SIP Information section, for Rerouting Calling Search Space and Out-Of-Dialog Refer Calling Search Space.
-
SIP Information section:
- Destination Address field, enter the OneAlert server IP address.
- Destination Port, enter 5060, the default OneAlert server port number, or the port number you assigned if different from the default.
- From the SIP Trunk Security Profile drop-down list, select the profile you previously created. Our example uses Syn-Apps SIP Trunk Profile.
- (optional) For Rerouting Calling Search Space and Out-Of-Dialog Refer Calling Search Space, set these values to the value you used for Calling Search Space in the Inbound Calls section.
- From the SIP Profile drop-down list, select the profile you previously created. Our example used Syn-Apps SIP Profile.
- From the DTMF Signaling Method drop-down list, select RFC 2833.
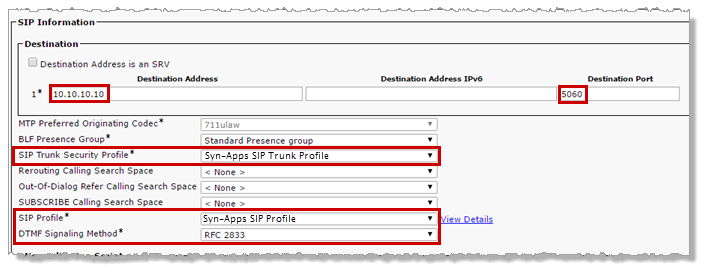
- Click Save.
- Click Reset when prompted to reset the trunk.
- Is OneAlert configured for redundancy?
- Yes: Continue on with the next step "Set up redundancy environment".
- No: skip to the step "Create Route Pattern".
Important: If you do not plan to set up OneAlert for redundancy (failover) now or any time in the future, skip this step and move on to Create Route Pattern.
Have you created your SIP trunk? This needs to be done before creating a route group.
First, delete the existing Route Pattern:
- Navigate to Call Routing > Route/Hunt > Route Pattern.
- Find the Route Pattern, select it, and delete it.
Next, create a Route Group:
- Navigate to Call Routing > Route/Hunt > Route Group.
- Click Add New.
- Provide a name.
- Set the Distribution Algorithm to Top Down.
- In the Route Group Member Information section,
- Highlight the SIP trunk for your primary OneAlert server and click Add to Route Group.
- Highlight the SIP trunk for your first secondary server and click Add to Route Group.
- Continue to add SIP trunks in the order in which you would like your servers accessed.
- Click Save.
All the servers are now displayed in the Current Route Group Members > Selected Devices box, in priority order.
Important: If you do not plan to set up OneAlert for redundancy now or any time in the future, skip this step and move on to Create Route Pattern.
- Navigate to Call Routing > Route/Hunt > Route List.
- Click Add New.
- Provide a name.
- Set Cisco Unified Communications Manager Group to Default.
- Click Save.
- Click Add Route Group.
- Select the Route Group you just created.
- Click Save and click OK to reset the Route List.
This defines the SIP line range for the SIP trunk you just created. You then create SIP lines in OneAlert within the range defined here.
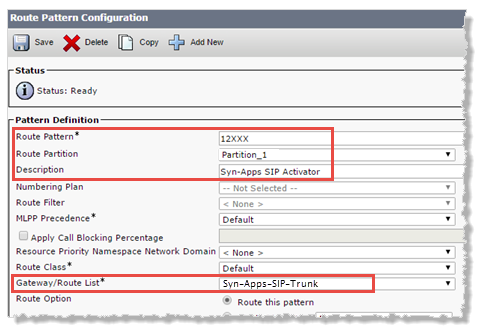
- Navigate to Call Routing > Route/Hunt > Route Pattern.
- Click Add New.
- Enter a Route Pattern. Our example uses 12XXX. (Additional route pattern examples are provided below.)
- Select a Route Partition. (This is not required but is typical.)
- Enter a Description for this route pattern. Our example uses Syn-Apps SIP Activator.
- From the Gateway/Route List drop-down list, do one of the following:
- If OneAlert is configured for redundancy (failover), now or will be some time in the future, select the Route List you previously created.
- If OneAlert is not configured for redundancy, and you have no plans of ever using the redundancy (failover) feature, select the SIP trunk you previously created. Our example used Syn-Apps-SIP-Trunk.
- Click Save.
Additional route pattern examples:
Note: CUCM only recognizes the square bracket grouping characters “[]”; you cannot use curly-braces “{}” or parentheses “()".
As seen in the examples below the thousands digit is always using "1". For the tens digit and ones digit, we chose to use the special character X, which represents 0-9 for its respective digit position. The hundreds digit is showing the various route pattern options in CUCM.
- 1XXX – Represents all numbers from 1000 to1999
- 1[1-3]XX – Represents all numbers from 1100 to 1399
- 1[369]XX – Represents all numbers in the three ranges: 1300 to 1399, 1600 to 1699, and 1900 to 1999
- 1[1-3][369]X – (extreme example) Represents all numbers in the ranges:
- 1130 to 1139, 1160 to 1169, and 1190 to 1199
- 1230 to 1239, 1260 to 1269, and 1290 to 1299
- 1330 to 1339, 1360 to 1369, and 1390 to 1399
- Did you already configure CUCM to communicate with OneAlert? See CUCM Configuration.
- Create SIP lines in OneAlert SIP Activator for the extension range you defined as the Cisco SIP Route Pattern. In our example, we're using 12XXX. So, in OneAlert, I'll create the SIP Lines I need in the range of 12000-12999. See SIP Activator.
-
Assign SIP activators and lines as a notification triggers. See Manage Notifications.
