Switching From SA-Announce to OneAlert
We know it can be challenging switching from one system to another. You need to figure out how your old workflows translate to the new environment. We're here to help. This topic addresses the most commonly asked workflow transition questions.
This depends on your PBX system.
Create a SIP trunk for use with OneAlert. See Cisco SIP Trunk Setup.
Leave the URL Authentication and Secured Authentication URL in CUCM pointing to SAA until you're ready to decommission or repurpose the SAA server.
In Revolution, go to Configuration > Phone Systems > Cisco , and select Settings. From here, make sure the Authenticator > Phone Auth Username and Password are the same as what SAA is using so that your IP phones can authenticate requests from OneAlert.
Create a SIP trunk for Revolution that uses a different range of extensions for SIP lines than what you defined for SAA so that both severs can activate notifications.
Both the SAA and Revolution servers can use the same Paging Relay as long as both servers are in the DHCP option 72 scope. IP speakers using DHCP Option 72 to register will need to be able to register to multiple servers.
See Paging Relays.
Switching from SAA to OneAlert is not an upgrade. You're advancing from old architecture to new architecture. Therefore, OneAlert and SAA cannot run on the same server. There is so much that’s new and different in OneAlert compared to SAA that there was no way to provide an upgrade path.
OneAlert was designed to provide a fresh start. Continuing to run SAA in parallel while setting up OneAlert on a separate server or VM ensures no system downtime and gives you ample time to learn OneAlert before making the final switch. Recreating data provides an opportunity to take advantage of OneAlert's improved workflows and product flexibility, and to streamline your notifications.
One of the biggest differences between OneAlert and SAA is decoupling the content you want to send (the notification) with how you want to send it (triggers). In OneAlert, you can use the same trigger to activate multiple notifications. We encourage you to learn the product BEFORE you just recreate all your notifications. Chances are you won't need as many of them.
First, let's talk about a basic difference between SAA paging groups and OneAlert notification types. In SAA, paging groups are typically defined as a predefined group of phones and other endpoints that perform an action (play live audio, play recorded audio, display text, etc.). In OneAlert, notifications that perform an action are separated from endpoints and phones. In OneAlert, there are three separate parts — triggers (the thing that activates the notification) – notifications (the action to be taken) – endpoints & contacts (the phones, speakers, and other endpoints or people to receive the notification). The Overview topic provides more details. In OneAlert, groups of endpoints and phones are called tags. See What are tags and why should I use them? below for more information.
Keeping in mind that we're now talking about notifications and not groups of endpoints and phones, here's how SAA notification groups translate to OneAlert notification types.
| SA-Announce Notification Group | Revolution Notification Type (in General Settings) |
|---|---|
| Normal | One-Way* – In OneAlert, we refer to this as live broadcast or paging. |
| Ad-Hoc | One-Way* with 'Allow users to add endpoints dynamically' set to Allow in the Endpoints & Contacts Selection section. |
| Respond | Answer Notification |
| Record-N-Play | Recorded |
| Emergency Alert | Stored Audio with Priority level set to 9 or 10 and Activation Type set to continuous, or One-Way with Priority level set to 9 or 10. |
| Auto Conference | Conference Notification |
| Holler | Two-Way* with 'Allow users to add endpoints dynamically' set to Allow in the Endpoints & Contacts Selection section. In OneAlert, we refer to two-way notifications as intercom. |
| Holler-RP | Not supported yet. |
| Insta-Holler | Two-Way* |
| Wokkie Tokkie (Normal and Ad-Hoc) | Push-to-Talk Notification |
| Text | Stored Audio – In SAA, a text paging group includes text, image, and audio. In OneAlert, this is a Stored Audio notification type. There is a separate Text and Images notification type that doesn't include audio. |
| Poll | Stored Audio with Response Options defined in the Message Details section. |
| Schedule | Stored Audio triggered by a scheduled event created in a calendar. |
*You must have a SIP trunk configured with a designated range of numbers to use as SIP lines in OneAlert. One-Way, Two-Way, and Recorded notification types can only be started by dialing a line number on a phone on the network. More details on creating SIP lines is provided below.
Tip: Each of the notification types are linked to examples provided here in the Help.
In OneAlert, there are a few more notification types you didn't have in SAA.
| Revolution Notification Type | Description |
|---|---|
| Direct Two-Way | This notification type allows you to create an intercom between two talk-back speakers. You assign the GPI of each speaker as triggers and the GPO of each speaker as endpoints. |
| Text and Images | These notifications cannot contain audio. |
| Text-to-Speech | This notification type converts text to audio using the built-in Microsoft TTS. In SAA, there was no built-in translation application. Text-to-speech was done using Twilio. In OneAlert, you can still use Twilio if you already have an account. If you don't have a Twilio account, you can now take advantage of TTS without purchasing a 3rd-party application. |
In SAA, line numbers are assigned and created as virtual phones when you create a group.
In OneAlert, the line number range is configured in a SIP trunk. Then you create line numbers, within the designated SIP trunk range, in OneAlert's SIP Activator. Once line numbers are created, you then assign them to notifications as triggers (the action that starts the notification). See the SIP trunk setup for your PBX system, which is part of configuring your phones, and Creating a New SIP Line.
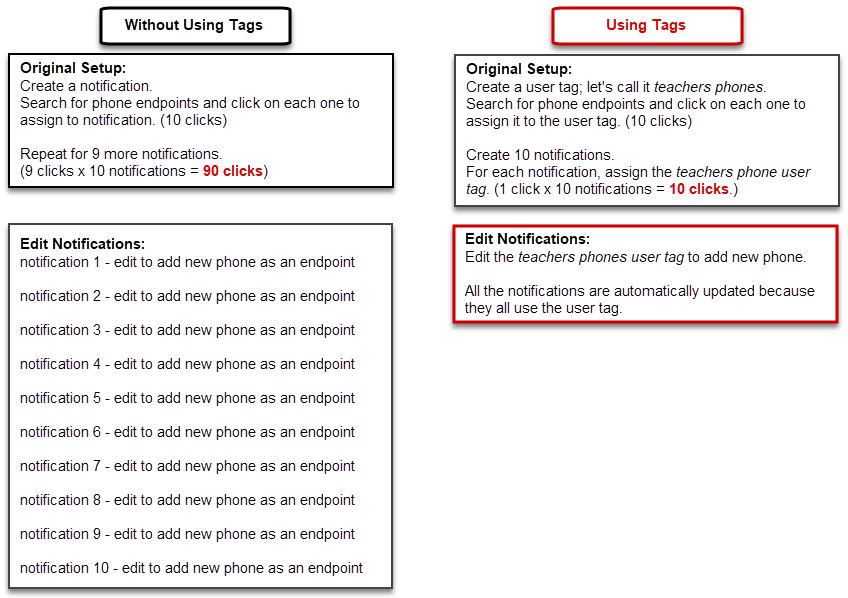
OneAlert uses tags to group endpoints or contacts together. Using tags makes it easier to add and remove endpoints to notifications.
For example, I have 20 teachers' phones that I assigned to 10 different notifications. I need to add another teacher's phone to those 10 notifications. Here's the workflow with and without user tags.
There are two types of tags – system and user.
System tags are endpoint tags automatically generated and updated by OneAlert. We've created several different groupings of endpoints that you can choose from. For example, there's already a system tag to send to all your phones. When devices are added or removed from the system, tags are automatically updated.
User tags are ones you create to meet your company's needs. These tags can contain endpoints, contacts, or any combination of both.For example, let's say I'm a manufacturer and I have two buildings – building A is for my administrative team and building B is for manufacturing. Both buildings have speakers. I create two users tags for my speakers – Building A speaker tag contains just the speakers in that building and Building B tag contains just the speakers in that building. I can now create notifications with the appropriate tag.
You can also create dynamic endpoint and contacts tags that automatically update based on criteria you enter. Using our previous example, my speakers don't get added or removed very often, but phones do. So I create a dynamic endpoint tag for Building A that automatically updates the tag when there's an addition or removal of phones. I do the same for Building B.
Please read the Creating and Using Tags topic for more information, examples, and instructions.
In SAA, endpoints do not count against your license until they are used in a paging group. Cloud Services (Clickatell, Twilio, etc.) are licensed separately.
In OneAlert, individual modules, and some features, are licensed. This allows you to customize OneAlert with just the features you need for your environment. Along with each module you purchase a license for, you purchase a set number of endpoints for each. Endpoints are not only devices that register with OneAlert, such as IP phones and IP speakers, but also endpoints that you create within OneAlert, like SIP lines and static streams. In Revolution, endpoint licenses are managed separately from notifications.
There are a couple of ways to manage endpoint licensing:
- You can have all endpoints that register with Revolution automatically be licensed and then unlicense the ones you don't want assigned to notifications.
- You can have all endpoints that register with Revolution automatically be unlicensed and then license the ones you want assigned to notifications.
Automatically licensing/unlicensing endpoints is a global setting. Individually licensing/unlicensing endpoints is done on the Endpoints page. You can also use bulk edit from the Endpoints page to change licensing.
You're also assigned (not charged) a set number of triggers. Triggers are tracked separately from your license.
Please read the License and trigger limit section of the Module and Endpoint Statuses topic for details on how endpoint licenses are consumed and on how to enable/disable endpoint licenses.
After you have recreated all SA-Announce groups in OneAlert and tested them with Revolution notifications, perform the following procedure.
- Create the SIP Lines (Configuration > Phone Systems > SIP, New > New SIP Line) for all of the SA-Announce paging group DNs and associate them with the appropriate OneAlert notifications. See Creating a New SIP Line.
- Power down the SA-Announce server
- For Cisco:
- Update the authentication URL and reboot the phones. See CUCM Configuration.
- Delete all paging group/dialer phones and their corresponding DNs from CUCM, since SA-Announce is decommissioned. See Delete Dialers in CUCM in the Delete/Recreate Paging Groups from SA-Announce and CUCM KB article.
- Modify the route pattern, or route group's route pattern, of the existing SIP trunk to match the new DN range. Cisco will prompt you to reset the trunk. See Cisco SIP Trunk Setup.
-
For Mitel MiVoice Connect:
- From the Director server, update the Trusted server list. See Configure Your Mitel Phones.
- Delete the SA-Announce Trunk Group/Trunks and move the Off System Extensions range to the OneAlert Trunk Group. See Mitel MiVoice Connect SIP Trunk Setup
- Test your notifications.
Confirm the SA-Announce username and password for authenticating to CUCM:
- Log in to SA-Announce.
- Go to Services > Broadcast Services > Advanced Settings.
- Expand the Select a Setting drop-down and find the Setting Value for:
- phoneUser (default: SynApps)
- phonePassword (default: SynApps)
If your values differ from the default values, you must configure OneAlert to match:
- Log in to OneAlert.
- Go to Configuration > Phone Systems > Cisco > Settings.
- Under Authenticator, for Phone Auth Username and Phone Auth Password, enter the values used for SA-Announce.
In addition to the links above, we recommend reading the following topics:
- OneAlert Overview – Provides an overview of how Revolution works, configuration, features, and licensing. (We already linked to this one, but it's worth repeating.)
- Notifications Basics – Provides an overview of what tasks the different users roles can access, a description of the different notification types, the different ways to activate notifications, what type of content you want to send in the notifications, and who can receive notifications.
- Dashboard – The Dashboard is the starting point for daily use of Revolution once it's setup and configured. End users can customize their dashboard to meet their needs.
