Notifications Basics
Before creating and maintaining notifications, it's helpful to understand a few things about how notifications are set up. It's also useful to know what the user roles permissions are for setting up notifications.
Using Variables in Notification Messages
Insert dynamic values into your message using variables (e.g., {dateLocal}, {callerID}). These are automatically replaced with real-time system or event data when the notification is sent.
Activator variables (e.g., {activatorTitle}) pull content from triggered/forwarded events.
Standard variables (e.g., {timeLocal}, {notificationName}) work in all notifications.
| Tag | Value |
| {activatorTitle} | Title set on the forwarded ActivatorTextCommand |
| {activatorBody} | Body set on the forwarded ActivatorTextCommand |
| {activatorLocation} | activatorVariables["Location"] (from responseEvent.Data] |
| {activatorCoordinates} | activatorVariables["Latitude/Longitude"] |
Simple replacements — used in all notifications (title, body, email subject, etc.)
| Tag | Value |
| {iteration} | Current repeat count |
| {iterations} | Total repeats (or "Continuous") |
| {delay} | Notification interval |
| {dateUTC} | Current UTC date |
| {timeUTC} | Current UTC time |
| {dateLocal} | Current local date |
| {timeLocal} | Current local time |
| {callerID} | Who sent the notification (SentBy) |
| {companyName} | Company name from settings |
| {accountID} | License account ID |
| {serverIP} | Rev server IP |
| {serverName} | Rev server FQDN |
| {notificationName} | Notification name |
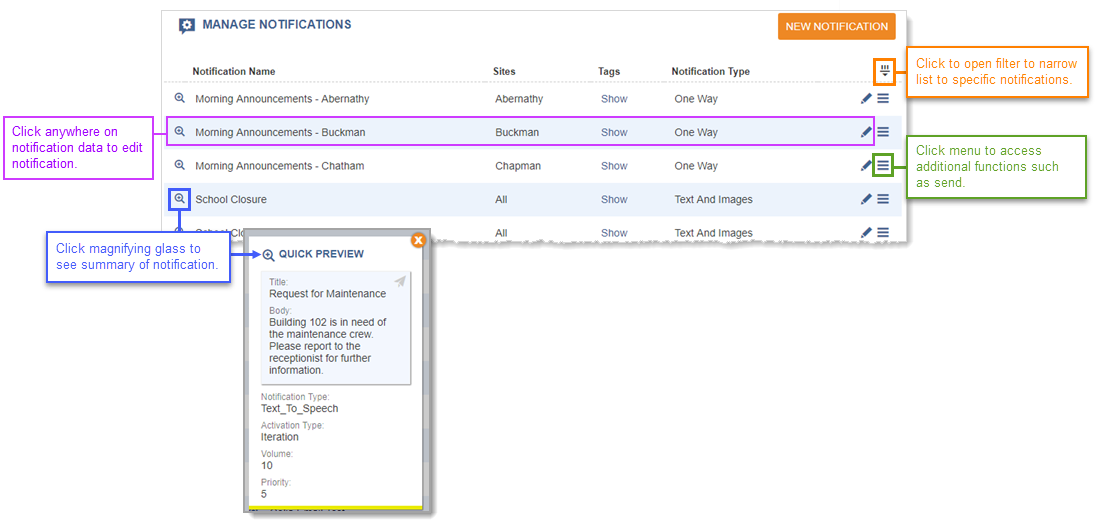
Navigating the Manage Notifications Page
Use the Filter to narrow down the list of notifications displayed. Click anywhere on the notification data to open the Notification Edit page. The menu provides additional functionality – Send, Copy, Delete – depending on your user role.
Access to notification functions depends on the user role assigned to the user account.
- Admin and Editor User Roles – Access all Manage Notifications functions.
- Sender User Role – Send and view existing notifications. Sender cannot make changes to existing notifications or create new ones.
- Viewer User Role – Can view existing notifications. Viewer cannot send notifications, edit notifications, or create new notifications.
The assigned user role also determines what is shown on the Dashboard. (See Users.)
Note: Be aware that the Sender user role can send notifications that have calendar events assigned to them. Therefore, the notification would go out manually when sent and when triggered by the calendar event. Make sure to let your end users know which notifications they should not send if you only want those notifications triggered by calendar events.
Creating Notifications
It's helpful to understand the basics of how notifications are created and the different options for creating them.
There are five basic tasks to creating a notification:
This is where you determine what type of notification you want this to be. Do you want to send text and images only or a prerecorded message? Do you want the notification to be a live broadcast or use it as an intercom? Do you want to record an announcement on the fly and send it?
This is where you decide how often to display the notification or play the audio. Do you want the notification to display or play once, multiple times, or continuously until you turn it off?
What is the priority of the notification? Is it an emergency notification that should interrupt any current notifications?
If your organization is using multiple sites, which site is this notification is available to? See Sites for more information.
-
Notification Name – Enter a string, which must be original, to help you identify the notification.
Note: You cannot use the following characters in the Notification Name: Dollar sign ($), Ampersand (&), Pound sign (#), Question mark (?), or open- or close-parentheses ( ( ) ).
The selected Notification Type defines the type of notification you're creating and what you can assign in the Message Details section. For example, does the notification just need to send text, and maybe an image? Does it need to include tones or a prerecorded message? Is this a live broadcast notification? The questions and examples below help you determine the Notification Type you need to select for your notification.

Then you'll want to choose Text and Image as the Notification Type. The Audio section in Message Details isn't displayed. This notification type is available to assign to Buttons and the Quick Notification list on the Dashboard. See the Text and Images Notification example.
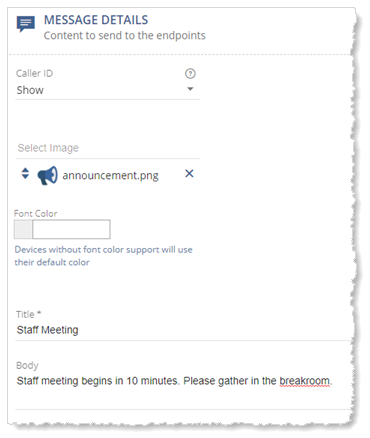
Note: Full-screen images are supported. These are images that combine images and text, which are meant to display as the total message content. To display full-screen images in a notification, you must leave the notification message details body text blank.

Then you'll choose Stored Audio as the Notification Type. The Audio section in Message Details displays and you can select one, or more, of the many tone audio files included with the product. Alternatively, your company may have uploaded their own audio tone files that you can select. This notification type is available to assign to buttons and the Quick Notification list on the Dashboard. See the Stored Audio Notification examples.

Note: Firefox may crash when previewing an audio file. We recommend using the Google Chrome browser.
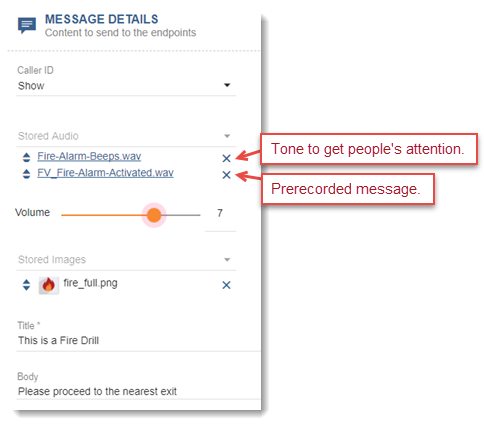
Then you'll choose Stored Audio as the Notification Type. The Audio section in Message Details is displayed and you can select one or more audio files. This notification type is available to assign to Buttons and the Quick Notification list on the Dashboard. See the Stored Audio Notification examples.
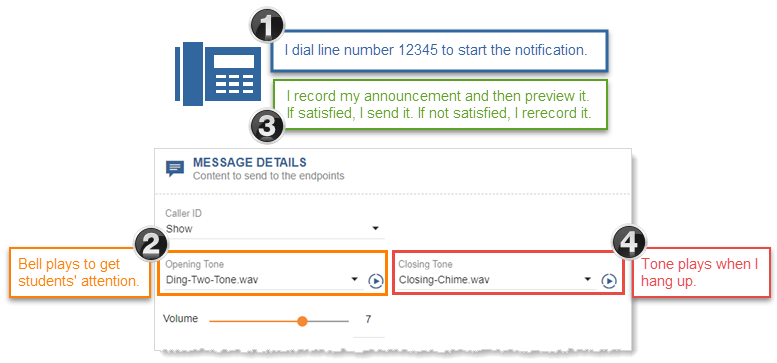
For example, I have a prerecorded message that says, "Manufacturing morning meeting starts in 10 minutes." I want to a bell to play to get people's attention before my prerecorded message begins.

Then you'll choose One-Way as the Notification Type. The Audio section in Message Details now includes the options for an opening and closing tone. See the Live Broadcast/Paging Notification example.
For example, this is my 'morning announcements' notification. I want a bell to play to get students' attention before I start giving the announcements for this morning. I also want to play a chime when I'm finished to let students know I'm done with announcements.
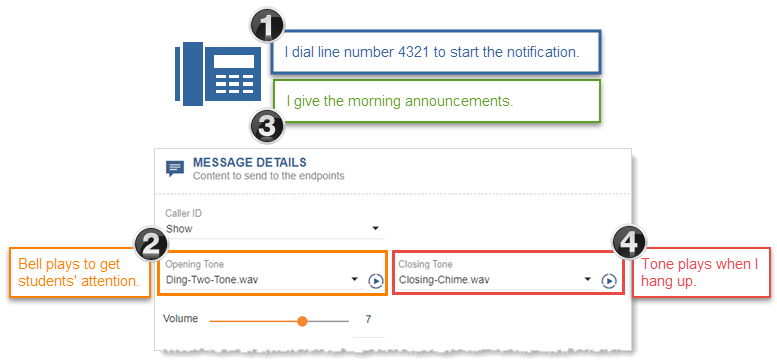
You don't have to include opening and closing tones, that's up to you.
Live broadcast notifications can only be triggered with a SIP line. The SIP line assigned cannot be assigned to any other live broadcast or recorded notification.
Live broadcasts are recorded so they can be sent to contacts through the Mobile app or email.
Tip: If you're using a Cisco IP phone for your live broadcast and put the phone on hold, the notification is terminated so that the hold music doesn't play out to the endpoints assigned to the notification. Only Cisco IP phones support this functionality.
This notification type has a lot of similarity to live broadcasts. However, instead of your announcement being broadcast live immediately, it's recorded and then sent. This gives you the opportunity to preview and rerecord your message if needed, and you can have the recorded message play multiple times or continuously until stopped.
Setup is very similar to live broadcast, except you select Recorded as the Notification Type and define the activation type (iterative or continuous). Recorded notifications are triggered using a SIP line, just like live broadcasts. The SIP line assigned cannot be assigned to any other recorded or live broadcast notification.
Once you've recorded your announcement, options are given over the phone to preview it and rerecord it, if necessary, before sending it. Once the recorded notification is sent, it is not saved for future use. If this is a continuous mode notification, the notification continues to play until you dial the line number again, wait for the announcement, and then press the asterisks (*) to stop it. See the Recorded Notification example.
Recordings are saved for the designated length of time defined by your system administrator in Global Settings > Notification Status > Notification Status Media Expiration.

You have a couple of choices here – Direct Two-Way or Two-Way. Intercom is always between two endpoints. The endpoints you want to use as your intercom, determines which Notification Type to use. With either choice, the Audio section in Message Details includes the options for an opening and closing tone. It's your choice as to whether you want to use them.
So, which intercom Notification Type should you use?
- If you want to create an intercom between two talk-back speakers, then choose Direct Two-Way.
- If you want to create an intercom by dialing a line number or destination code from a phone and connecting to another phone or talk-back speaker, then choose Two-Way.
(Admins, see Destination Codes for more information.)
There are a couple of rules for this one:
- If the endpoint is a phone, it cannot be a shared line.
- If the endpoint is a phone and that phone is in Do Not Disturb mode when you dial it, you will not be connected.
See the Intercom Notification examples. Revolution records this notification and saves it for a designated length of time defined by your system administrator in Global Settings > Notification Status > Notification Status Media Expiration.
Then you'll use Push-to-Talk. Your system admin will first set up a phone service trigger. The phone service trigger gets assigned to the Push-to-Talk notification. This allows users to begin a push-to-talk conversation from a supported IP or wireless phone. Once you activate the notification, you push a button on your phone to talk, release the button when you're finished. The recipient pushes a button on his or her phone to respond, releases it when he or she is finished. Just like a walkie-talkie. There's also a button called Shout that lets the speaker talk without having to hold the button down. The speakers then presses the Unshout button when finished speaking. See the Push-to-Talk Notification example.
This notification type requires multicast and is only supported on Cisco XML-enabled IP phones that also support soft-key buttons. This notification is not recorded.
Then you'll choose Answer. This type of notification can only be triggered by dialing a SIP line number. The notification is sent to multiple phones and presents an Accept option on the phones' soft-keys. As soon as a recipient presses Accept, all other endpoints are dropped, and the caller and responder phones become a one-to-one communication. You can include speakers as endpoints to alert recipients of the notification, but you can't respond from a speaker, even if it's a talk-back speaker. See the Answer Notification example.
Revolution records this notification and saves it for a designated length of time defined by your system administrator in Global Settings > Notification Status > Notification Status Media Expiration.

Then you'll choose Text-to-Speech. The Audio section in Message Details includes the options for an opening and closing tone. It's your choice as to whether you want to use them. See the Text-to-Speech Notification example.
Then you'll choose Conference. This option sets up a conference call between predefined endpoints. It also allows you to add additional action items that display as buttons after the conference is triggered – Notify, Add Endpoint, Add Endpoint as Destination Code, and Call911. Conference calls are automatically recorded and have a defined time limit. See the Conference Notification example.
Revolution records this notification and saves it for a designated length of time defined by your system administrator in Global Settings > Notification Status > Notification Status Media Expiration.
There are two Activation Types – Iteration and Continuous. The system default is one iteration; where the notification is received, its content displayed once or audio played once, and then the notification is done. When you increase the number of Iterations, the notification repeats the designated number of times with a pause in between as defined by the Repeat Interval. If you want the notification to repeat with no pauses in between, set the Repeat Interval to zero.
The important difference between iteration and continuous is that when Continuous is selected, the notification continues to repeat until the notification is stopped.
You can configure any of the following methods to stop Continuous notifications or Direct (Direct One-Way, Direct Two-Way, or Direct Conference):
- Single Trigger set to Toggle — Configure a single trigger for the notification with the Trigger Behavior set to Toggle. This allows you to activate and deactivate the notification with the same trigger..
-
Multiple Triggers — You could set one trigger with Trigger Behavior set to Toggle, which acts as above, and also set a second trigger with Trigger Behavior set to Deactivate.
For example, if you start a building evacuation continuous notification by dialing 999 from a phone on the network. When the emergency is over, you can "deactivate" the notification from a Mobile app.
Deactivating a notification will occur after any current audio completes.
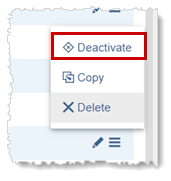
- Deactivating from the Revolution GUI — Select Deactivate from the notification's menu on the Notification page.
-
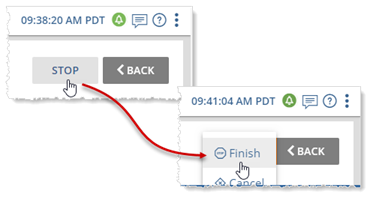
Stopping or Canceling from the Revolution GUI — Select Stop > Finish or Stop > Cancel on the Notification detail page.
Finish stops the notification after its current audio completes. Cancel stops the notification mid-stream.
Tip: You can also use this method to stop a notification with multiple iterations.
Note: If for some reason the notification does not cancel, a Kill option is presented. If you have to use this option, make sure to notify your administrator. Using the Kill option may leave endpoints in a bad state, and they may need to be rebooted.
-
For Text and Image notification types, when contact methods are selected (Mobile, Email, etc.), the notification is sent just once to contacts regardless of the number of iterations or continuous mode. This prevents contacts' in-boxes from getting flooded or contacts being charged for multiple SMS messages.
-
For Stored Audio notification types, if you have more than one audio selected, each audio repeats for the given number of iterations. For example, I want to play a "store closing due to bad weather" message 5 times at 3-minute intervals.
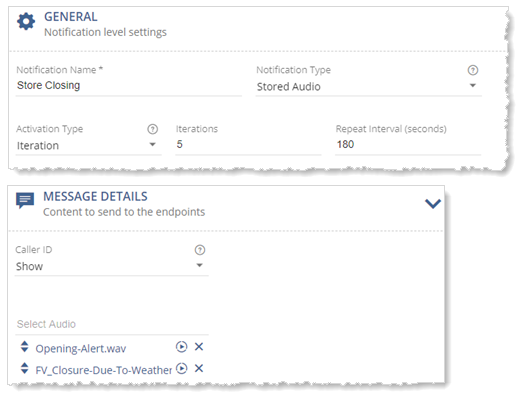
When the notification is triggered, you hear:
Opening-Alert + FV_Closure --- Opening-Alert + FV_Closure --- Opening-Alert + FV_Closure --- Opening-Alert + FV_Closure --- Opening-Alert + FV_Closure
Note: When contact methods are selected (Mobile, Email, etc.), the notification is sent just once to contacts regardless of the number of iterations or continuous mode. This prevents contacts' inboxes from getting flooded or contacts being charged for multiple SMS messages.
-
For Text-to-Speech and Recorded notification types, if you have selected opening and closing tones along with your recorded message, the opening tone is only played once, the recorded message is played the designated number of iterations (or continuously until stopped), followed by the closing tone. For example, I want to play a "building evacuation" message at 15-second intervals continuously.
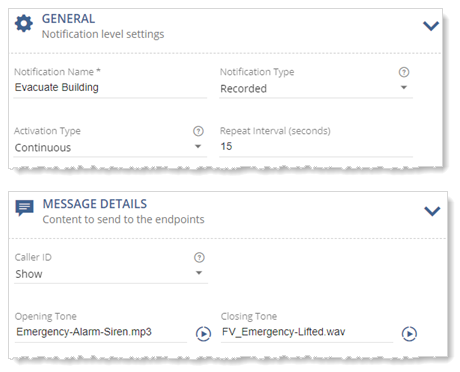
When the notification is triggered, you hear
Emergency-Alarm-Siren + recorded message --- recorded messaged --- recorded message ...... repeat recorded message continuously...
until you trigger the notification again to stop it, then you hear:
FV_Emergency-Lifted
Note: When contact methods are selected (Mobile, Email, etc.), the recorded or text-to-speech message is sent just once to contacts regardless of the number of iterations or continuous mode. The opening and closing tones are not sent.
Note: Activation Type is hidden for notification types that are live broadcasts (one-way) or intercom (two-way).
When you set up your notifications, you assign a priority level of 1-10.
Note: Not all endpoints support priority levels. Check the endpoint vendor documentation.
By default, priority 9 and 10 are considered emergency alerts. See Emergency Alert for information about this functionality and how to change the default value.
Here's how priority levels are handled by the system, when all endpoints for the notifications are the same:
- When a higher priority notification is received by endpoints, any active lower priority notifications currently playing are quickly stopped and the higher priority notification plays. An Error-Preempted message is logged.
- When a higher priority notification is currently playing and a new notification of equal priority is received by endpoints, the new notification does not play. A Priority Busy error is logged. Refer to Queuing Notifications to change this behavior for a notification.
- When a lower priority notification is received by endpoints and a notification of higher or equal priority is currently playing, the new notification in not played. A Priority Busy error is logged. Refer to Queuing Notifications to change this behavior for a notification.
- When multiple notifications are triggered at the same time that go to the same endpoints, notifications with the highest priority are played. Lower priority notifications are not played. A Priority Busy error message is logged. Refer to Queuing Notifications to change this behavior for a notification.
- When multiple notifications are triggered at the same time that go to the same endpoints and the notifications have the same priority level, the first notification received is played. The other notifications are not played. A Priority Busy error is logged. Refer to Queuing Notifications to change this behavior for a notification.
The priority rules differ for notifications that have overlapping endpoints.
-
In this first case, endpoints C and D are part of two different notifications with differing priority levels.
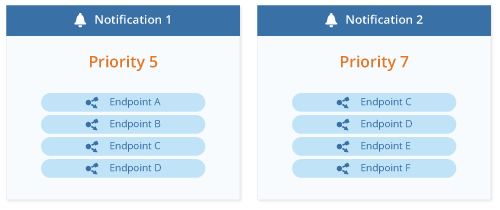
When Notification 1 begins, endpoints ABCD all receive the notification. However, when Notification 2 activates, Revolution will stop Notification 1 on ABCD and begin Notification 2 on endpoints CDEF. This is because Revolution cannot stop a notification on only a partial set of endpoints, resulting in AB having Notification 1 end without receiving Notification 2
-
In this second case, endpoints O and P are part of different notifications, where the second notification is a lower priority.
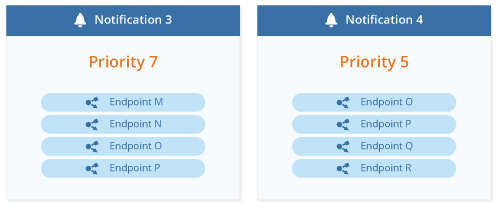
When notification 3 begins, endpoints MNOP all receive the notification. When Notification 4 starts, it will not override the notification on endpoints MNOP, therefore only endpoints QR will receive Notification 4.
IP Devices with Priority Settings
Some IP devices, such as those with LED signs, have internal priority settings that you can map to our Priority levels.
Refer to the documentation for your device and adjust its settings where necessary.
Emergency Alert
By default, when you set the Priority to level 9 or 10, you are defining the notification as an emergency alert. You can alter this value by going to Global Settings > Notification > Emergency Priority Threshold, where any value greater than the setting will be treated as an emergency alert.
This definition instructs the Desktop module to send notifications to Desktop Notification Clients in the Emergency Alert Template.
It also instructs the Email module to add a High Priority flag to any emails sent.
When editing notifications, the Priority slider will change color and display a tool-tip when you set it to an emergency alert level.
Notification Priority for Mitel 69xx Phones
For Mitel 69xx phones, if an endpoint is on an active call, an incoming notification will behave as follows.
- If the notification priority is greater than the Emergency Priority Threshold global setting (default of 8), then the phone will merge the incoming stream into the active call.
- If the notification priority is less than or equal to the Emergency Priority Threshold setting, then the phone ignores the incoming notification.
You can set each notification to enter a queue if it conflicts with equal or higher-priority notifications. As the higher-priority notification completes, any queued notification will be sent.
Note: This functionality is available only for non-live notification types. Therefore, you cannot use this for One-Way, Two-Way, Conference, Answer or Listen-In notification types,
When you enable the Allow Queuing behind higher priority notification field, Revolution will queue the notification for any overlapping endpoints running higher priority notifications. In this case the lower-priority notifications will return a status of "Queued" and will attempt to run when the higher priority notification completes.
For example, assume you have multiple panic buttons and there is a possibility that more than one could be triggered near-simultaneously, you could enable this to ensure that Revolution sends notifications for all of them.
See Setting the priority.
You may want to create notifications that are sent only during certain hours of the day.
For example, say you have a CAP notification that should go to one security team during work hours (9:00 am to 5:00 pm) and a secondary security team during off hours (5:00 pm to 9:00 am).
Note: Active hours are ignored if manually triggered within the web interface.
-
Enable Enable Active Hours.
-
For Start Time and End Time, enter the time range for the notification.
Start Time is inclusive and End Time is exclusive. For example, if you set the active hours as 12:00 pm to 3:00 pm, the notification would activate at 12:00 exactly and up to, but not including, 3:00 pm.
If you enable active hours on a live audio notification, such as one-way or two-way, Revolution will validate your triggers against other notifications with the same trigger. If another notification has overlapping active hours, you will receive an error notifying you that the trigger is already in use.
If your admin has set up multiple sites, you can assign a notification to a particular site or leave it available for all sites (which is the default). To assign a specific site, disable Available in All sites and select a Site from the drop-down list.
Tip: If there is only one site available in the Site drop-down list, then multiple sites are not being used and you can leave Available in All Sites enabled.
Set a maximum time limit for the length of the notification.
- Select Enable Time Limit
- For Time Limit, enter a value, in seconds, for how long the notification should be active.
Note: The Time Limit value overrides any other setting. Therefore, if you have six minutes of iterating notifications, but your Time Limit is five minutes, the notification will stop after five minutes.
Some examples of use include:
- Create a passing period for your school schedule. Create a Direct One-way notification that plays audio from an input stream (Source Endpoint) for a defined length between one class ending and the next beginning
- Display a notice (text and or images) on IP phones for a given amount of time.
This is where you define what actions trigger sending the notification. Available triggers are determined by what your admin configured in the system.
Note: Admins can create new triggers on the fly when creating or editing notifications (except for Mobile Assistance). Editors can create new Scheduler events on the fly, but not other triggers. Senders and Viewers do not have permission to create triggers or events.
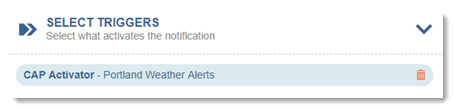
Revolution can monitor incoming CAP alerts and pass these alerts on to your endpoints. See the CAP Alert Notification example.
For example, I want to pass on severe weather alerts, issued by the National Weather Service, to my endpoints (phones, speakers, etc.) I create a Portland Weather AlertsRevolution's NWS CAP service (by starting with Revolution's preconfigured NWS CAP feed and selecting the Greater Portland area to monitor), and then assign CAP Activator > Portland Weather Alerts to trigger the notification, which I have set up to forward the content from the NWS alert to my endpoints.
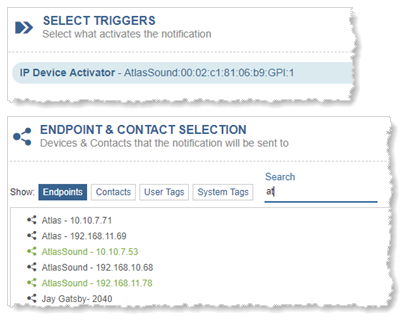
A notification is triggered by a device, such as a button or sensor. IP devices have one or more general purpose input (GPI) pins that allow you to connect one IP device, such as a button, to another IP device, such as a speaker. See the Intercom Direct Two-Way Notification example.
For example, I have a notification set up as an intercom between two talk-back speakers. To begin talking into speaker A, I press a button connected to that speaker. This button is the trigger that starts the notification that allows me to talk to speaker B. I select the button on speaker A as the IP Device Activator. I then select both speakers A and B as the endpoints in the Select Tags & Endpoints section.
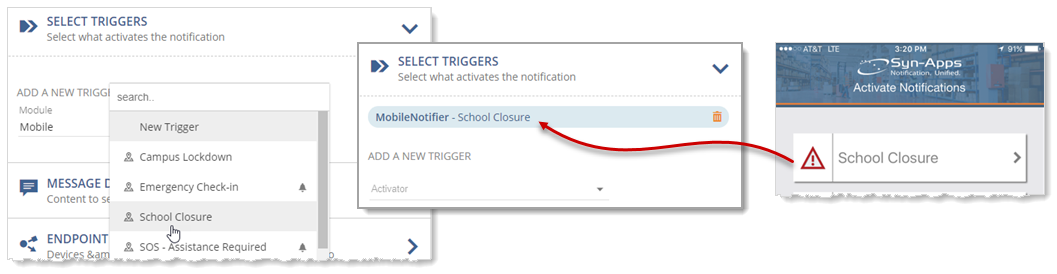
Revolution users can trigger notifications from within the Mobile app. Mobile Trigger Buttons are defined in Mobile Activator and then assigned as a notification trigger. See the Mobile Notification examples.
For example, I have a notification called "School Closure" that lets me notify faculty, staff, students, and parents that school is closed due to inclement weather. I have the Mobile app installed on my smart phone. I have created a Mobile Trigger Button called "School Closure" that displays in my Mobile app on my phone. I can trigger sending the notification from my phone and the Trigger Button allows me to create content for the notification on the fly on my phone.
Your contacts that have the Mobile app can trigger notifications from within the app using Mobile Assistance Buttons. Mobile Assistance Buttons are defined in Mobile Activator and then assigned as a notification trigger. The difference between Trigger Buttons and Assistance Buttons is that only Revolution users have access to Trigger Buttons.
Tip: Users must receive an invitation from Revolution to download the Mobile app and register their mobile devices. See Using the Mobile App for more information.
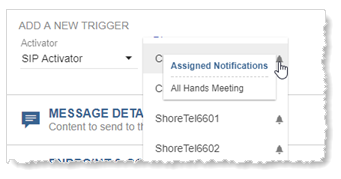
Phone services triggers configure a phone's soft-keys so you can send a notification by pressing a button on a phone. Think of it like speed dial. This trigger method is what you'll use for Push-to-Talk notifications. See the Push-to-Talk Notification example.
Important: Live broadcast/paging notifications can only be triggered by dialing a SIP line number from a phone.
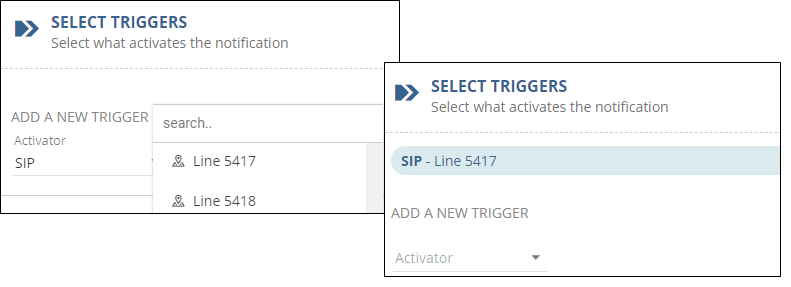
This is simply a line number you can dial from a phone to trigger a notification. See the Live Broadcast/Paging Notification examples or the Intercom Two-Way Notification example or the Stored Audio Notification examples.
For example, I have a notification called "Campus Lockdown" that sends a high-priority notification to all phones and speakers to let everyone know there's an intruder on campus and lockdown protocols are immediately in place. I assign SIP Activator and line number 5417 as the trigger. When an authorized person needs to send this notification, that person dials 5417 from any phone to trigger it.
Tip: If the trigger has an alarm next to it, hover on it to see a list of notifications using this trigger. If there's no alarm icon, the trigger hasn't yet been assigned.
Using SIP Activator as a trigger also allows you to assign endpoints on the fly (dynamically) to receive the notification. For example, I set up a Two-Way intercom notification, I want to decide at the time I trigger the notification which phone or talk-back speaker I want to create my intercom with. I have Two-Way as my Notification Type, SIP Activator as my trigger, Revolution will only allow one dynamically entered endpoint (because two-way can only connect to a single endpoint), and no endpoints assigned. I dial 7101 from a phone and then enter the line number of the phone I want to connect with. See Dynamic Endpoints below for more information.

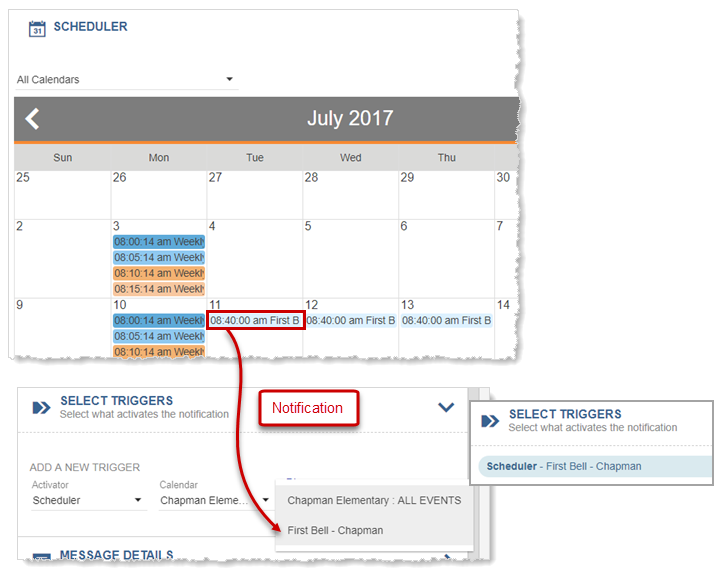
A notification is triggered by a scheduled event you've set up on a calendar. These notifications are triggered automatically, according to the date and time set in the event created in Scheduler. See the Scheduled Notification example.
For example, I have notifications set up to play bell audio tones for my school schedule – first bell, tardy bell, lunch bell, dismissal bell. I create an event and a notification for each time I want a bell audio file to play on my speakers. In my notification, I assign the event as the action that triggers the notification.


If you're using Cisco, Mitel, or Poly phones, Revolution supports monitoring specific calls such as 9-1-1. Once the numbers to monitor are configured, they can be assigned as a notification trigger. When the monitored number is dialed on a phone, the notification it's assigned to is automatically triggered.
Revolution Interface – Notifications that are not live broadcasts can be triggered from the Revolution interface.
Tip: You can add triggers on the fly when setting up the notification. Select the Activator and then click New from the Trigger drop-down list. A separate window opens that allows you to create the trigger. (Note: This is not an option for Mitel dial monitoring triggers because those triggers are set up in your Mitel communications manager.)
When a trigger is deleted from Revolution, it's also removed from any notifications to which it is assigned.
Each trigger you define can have a specific behavior for the notification, including activating, deactivating, canceling, and in some cases toggling.
After selecting your Activator (type of trigger) and the specific Trigger, you will be prompted to select the Trigger Behavior. The choices include:
-
Activate — The trigger will activate the notification.
-
Deactivate — The trigger will deactivate the notification, where it will finish any part of the notification that is in progress.
-
Cancel — The trigger will cancel the notification and it will end immediately, regardless of whether part of the notification is currently in progress.
-
Toggle — The trigger will either activate an inactive notification or deactivate an active one.
This option is only available if your notification is created with a Continuous Activation Type or if your Notification Type is Direct Conference, Direct One-Way, or Direct Two-Way.
You can limit the activation of a notification based on the location of a trigger.
This functionality is limited to activating endpoints (such as dial monitoring, phone services, SIP DN matches), mobile and GPI triggers.
The following are some sample scenarios:
-
You want a mobile contact, who activates a Request Assistance button, to be routed to the closest security team.
-
When a 9-1-1 call is placed, enable a visual indicator, such as a flashing strobe, that identifies the location where the call was made.
From the Select Triggers section of your notification:
-
Enable Restrict Triggers by Geographic Area.
-
For Area, select the area you have already created. See Defining geofence areas.
-
For Boundary, define whether the selected region should be Inside or Outside the defined area.
Based on your selections, the notification will activate if any of the area restrictions are met.
This is where you define what content is sent with the notification – caller ID, image, text, audio based on the notification type you selected, and whether to include response options. You can also choose to use the endpoint's default volume setting instead of setting it in the notification.
-
Caller ID – You can choose to Show or Hide the caller ID, which may be the extension number or the name of the person assigned to the extension calling, depending on how this is set up in your phone communication manager system. Alternatively, you can select Custom to add a descriptive name of your own, which allows for the use of text variables from the Add Text Variables icon
 .
. -
Select Audio and Select Image – You can include whatever combination of these items you like, such as: image and text; image and audio; image, audio, and text; text only; or audio only.
-
Volume – You can choose to use a device's default volume instead of setting the volume in the notification. Keep in mind that if you choose this and someone has the volume turned down low on their phone, they may not hear the notification. If the endpoint is a speaker, your admin may have adjusted the speaker volume in the speaker itself, and/or in the Revolution Endpoint volume setting. See Endpoints > Volume for more information.
Poly Note: Revolution does not control Poly Paging Groups, therefore the default volume of the endpoint is always used.
-
Font Color – You can use a different font color for your message text. If a receiving device doesn't support color, the device's default font color is used (typically black).
-
Title – Enter text or variables to briefly describe the message. See Using external content for the message for information about variables.
Note: You cannot use the following characters in the Title: Ampersand (&), less- or greater-than ( < > ), or double-quote (").
-
Body – Enter a more complete message to be sent as the notification, using text or variables. See Using external content for the message for information about variables.
Set up your notification to ensure any displays receiving the notifications, including the Desktop Notification Client, are cleared after a specified amount of time. Use this setting to delay when a notification is cleared after its normal time.
Note: This option is not available for Avaya or Cisco multi-platform phones.
When completing the Message Details section of your notification:
- Select Clear notification from display on completion
- For Delay before clearing, enter a time, in seconds, after which the alert is cleared from the display.
For example, if you send a text-based notification with a short-duration audio, use this setting to ensure the text displays beyond the length of the audio.
Note: For Mitel 53xx phones, this functionality is available, however the phones will only poll for updates every 15 seconds, so you may see a delay before a notification clears after completion. It is suggested that you set Delay before clearing to a value greater than 15 seconds to avoid the scenario where the phone receives an instruction to clear the display before displaying the notification.
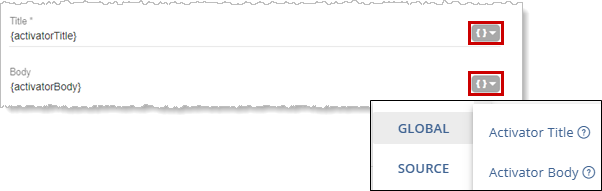
You can choose to use the content from the action item triggering the notification. For example, to forward the content from the National Weather Service alerts I set up to monitor weather alerts for Portland, I click the bracket symbols { } next to title and body to insert variables that will use the title and body from the NWS weather alert.
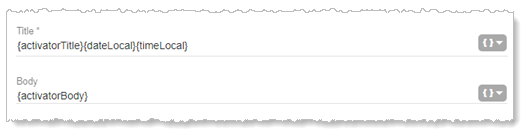
Using the Add Text Variables icon, you can use multiple variables for the message title and body. For example, I have a School Closure notification set up. I've included date and time variables in the title since notifications received by my IP phones don't include a date/time stamp.
Here are some things to keep in mind when using variables:
- Depending on what the receiving endpoint is, including additional variables may result in some duplicate information being included in a notification. If this notification is sent to Desktop Notification Clients or contacts' mobile devices, those endpoints automatically include a date/time stamp, so end users viewing the notification on their DNC or in their Mobile Client app see this information twice. And this may be fine if it's important that phone and speakers receive a date/time stamp.
- If you have Caller ID set to Show and include the {callerID} variable, this information will be received twice.
- The {activatingContact.Coordinates} and {activatingContact.Address} variables are only applicable to notifications triggered from a mobile device via the assistance button. See the Mobile Notification examples.
This is where you create notification actions that result due to some behavior associated with a notification.
Scenarios include:
- Activating a different notification based on when your notification starts, ends, receives no response, or issues an error. See Sending a notification based on an event.
- Create notification actions (also referred to as response options) that will be performed by a contact from their device, such as offering a response, activating another notification, dialing a specific number, or stopping a notification. See Enabling an action from an endpoint
- Create notification actions that appear in the form of buttons on the Sent Notification Details page (Notifications > Sent). See Creating actions that are available from the Sent Notification Details page
Responses are displayed on the Sent Notifications page. See Sent Notification Responses Tab.
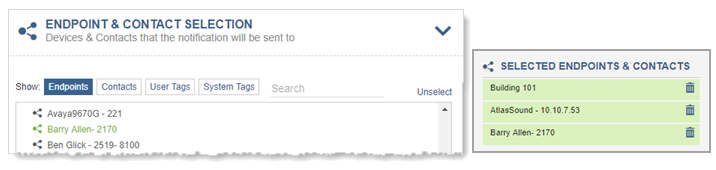
This is where you decide where the notification is sent – users' phones, overhead speakers, contacts, users' desktops, etc. You can select individual endpoints and contacts or you can use tags. Tags are simply a way of grouping endpoints together. Some tags were automatically generated by the application; others were created by your system administrator. Only system admins can create user tags.
If you're allowing a notification to be triggered by dialing a line number, you can use dynamic or static endpoints. See below.
Contacts are people, whereas endpoints are devices. Contacts allow you to extend notifications to external communication methods such as email addresses and mobile devices (smart phones and tablets).
Note: Live broadcasts (one-way notifications) and TTS notifications can be forwarded to mobile devices; they cannot be sent to email addresses.
When you select a SIP activator for your Trigger, for Allow users to add endpoints dynamically, you can select Allow and users can enter as many endpoints as they want on the phone when triggering the notification.
What this means is that when a user dials the line number to activate the notification, the user is prompted to enter the destinations, separated by an asterisk (*). When finished, the user enters the pound sign (#) and then begins speaking.
For example, I dial 7101 to trigger the notification. I'm then prompted to enter the destinations I want the notification sent to. I enter 2019*2105*2040#. The notification is sent to extensions 2019, 2105, and 2040.
Note: Users can only enter one DN for two-way notifications, while an unlimited number of DNs can be entered for one-way notifications.
You can also include IP speakers as destinations if your system administrator has assigned destination codes to them. Your system admin may also have configured a combination of IP phones and speakers for the same destination code.
For example, my system admin has configured all the speakers on the first floor with a destination code of 20. I dial 7101 to trigger the notification. When I'm prompted to enter the destinations that I want the notification sent to, I enter 20#. The notification is broadcast to all the speakers on the first floor. Another example might be that my system admin has configured all the speakers and manager phones on the first floor with a destination code of 30. When I dial 7101 to trigger the notification and enter 30# as the destination, the notification is broadcast to all the speakers on the first floor and the manager's phones.
Your system admin should provide you with a list of destination codes you can use. (Admins, see Destination Codes for more information.)
These are the endpoints you select from the list. You can add as many as you like.
You can filter the Endpoints and User Tags list by:
- beginning to type in a keyword. The list filters as you type.
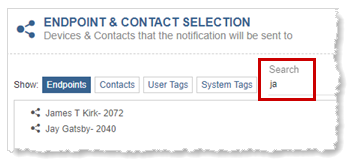
- clicking on a filter tab.
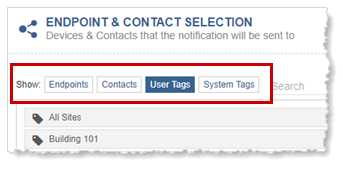
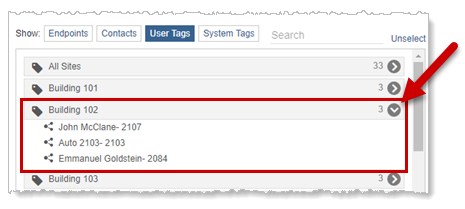
To view the endpoints assigned to a tag, click the >.
- Click System Tag Search.
- Select the type of system tag you want to search for.
- Begin typing in a keyword or numbers (for searching by IP address, DN, model, etc.)
The list filters as you type.

You can assign individual contacts or use a dynamic contact tag that your admin has created.
- From the Contacts tab, you can search by Department, Company, Job Title, Category, or Name.
- Select the contacts in the search results list.
- Check the Contact methods to use for contacts assigned to this notification.
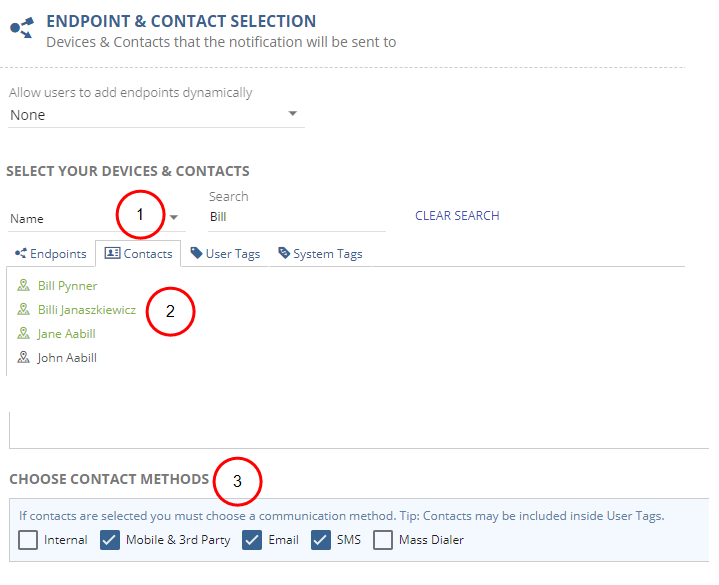
The contact methods define how your contacts should receive the notification. Whenever you assign contacts to the notification, you must also select at least one option from the available contact methods.
Note: If you do not have a license for a contact method, it will be grayed out.
-
Internal – sends to any endpoints associated with the Internal Endpoints setting of the contact.
-
Mobile & 3rd Party – sends to any mobile devices associated with the Mobile Clients setting of the contact; also depends on whether the Allow Mobile option is enabled.
-
Email – sends to any email address associated with the contact. See Email Notifier.
-
From Address - Specify an email address. The notification email will use this email as the reply-to email.
If your Emailer relies on an Oauth Token for Office 365, the From Address must match the account used to create the token.
If you do not specify an address, any responses will go to the sender of the email, which defaults to the username of your SMTP server settings. See Email Notifier.
-
-
SMS – sends the notification to any External Phone Numbers associated with the contact; also depends on whether the SMS Capable option is enabled. See SMS/Dialer Module.
-
Dialer – sends the notification to all eligible phones associated with the contact. See SMS/Dialer Module.
Selecting a Specific Gateway
For the Email, SMS, and Mass Dialer methods, there will be secondary fields from which you can define the specific gateway you wish to use, as you created during configuration of the notifiers.
Controlling the gateway selection on a per-notification basis allows you to configure notifications to be specific to a trigger or contact group. This could enable notifications that are tailored to a specific brand and thus separate emails and phone numbers. You could also target mass dialer notifications to different groups and use different text-to-speech languages.
- From the Contacts tab, select the communication methods to use for contacts assigned to this notification.
- From the User Tags tab, begin typing in the name of the dynamic contact tag.
- Select the dynamic contact tag from the search results.
General Purpose Output Relay Mode
This functionality always displays but is only applied when an IP device with a relay is selected as an endpoint, such as an IP speaker or Paging Relay. This is used when an IP device (such as a Paging Relay) is connected with another IP device (such as a strobe light or beacon) and you want the IP device to perform an action when the notification is triggered (such as turn the light or beacon on). It's also used when an on/off GPI button is connected to an IP speaker (such as a talk-back speaker) and the button is used to turn intercom communication on and off.
- While Active- Relay is on only for the duration of the notification. For example, a light comes on when the notification begins and goes off when the notification finishes.
- Pulse - Relay is on for the user-defined length of time, regardless of whether the notification is still playing or finished. For example, a light comes on when the notification begins and continues to stay on after the notification is finished, until the specified time, and then the light turns off.
- Turn On/Turn Off - Relay turns on when notification is received and stays on until a notification with GPO=Turn Off is received. For example, a light comes on when a campus emergency notification is received and the light stays on until a second notification is sent to turn it off.
- The Manage Notifications topic provides instructions for creating, editing, and deleting notifications.
- The Scheduler topic provides instructions on creating, editing, pausing, and deleting events and calendars.
- Review the Dashboard topic.
