Sites
Use sites to control which users have access to which notifications, triggers, endpoints and contacts. This provides a form of permissions for your environment.
Note: Only an All Sites Admin can assign sites. Refer to All Sites Admin vs Site Admin.
If your organization is only using one site, all user accounts are assigned to the Default site and Allow Access to All Sites is enabled. Triggers, endpoints, and notifications are left with Available in All Sites enabled. You don't need to do anything with Sites.
If your organization uses multiple sites, you can assign individual sites to user accounts, triggers, notifications, and endpoints or keep them available to all sites. Users can only access the data assigned to their sites or all sites.
Example,
My school district has three schools. As the All Sites Admin for my district, I've created a site for each school – Abernathy, Buckman, and Chapman.
Next, I set up my user accounts – Adam and Angie at Abernathy, Betty and Bob at Buckman. Adam and Betty are assigned the Editor user role for their sites, and Angie and Bob are assigned the Admin user role for their site.

Last, I determine which notifications belong to which sites.
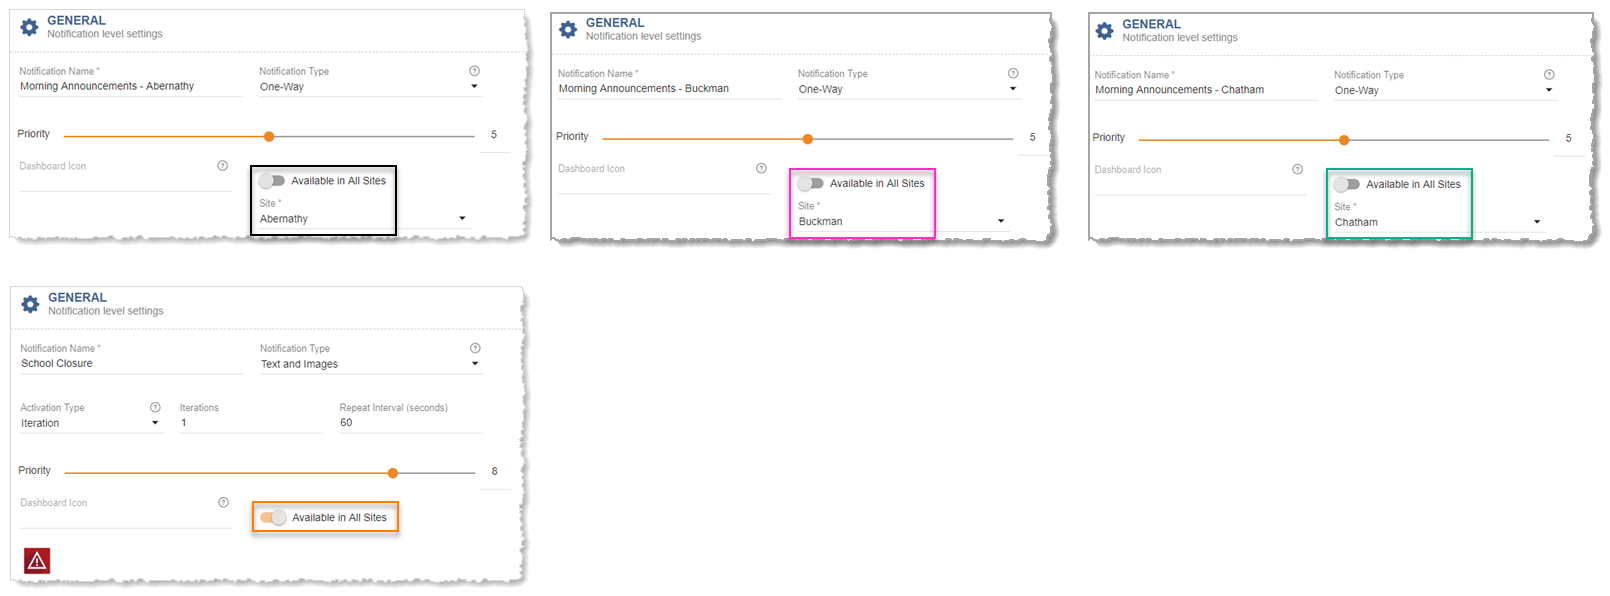
Now, when my users log in, they can only see notifications assigned to their specific site and those assigned to all sites.

- One site or multiple sites:
- If your organization only uses one site, you can leave everything at the default values. The system automatically creates a Default site. Endpoints that register with Revolution are automatically assigned to all sites. User accounts get assigned the Default site and Allow Access to All Sites is enabled. Triggers, endpoints, and notifications are all left at Available in All Sites and don't need to be assigned to a site. You do not need to do anything on the Sites configuration page, unless you want to change the name of the Default site.
- If your organization uses multiple sites, every trigger, notification, and endpoint can be assigned to a specific site, or you can have some things site specific and others available in all sites, or you can have everything site specific. You'll create the sites you need and then assign them accordingly.
- User accounts:
- Every user account must be assigned to a site. If your organization is only using one site, user accounts are assigned to the Default site and Allow Access to All Sites is enabled.
- If your organization is using multiple sites, user accounts are assigned to one or more and you determine whether each user account has access to all sites or just their assigned sites. For simplicity, we refer to user accounts with Allow Access to All Sites enabled as an All Sites users, and those with Allow Access to All Sites disabled as Site users.
- The User Role assigned to each user account determines what tasks the user can perform for their site.
- Triggers, Notifications, Endpoints, and Contacts:
- If your organization uses only one site, triggers, endpoints, and notifications are all left at Available in All Sites and don't need to be assigned to a site. You don't need to do anything further.
- If your organization uses multiple sites, you'll need to assign sites to triggers, notifications, endpoints, and contacts. Triggers, endpoints, contacts, and notifications assigned to a specific site are only available to users assigned to the same site. Site Admins can view all triggers, endpoints, contacts, and notifications, but can only make changes to those assigned to that admin's site. Site Admins can add new triggers, endpoints, contacts, and notifications, which are automatically assigned to the Site Admin's assigned site.
Tip: To aid in site management, endpoints and contacts you can configure endpoints and contacts to be dynamically assigned to sites.
- Scheduler:
You cannot assign individual events on a calendar to a specific site.
For example, you cannot have Calendar A Available in All Sites but have Event 1 assigned to just the Abernathy site.
- If your organization uses only one site, calendars are all left at Available in All Sites and don't need to be assigned to a site. You don't need to do anything further.
- If your organization uses multiple sites, you can assign calendars to a specific site or leave them at Available in All Sites. Calendars assigned to a specific site are only available to users assigned to the same site. Calendars assigned as Available in All Sites can be viewed by all users, but only edited by Site Admins and Site Editors assigned to the same site. Site Admins and Editors can create new calendars, which are automatically assigned to their site.
- Allow Access to All Sites versus Available to All Sites ... These are not the same thing:
Allow Access, along with the user role assigned, determines what the admin and editor users can add and edit. An All Sites Admin can perform any tasks permitted by the user role, on any site.
For example, Editor Cindy has Allow Access to All Sites enabled but she's still can't access configuration settings in the application because the Editor User Role doesn't allow that. What she can do is edit all notifications regardless of what site their assigned to because the Editor User Role grants permission to edit notifications and the Allow User Access to All Sites extends that permission to all sites, not just her assigned site. On the other hand, Editor Adam can only edit notifications assigned to Abernathy, his assigned site. A user account with Allow Access to All Sites disabled can only perform tasks permitted by their user role for their assigned site.
Available determines which triggers, endpoints, and notifications are available for selection by users. Available does not determine whether users can edit available triggers, endpoints, or notifications. That's determined by the user role plus the 'Allow Access to All Sites' setting. Think of 'Available' as making these items either exclusive (assigned) or non-exclusive (all). Anything that's non-exclusive (all) is available to all users regardless of what site is assigned to the user account. Anything that's exclusive (assigned) is only available to users assigned the same site.
For example, Editor Adam @ Abernathy (Allow Access to All Sites disabled) can only create and edit notifications for the Abernathy site, but he can assign triggers and endpoints to those notifications that are assigned to either the Abernathy site (exclusive to Abernathy users) or all sites (non-exclusive). He can't assign triggers and endpoints assigned to Buckman because those are exclusive only to Buckman users.
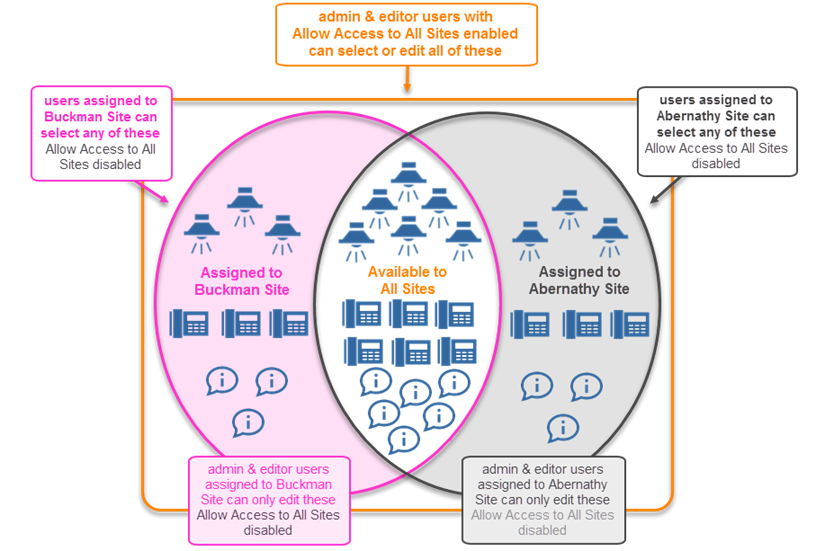
The basic steps are:
Go to Users, Contacts, & Sites > Sites and add as many new sites as you need. Adding sites is simple. See Assign Sites to Endpoints and Contacts below for dynamic site assignment.
-
Select New.
-
For Site Name, enter an easy to recognize name for your reference.
-
For Location, enter a brief description of the location, which is returned if you use the {source.Location} variable in your Notifications.
-
For Enter a location, begin entering a location and select the correct value from the list to narrow down the map to the general area for your location.
-
Select Drop Pin to place a location marker in the center of the map and zoom and scroll the map to place the pin in the exact location associated with the Site. The Latitude and Longitude values are automatically updated.
When Revolution needs location information for an endpoint, it will use the following priority:
-
Location information associated with the specific endpoint.
-
If the endpoint does not have location information, the variables will use the location information of the Site.
-
If neither the endpoint nor the site has location information, the variables will return null values.
-
-
(Optional) Manually enter the Elevation value.
-
Dynamically assign endpoints or contacts associated with the site. See Use dynamic filters to automatically assign sites.
-
Select Save
Assigning a specific site is part of creating a user account See the Users topic.
If you already have user accounts that you want to assign to a specific site, you'll need to edit them.
- Go to Users, Contacts, & Sites > Users.
- For a User account select

- Disable Allow Access to All Sites and select any number of Sites from the drop-down list.
- Select Save.
- Repeat for each user account you want assigned to a specific site.
These users will have access to triggers, endpoints, and notifications assigned to their site and all sites.
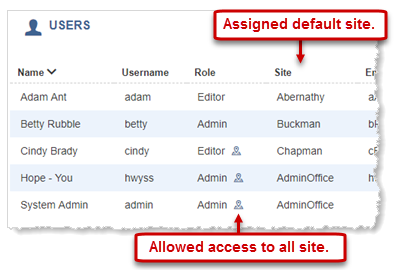
The Users page has a Site column that tells you which site is assigned as the default and whether the user has access to all sites.
Assigning a specific site is part of creating an Activator trigger – SIP lines, IP device trigger, triggers for the Mobile Client app, and CAP services. Refer to the help topic for the Activator you're configuring.
Note: You do not assign sites when you configure SIP Activator > SIP Registration. You assign sites to the SIP phones that register with Revolution after SIP is configured.
If you already have triggers created and you now want to assign it to a specific site, you'll need to edit any existing triggers that you want assigned a specific site. Triggers that will be available to all sites don't need to be edited since that's the default value.
- Edit any of your triggers.
- Disable Available in All Sites and select a Site from the drop-down list.
- Select Save.
- Repeat for each trigger you want assigned to a specific site.
These triggers will only be available to users assigned the same site or all sites.
The Activator pages have a Site column that displays which site the trigger is assigned to or All when Available in All sites is enabled.
Tip: Single-site organizations can skip this. All endpoints and contacts are assigned to All Sites.
The Endpoints and Contacts pages have a Site column that displays which site the endpoint or contact is assigned to or All when Available in All sites is enabled.
There are several methods to assign sites to endpoints and contacts:
- Dynamic Endpoints and Dynamic Contacts use Boolean operators to define search filters to assign sites.
-
Endpoints are initially assigned to All Sites, regardless of whether the endpoint device is automatically added to Revolution through DHCP option 72 or manually created through a Notifier. Endpoints are then assigned to a specific site the next time the site assignment filter runs, which is determined by the Site Import Timer. See Determine how frequently you want the filters applied.
You can optionally instruct Revolution to license any dynamically assigned endpoints.
- Contacts can be assigned to sites in a few different ways:
- You can assign a site to the contact invitation that prompts people to create a contact account through the Self-Management Portal. When the person creates their contact account, the account is automatically assigned to the site defined in the contact invitation.
- You can assign a site when manually creating a contact.
- You can create a filter to assign sites. Site assignment filters are typically used to assign sites when contact records are imported from an external source (Active Directory, CUCM, a CSV file).
Let's look at a few examples first. We'll start with a very simple filter, and then we'll build a more complex one.
I have two office buildings that I'm setting up as separate sites. My Portland A Building uses IP addresses 10.10.10.xx and my Portland B Building uses 10.10.12.xx. I created filters that assign all my A Building endpoints to the Portland A Building site and all my B Building endpoints to the Portland B Building site. After a new phone or device is added and registers to Revolution, it's assigned to the appropriate site when the endpoint site assignment filter runs. I define how often the filter runs in the Global Settings > Endpoints section.

My Engineering and Support departments are located in A Building, and my Sales and Marketing departments are located in B Building. All of my employees will be contacts so they can receive notifications to their mobile phones. I'm importing my employee records from Active Directory as contacts in Revolution. I add contact filters to my sites that will assign contacts to the appropriate sites for me when the contact site assignment filter runs.
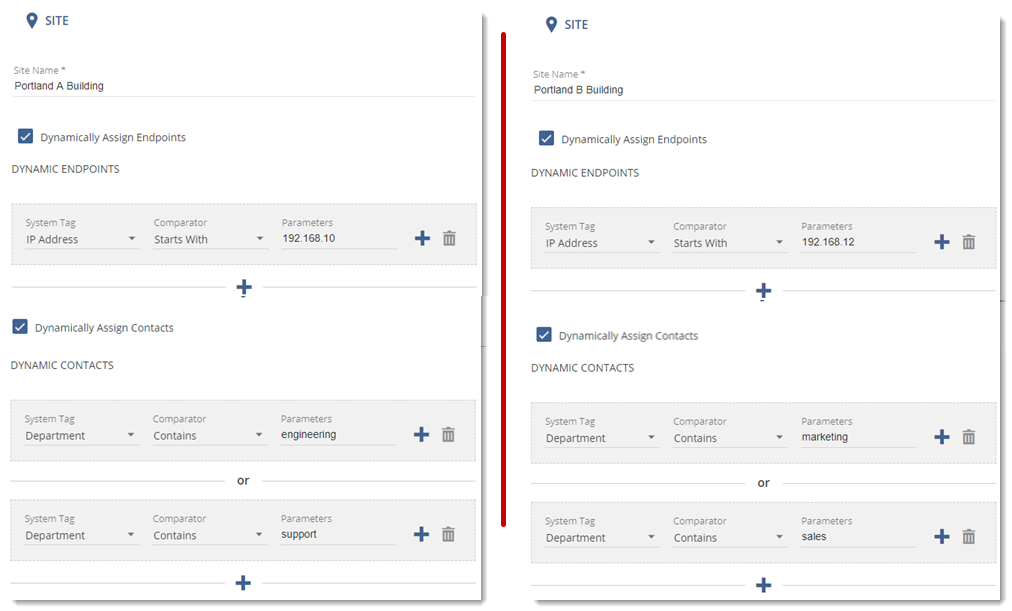
There are two configurations:
The process is the same to create dynamic endpoints and contacts.
It is possible to create dynamic filters that result in endpoints being included in multiple site filters, which can cause unpredictable results. If this occurs, Revolution will notify you in the following ways:
- The Conflicts column of the Sites page will contain a red dot. Hover over the red dot for additional information.
- The Messages icon in the Revolution toolbar will flash red (
 ). Select the icon to view message details.
You should address these issues as soon as possible.
- Go to Users, Contacts & Sites > Sites
- Do one of the following:
- Select New and enter a Site Name.
- Select Edit (
 ) for an existing site.
 -
(Optional) Enable one or both of Dynamically Assign Endpoints and Dynamically Assign Contacts.
By default, unlicensed endpoints are not assigned to a site. However, you can optionally enable Automatically License All Dynamically Assigned Endpoints. This will license any endpoints that are not licensed through other means. The endpoint assignment occurs on the same interval as you set for your site assignment filters, see Determine how frequently you want the filters applied.
- Select a System Tag from the drop-down list.
- Select a Comparator (Boolean operator).
- Enter the Parameter to match. Parameters are not case sensitive. You can enter multiple search words; do not use quotes.
- Do one of the following:
- If this is the only search criteria (like in the first example provided above), click Save.
- If you need to add an AND Boolean search criteria, click the + to the right of the Boolean search statement. Add your additional search criteria. Click Save or Save when you've finished building your search criteria statements.
- If you need to add an OR Boolean search criteria, click the + below the Boolean search statement. Add your additional search criteria. Click Save or Save when you've finished building your search criteria statements.
For each section you're using:

Now that you've set up your site assignment filters, you need to determine how frequently to apply the filters.
Important: This timer applies to both endpoint and contact site assignments, even though
- Go to Global Settings > Endpoints.
- Change the Site Import Timer value.
- Select Save.
If your environment does not add new endpoints or contacts very often, you may want to change the timer to a longer time period for applying the site assignment filters.
If you're not using dynamic site assignment for endpoints, any endpoints that register through DHCP option 72, or you create when configuring Notifiers, are automatically assigned to all sites. You'll need to edit endpoints on the Endpoints page to assign them to specific sites. There's a bulk edit function to make this process quicker. See the Endpoints topic.
If you're not using dynamic site assignment for contacts, use the bulk edit function to assign sites to existing contacts. See the Contacts topic.
Contacts created through the Revolution Self-Management Portal can be assigned to a site as part of the invitation process. See the Contacts topic.
Assigning a specific site is part of the General Settings when creating a new notification. Therefore, users with Admin or Editor User Roles can assign sites. However, only an admin user can create sites because that's part of configuration. See the Notification Basics topic.
If you already have notifications created and you now want to assign it to a specific site, you'll need to edit any existing notifications that you want assigned a specific site. Notifications that will be available to all sites don't need to be edited since that's the default value.
- Go to Notifications > Manage.
- For a notification, select

- Disable Available in All Sites and select a Site from the drop-down list.
- Select Save.
- Repeat for each notification you want assigned to a specific site.
These notifications will only be available to users assigned the same site or all sites.
The Manage Notifications page has a Site column that displays which site the notification is assigned to or All when Available in All sites is enabled.
You can restrict calendar access in Scheduler to an individual site. All events for the restricted calendar are available only to that site.
- Go to Scheduler > Calendars.
- For the Calendar, select

- Disable Available in All Sites and select the Site to assign.
- Select Save.
You can set up the Revolution interface, such that it shows you what a single-site user would see. This allows you to analyze your site assignments to ensure they are working as intended.
- Select the User Profile icon in the Revolution toolbar
-
Select Browse as a Single Site.
This displays a banner at the top of the page, which will always be visible as you navigate the GUI.
-
From the banner, select the site you want to analyze.
If you are an All-Sites admin, you can choose from any site. If you are not an All-Sites admin, but you are assigned to multiple sites, you will only see those available.
Note: Select the X on the right side of the banner to exit single-site viewing mode.
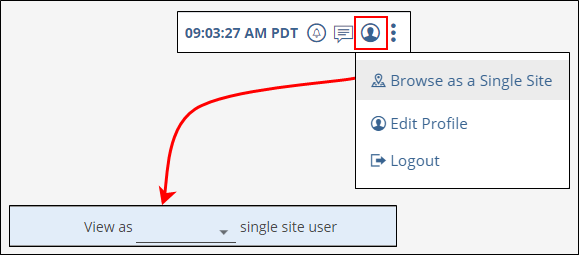
Once you are viewing the site as a single-site user, you can navigate through the GUI and ensure users from that site are able to see what you intend.
Some notes about what is accessible:
- Your user role defines what you will be able to view or edit.
- Bulk actions for Endpoints, Contacts, and Users are not available.
- You can save any Global Settings if you are an All-Sites admin.
Before you can delete a site, you must reassign any user accounts assigned to the site must.
Once you delete a site, any endpoints, contacts, notifications, and calendars that were assigned to the site are automatically reassigned to All Sites. If this is not your desired result:
- For endpoints, contacts, notifications, and calendars, filter by the site name
- For each item, reassign them to a new site.
- Delete the site.
