Contact Invitations
Note: All Sites Admins and Editors can send contact invitations for any site. Site Admins and Editors can send contact invitations for their assigned site.
Use Contact Invitations to invite Revolution users and other people to:
- Use the Revolution Self-Management Portal.
-
Download the Mitel Revolution Mobile Application app so they can receive notifications on their mobile devices.
Important: Everyone using the Mobile App must be entered as contacts and sent a mobile invitation in order to receive notifications. See Mobile Client App for more information.
- Multiple ways to add people as contacts:
- Import internal people from Active Directory or CUCM.
- Manually enter contacts.
- Invite people to use the Self-Management Portal to create their contact record.
-
You define while creating the contact or the contact invitation whether the person can use the Mobile app. Use of the Mobile app does not require the Self-Management portal.
Note: The Mobile app is not required in order for contacts to receive notifications as text messages. You can use the SMS Notifier to do that if your organization has a Clickatell, Twilio, or Mitel Summit account. The Mobile app provides contacts with a way to send notifications from their mobile devices, in addition to receiving notifications.
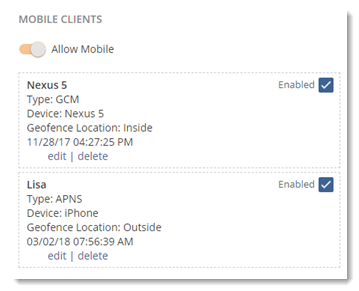
- Once registered for the Self-Management Portal, people enter their personal information. If you allowed the invitee to use the Mobile app, the invitees can download the Mobile app on their mobile devices and register them with Revolution, those devices display in the contact's personal info.
- Contacts using the Self-Management Portal can, at any time, disable or delete their devices from their contact info. When they do, they are automatically removed from the Contacts page, any notifications they are assigned to, and any tags they are assigned to.
- If you've already manually entered contacts or imported them through Active Directory or Cisco Call Manager, you can still invite them to use the Self-Management Portal. Use the Existing Contacts tab to select contacts to send invitations to.
- The Self-Management Portal provides a path for people to create their own contact account, thus you don't have to. Contacts can then manage for themselves how they want to be contacted (email, SMS, mobile) through the Self-Management Portal. Internal contacts may have additional methods of receiving notifications (desk phones, desktop notification client, building speakers). People are provided a link to the Portal. They enter their email address in the Self-Management Portal landing page. Once the email address is verified, they create a Self-Management account, which creates a contact record in Revolution.
- Read Intrado Privacy Policy.
- If you do not want contacts to use the Self-Management Portal, you must manually create contact records and then use the Sending Invites to Existing Contacts process to invite them to use the Mitel Revolution Mobile Application app, if you're using it.
- All Sites Admins and All Sites Editors can send invites to contacts and assign the invitation to All Sites or a specific Site.
Need to send invitations to existing contacts? See Sending Invites to Existing Contacts below.
There are three ways to invite people to become contacts:
This method sends an invitation to the list of email addresses provided inviting people to use the Revolution Self-Management Portal to become contacts in Revolution. You can also choose to allow them to use the Mobile app to receive notifications on their mobile devices.
-
Depending on your User Role:
Admins Editors - Go to Users Contacts & Sites > Contacts
- Select Invitations
- Select Email
- Go to Contacts
- Select Invitations
- Select Email
-
For Email Addresses, enter information for your contacts, one entry per line following the format:
<email_address>, <FirstName> <LastName>
For example, peter.parker@gmail.com, Peter Parker
-
(Optional) For Category, enter a category name to identify this group of invites.
You can use the Category to create dynamic contact tags to assign as endpoints to notifications, and to filter Contacts when assigning them to notifications
For example, Buckman Parents.
-
(Optional) For Expires, enable or disable whether there is an expiration for the invitation.
If enabled, you can alter Expiration in Days to your desired time frame.
Note: This is the expiration for the Self-Management Portal invitation only. If you're allowing Mobile, the mobile invitation is separate and doesn't expire because this is what app users use to log in to the Mobile app.)
-
For multi-site organizations only: All Sites Admins and Editors can assign this group of contacts to a specific site, or leave it at All Sites.
For example, since these are Buckman parents, I'll assign them to the Buckman site.
For Site Admin and Editors, the site is automatically assigned to their site.
-
(Optional) For Allow Mobile, enable or disable whether you want this group of contacts to receive notifications on their mobile devices.
When enabled, your contacts will also be invited to download the Mobile app and register their device to receive notifications.
-
(Optional) For Send Invitations, enable or disable whether the invitation is sent upon selecting Add Email Invitations.
You can send the invite later.
- Select Add Email Invitations.
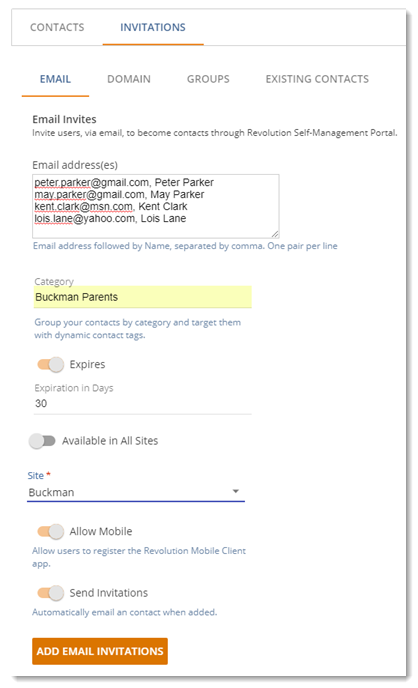
An invitation is created for each email address entered.

After the invitee creates an account, they appear as a contact in Revolution. Once this happens, the email invitation falls off the list. See Email Invite Workflow below for a review of the workflow to register for the Self-Management Portal.
If you left Allow Mobile enabled, the person is automatically sent a mobile invite email once the contact record is created in Revolution. See Mobile Device Registration Workflow below. You can edit the contact to see if mobile devices have been registered and send a new, mobile-only invitation if necessary. See Sending Invites to Existing Contacts below.
Domain Invites allow you to create an invitation code that you then send to a group of people all in the same domain (such as your internal employees) inviting them to register for the Self-Management Portal and (optionally) to register their mobile devices. With domain invites, once the invitation is created, you send an email to people, along with a link to the Self-Management Portal, using an email program of your choice, inviting them to create a Self-Management Portal account.
There are two main steps to using domain invitations:
-
Depending on your User Role:
Admins Editors - Go to Users Contacts & Sites > Contacts
- Select Invitations
- Select Domain
- Go to Contacts
- Select Invitations
- Select Domain
-
For Domain, enter the domain you wish to add.
For example, buckman.edu
-
(Optional) For Category, enter a category name to identify this group of invites.
You can use the Category to create dynamic contact tags to assign as endpoints to notifications, and to filter Contacts when assigning them to notifications
For example, Buckman Staff.
-
(Optional) For Expires, enable or disable whether there is an expiration for the invitation.
If enabled, you can alter Expiration in Days to your desired time frame.
Note: This is the expiration for the Self-Management Portal invitation only. If you're allowing Mobile, the mobile invitation is separate and doesn't expire because this is what app users use to log in to the Mobile app.)
-
For multi-site organizations only: All Sites Admins and Editors can assign this group of contacts to a specific site, or leave it at All Sites.
For example, since these are Buckman staff, I'll assign them to the Buckman site.
For Site Admin and Editors, the site is automatically assigned to their site.
-
(Optional) For Allow Mobile, enable or disable whether you want this group of contacts to receive notifications on their mobile devices.
When enabled, your contacts will also be invited to download the Mobile app and register their device to receive notifications.
- Select Add Domain Invitation.
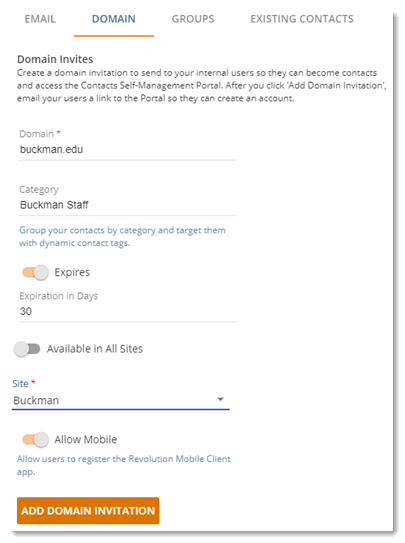
The Domain Invitation now appears in the list.

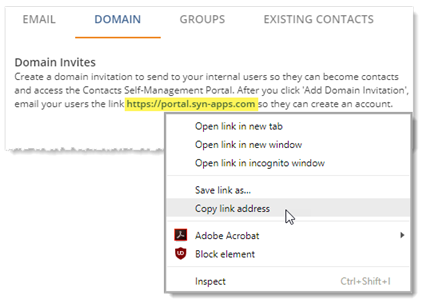
Now that the domain invitation has been created, you need to send people the Self-Management Portal link. Use whatever method you chose – email, chat, message board, etc. The Portal link address is in the Domain Invites summary on Contacts > Invitations > Domain, or copy it here – https://portal.syn-apps.com.
Once people create a contact account, they appear on the Contacts page. See Email Invite Workflow below for a review of the workflow to register for the Self-Management Portal.
If you left Allow Mobile enabled, the person is automatically sent a mobile invite email once the contact record is created in Revolution. See Mobile Device Registration Workflow below. You can edit the contact to see if mobile devices have been registered and send a new, mobile-only invitation if necessary. See Sending Invites to Existing Contacts below.
This method has you create a group invite code. You then copy the invite code to include in an email you send through whatever email program you like. This is different from the domain invite code in that you can send the invite to any email address whether in your domain or not. For example, I create a Buckman Parents group. I then email the group invite code to all the Buckman parents.
-
Depending on your User Role:
Admins Editors - Go to Users Contacts & Sites > Contacts
- Select Invitations
- Select Groups
- Go to Contacts
- Select Invitations
- Select Groups
-
For Groups, enter a name for the group. For example, Portland Office
-
(Optional) For Category, enter a category name to identify this group of invites.
You can use the Category to create dynamic contact tags to assign as endpoints to notifications, and to filter Contacts when assigning them to notifications
-
(Optional) For Expires, enable or disable whether there is an expiration for the invitation.
If enabled, you can alter Expiration in Days to your desired time frame.
Note: This is the expiration for the Self-Management Portal invitation only. If you're allowing Mobile, the mobile invitation is separate and doesn't expire because this is what app users use to log in to the Mobile app.)
-
For multi-site organizations only: All Sites Admins and Editors can assign this group of contacts to a specific site, or leave it at All Sites.
For Site Admin and Editors, the site is automatically assigned to their site.
-
(Optional) Enable Allow Mobile if you want this group of contacts to receive notifications on their mobile devices.
When enabled, your contacts will also be invited to download the Mobile app and register their device to receive notifications.
- Select Add Group Invitation.
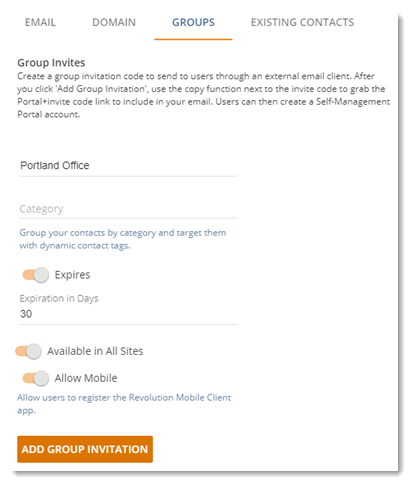
The Group Invitation now appears in the list.

Send People the Self-Management Portal Link
Now that the group invitation has been created, you need to send people the Self-Management Portal link. Copy the Invite code link and use whatever method you chose – email, chat, message board, etc. See Group Invite Workflow below for a review of the workflow to register for the Self-Management Portal.
If you left Allow Mobile enabled, the person is automatically sent a mobile invite email once the contact record is created in Revolution. See Mobile Device Registration Workflow below. You can edit the contact to see if mobile devices have been registered and send a new, mobile-only invitation if necessary. See Sending Invites to Existing Contacts below.
This method allows you to
Existing contacts may have been entered manually or imported from Active Directory, Cisco Call Manager, or a CSV file.
Have you entered people as contacts?
-
Depending on your User Role:
Admins Editors - Go to Users Contacts & Sites > Contacts
- Select Invitations
- Select Existing Contacts
- Go to Contacts
- Select Invitations
- Select Existing Contacts
- (Optional) If you do not want these contacts to use the Mobile app, disable Invite Mobile.
-
(Optional) For Only Unregistered:
-
Enabled — will send invitations to the selected contacts only if they have never registered. Any contacts who have registered will not be notified
-
Disabled — will send invitations to selected contacts who have not registered, it will also send login reminders to contacts who have already registered.
-
-
Select the contacts you want to invite via email, filtering the list as necessary.
- Select Send Invitations.
See Existing Contacts Workflow below for a review of the workflow to register for the Self-Management Portal.
Are people entered as contacts? (This could have been manually or through the Self-Management Portal.)
-
Depending on your User Role:
Admins Editors - Go to Users Contacts & Sites > Contacts
- Select Invitations
- Select Existing Contacts
- Go to Contacts
- Select Invitations
- Select Existing Contacts
- Disable Self-Management.
- you have already manually entered, or imported, people as contacts and do not want them to use the Self-Management Portal, or
- people have already created their contact account through the Self-Management Portal but haven't yet registered their mobile device(s). Check Disable Self-Management so they only get an invitation to register their mobile devices.
- Check the contacts you want to send an invite email to. (You can filter the list and then click the select all check-box in the header.)
- Click Send Invitations.
In this scenario,
See Mobile Device Registration Workflow for a review of the Mobile registration process.
The registration process is slightly different for each of the four invitation methods.
People must use standard Windows password requirements when creating passwords for their Self-Management Portal account.
- be at least 8 characters in length
- contains at least 1 lowercase and 1 uppercase letter
- contains at least 1 number (0-9)
- contains at least 1 special character (! @ # $ % ^ *)
- Person receives an email invite to register to use the Self-Management Portal.
- Person clicks Register in the email, creates a password, agrees to the privacy policy, and clicks Register on the Portal landing page. The email address is verified behind the scenes.
- Person logs in to the Portal and provides contact information.
- If you left Allow Mobile enabled, people are automatically sent a Mobile invite after their contact record is created. See Mobile Device Registration Workflow below.
- Person receives the Self-Management Portal link. You can send it in an email, post it in a chat, whatever your preference.
- Person enters his or her domain email address, clicks Register, and waits for a confirmation email.
- Person clicks Confirm Account in the confirmation email. Email address is verified.
- Person is presented with a page to create a password and agree to the privacy policy, clicks Register, and is presented with the Self-Management Portal login page.
- Person logs in to the Portal and provides contact information.
- If you left Allow Mobile enabled when you created the domain invite, the person clicks 'Send mobile invite' in the Self-Management Portal, if he or she chooses. See Mobile Device Registration Workflow below. If you disabled this feature, the 'Send mobile invite link' is not displayed.
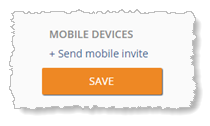
Note: The contact is created in Revolution when the person clicks Register to validate the email address entered. Until the person logs into the Portal to add his or her contact information, the person's email address displays on the Revolution > Contacts page as the display name.
- Person receives the group invite link. You can send it in an email, post it in a chat, whatever your preference.
- Person opens the Portal.
- Person creates a password, agrees to the privacy policy, clicks Register, and waits for the confirmation email.
- Person clicks Confirm Account in the confirmation email and clicks Register. This person should now show as a contact in Revolution.
- Person logs in to the Portal and provides contact information.
- If you left Allow Mobile enabled when you created the domain invite, the person clicks 'Send mobile invite' in the Self-Management Portal, if he or she chooses. See Mobile Device Registration Workflow below. If you disabled this feature, the 'Send mobile invite link' is not displayed.

- Contact receives email invitation.
- Contact clicks Register.
- Contact enters email address and creates a password, agrees to the privacy policy, clicks Register, and waits for the confirmation email.
- Contact clicks Confirm Account in confirmation email. Email is verified and the Portal login page is presented.
- Contact logs in and adds contact information.
- If you left Allow Mobile enabled when you created sent the invite, the email invitation includes Mobile invitation information. See Mobile Device Registration Workflow below.
The steps to register your mobile device are the same. The only difference is in the email template used to send the invitation.
People who have been invited to create a Self-Management Portal account can't receive a mobile invitation until they've registered for the Portal, therefore their contact record is created in Revolution. Therefore, they're first sent a Self-Management registration invite and then they're sent a separate mobile invite after they have a contact record.
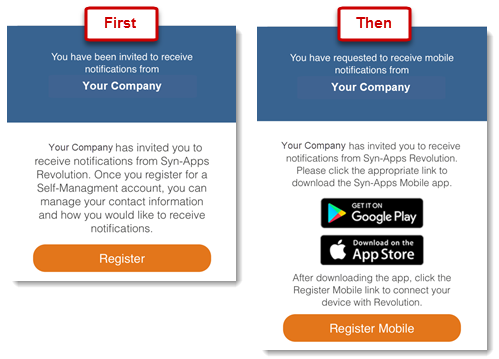
Existing contacts who have been invited to create a Self-Management Portal account and register their mobile devices receive an email invitation that contains both registrations.
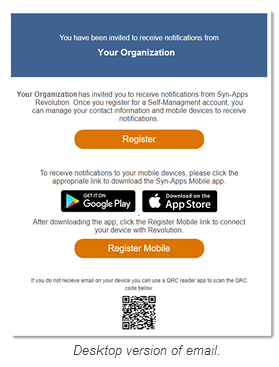
Contact downloads the appropriate Mobile app version.
- Google ChromeOS devices (Chromebook/Chromebox) that support Android apps can download and use the Mitel Revolution Mobile Application app.
- To download the Mobile app on a Google ChromeOS device, Chromebook/Chromebox Settings > Google Play Store must be enabled. (Not all Google ChromeOS devices support access to Google Play Store (or Android apps). If they don't, users can't download and use the Mobile app.)
- Google ChromeOS devices (Chromebook/Chromebox) counts towards your contact licenses, not your endpoint licenses.
- Using images with ChromeOS devices is not consistent. Some devices may require a camera be attached or installation of a photo app. These are Google issues, not Revolution.
- Google ChromeOS devices count towards your mobile license, not your endpoint license.
Once presented with the Authentication ID screen in the app, the contact goes back to the email invitation and clicks Register Mobile. Contact repeats the process to download the Mobile app on additional devices. The contact's mobile devices now appear in the contact record.
Note: Contacts who choose to register their device using the QRC code must have a QRC app available on their phone. There are several apps for iOS and Android devices available.
Contacts can log in to the Self-Management Portal anytime to management their mobile devices.
- Add contacts to notifications. See the Text and Images Notification example.
- Check the appropriate Contact Methods to use in the Select Endpoints & Contacts section when creating your notifications. These methods apply to all the contacts selected as endpoints. (In other words, you can't have some contacts receive email only and others receive SMS only.)
