Installation Steps
Important: You will need to reboot the server after installation. If the installer does not reboot the server automatically, select restart from the Windows start menu. You will also need to reboot IP speakers on the network that you want to register with Revolution after the installation.
Before You Begin
Have you completed all the tasks in the Before You Begin section of the Installing Revolution topic?
Installation
When you purchased Revolution, you received an email with:
- a link to download the Revolution installer
- your organization's Customer ID and Authorization ID
Contact Support to obtain your organization's license and a link to the offline installer. Alternatively, you can download the offline installer from:
https://www.syn-apps.com/welcome-to-mitel-revolution/
Copy these to your Windows server:
- offline installer
- installation ZIP file. The installation process will ask for the location of the ZIP file.
- your product license
- Customer ID and Authorization ID
The following procedure is for both standalone and redundancy environments. If you are licensed for the Redundancy feature, you install on your primary (publisher) server first.
-
Do one of the following:
- If you're already logged in as an administrator, double-click on the executable.
- If you're not logged in as an administrator, right-click on the executable and select Run as administrator.
The install wizard unpacks appropriate files and prompts for license agreements.
-
Do one of the following:
- Offline Installation – Click Browse and select the license file you copied to your server.
- Online Installation – There's nothing to enter because the license file is automatically downloaded as part of the installation.
-
License Check
Enter the Account ID and Authorization ID from the email you received from Intrado.
-
Redundant Subscriber – This window only displays if Revolution is licensed for the Redundancy feature.
Leave this unchecked for the primary server. Instructions for installing on a secondary (subscriber) server are in the Build your secondary server topic.
-
Version Picker
Select the Revolution version to install. Only versions newer than your current version are presented.
-
Website Settings
- Enter Revolution user interface admin login credentials. There are no password restrictions here.
- If you have more than one network card, those additional IP addresses are listed in the IP Address drop-down list. Select the appropriate IP address to use.
-
SQL Settings
- (Optional) You only need to change the SQL instance if you already have the appropriate SQL database installed on this server and want to use it instead of the default. (See Database Requirements.) If this is the case, select your SQL instance from the drop-down menu and enter your login credentials.
-
(Optional) Change the Write and Read Passwords. You can leave the default passwords.
- Passwords should be different from one another.
- Passwords must follow standard Microsoft password policy:
- be at least 8 characters in length
- contains at least 1 lowercase and 1 uppercase letter
- contains at least 1 number (0-9)
- contains at least 1 special character (! @ # $ % ^ *)
- You don't need to remember these passwords. They are used by the system.
Note: If you need to lock down your SQL server instance to only allow local access, follow the SQL Server Lockdown instructions.
- Click Install. The installer may display that it's skipping parts of the installation. This occurs when the installer detects that the proper .NET or SQL is already installed.
- Click Finish.
- Reboot the server when install completes. Windows Services default to using delayed start and will take a few minutes to come up.
- Reboot IP speakers on the network that you want to register to Revolution.
Installation is now complete.
You must send your offline installation system key to Support. Revolution will not be fully functional until Support receives the system key generated during the Revolution installation and updates your license with it.
- Log in to Revolution.
- Click Global Settings and expand Licensing.
- Copy the System Key and send it to Support, along with your Account ID. It's easiest if you just reply to the original email from Support that already has your Account ID and include the System Key. Support updates your license with the System Key and sends you the update so you can manually install it. (This all happens automatically during an online install.)
- Once you receive the updated license from Support, copy the new license over the existing one in
C:\Program Files (x86)\Syn-Apps\SA-AnnounceRevolution\license.xml. - Restart Revolution.
You should be good to go.
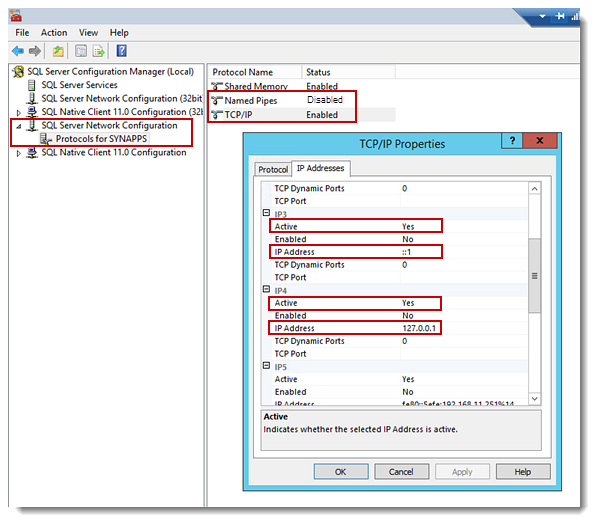
- Open SQL Server Configuration Manager after installing Revolution.
- Navigate to SQL Server Network Configuration > Protocols for SYNAPPS.
- Right-click Named Pipes and click Disable.
- Right-click TCP/IP and click Properties.
- In the Protocol tab, set Listen All to no and click Apply.
- In the IP Addresses tab, make these two local addresses have Active set to yes.
::1(ipv6)127.0.0.1(ipv4)- For all other IP addresses, set Active to no and click Apply.

If you receive an error that the specified file is read only, you will need to manually update the settings in the registry:
- Open regedit (Registry Editor).
-
Navigate to
HKEY_LOCAL_MACHINE\SOFTWARE\Microsoft\
Microsoft SQL Server\MSSQL19.SYNAPPS\MSSQLServer\
SuperSocketNetLib\Tcp - Each IP Address has a folder under the ‘Tcp’ folder. For each non-local IP Address, right-click Active registry key, and click Modify.
- Change Value data to 0 and click OK.
Important: Leave local IP addresses ::1 and 127.0.0.1 Active set to yes.
The installer automatically creates a self-signed Certificate of Authority, assigns it to the app, and enables TLS/SSL. If you want to use your own cert/CA, follow these steps.
Note: See "Redirect your Revolution web interface" for information on redirecting Revolution from http to https.
There are two basic steps:
- Create a certificate or certificate request for an existing cert.
- Bind the cert to the website.
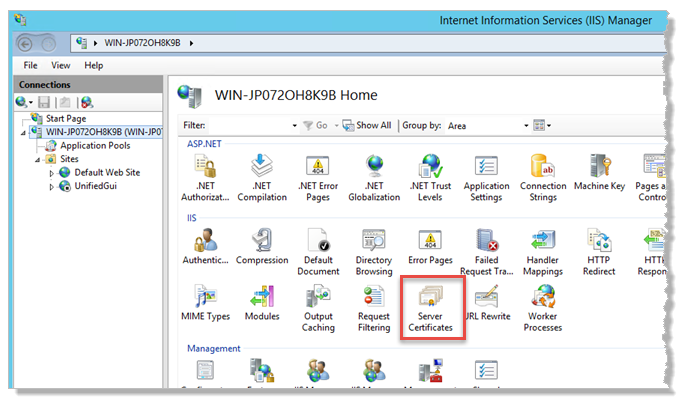
Open the IIS Manager on the IIS server hosting the Revolution application.
Create certificate request or certificate.
- Click the server name in the left-navigation tree.
- Double-click Server Certificates.

- Do one of the following:
- If you're using a third-party certificate or your network has its own CA:
- Click Create Certificate Request under Actions in the right-hand column.
- Complete the steps, referring to your Windows documentation for instructions. The information you enter depends on what's provided by your third-party cert.
- If you don't have a third-party certificate, you'll create a self-signed cert:
- Click Create Self-Signed Certificate.
- Enter a descriptive name. Our example uses Revolution app.
- Select Web Hosting from the Select a certificate store for the new certificate drop-down list.
-
Click OK.
Bind certificate to website.
- Click Sites > UnifiedGui.
- Click Bindings under Actions > Edit Site in the right-hand column.
- Click Add.
- Select https from the Type drop-down list.
- Use the default IP address and Port.
- Select the self-signed cert you just created from the SSL certificate drop-down list.
-
Click OK.
- Click Close.
When using a self-signed cert, you'll get a browser error stating there's a problem with the cert. This is normal behavior. Each browser provides its own path for continuing. For example, in Chrome, click "Advanced" and then click "Proceed".
- Reboot the Revolution server to complete the installation if you have not already done so.
- Double-click the desktop icon to open the Revolution web interface, log in with the credentials you created during install, and begin configuration.
- If your organization utilizes multiple network cards, set the IP address to use for Revolution in Global Settings > Network.
- If your organization is licensed for the Redundancy feature, complete configuration on the primary server before installing Revolution on the secondary server.
