Paging Relays
There are two common transmission methods used to send audio (stored or live broadcast) to registered devices – unicast and multicast. In a nutshell, unicast transmits multiple audio streams to the network, one for each configured endpoint. Multicast sends only one stream of audio to the network, which endpoints are configured to listen for. Revolution requires multicast for sending audio to endpoints. (Sending notifications with audio to contacts does not require multicast). If the network does not support multicast transmission, a Paging Relay can be used to bridge a multicast stream to a remote sub-network. Multicast relaying is one of the main functions of the Paging Relay device, although it can do much more, like relaying IP device sensor and contact closures and connecting to analog speaker systems.
Tip: When Paging Relays are configured on the network, Revolution automatically uses them for audio. There's nothing additional you need to configure for this. You do not need to enable multicast in the Paging Relay.
There are three basic steps:
Tip: If you already have Paging Relays, make sure you're running the latest firmware on your Paging Relay. Refer to your Paging Relay documentation > Update Paging Relay Device Firmware.
Minimum switch port settings for the Paging Relay are:
- 100 Mbps (no support for 1GB)
- Full duplex
- Flow control enabled
- Portfast enabled
Typically, the Paging Relay is configured to reside in the Voice VLan, gets its IP Address from a Dynamic Host Configuration Protocol (DHCP), and auto-registers to Revolution via the DHCP Option 72 WWW server value.
If DHCP option 72 is unavailable to you, or your network policies require you to use a static IP address, you need to configure your network to recognize the Paging Relay device and configure Paging Relay with a static IP address so it can register with Revolution. See Paging Relay Static IP Setup.
For detailed instructions on setting up and configuring the Paging Relay, see the Paging Relay Admin Guide.
Tip: A bit about Paging Relays. Each Paging Relay has a GPI, GPO (Relay), and Line Out. GPI is a notification trigger (activator); Relays and Line Outs are notification endpoints. You can change the name of GPIs (triggers). See Editing IP Device Details.
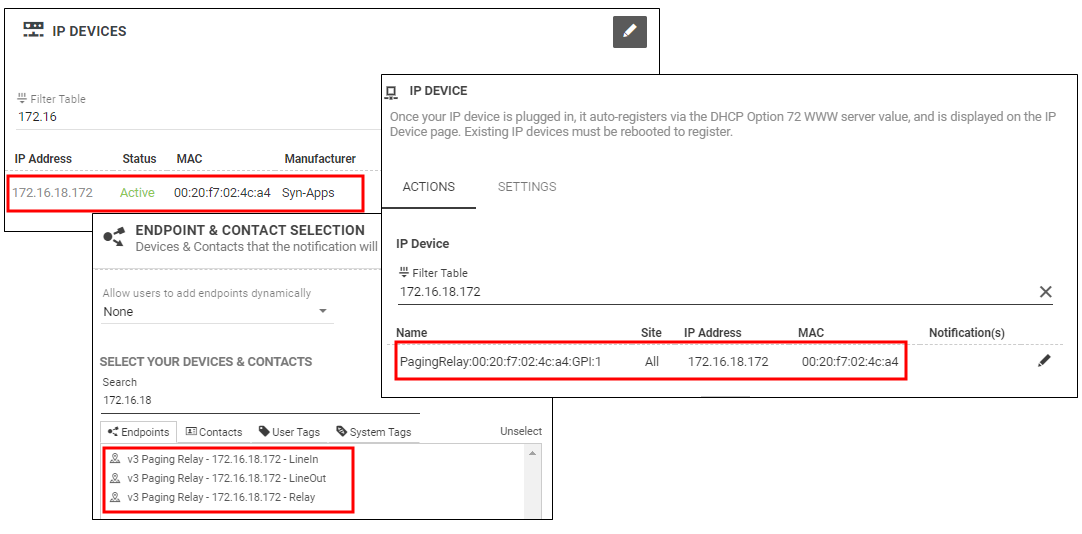
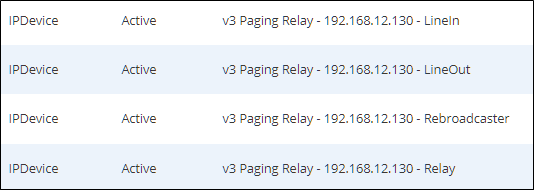
You will also see the Line In, Line Out, and Relay options for each Paging Relay listed on the Endpoints page.
Note: If you have a Paging Relay on a remote network, you'll also see an additional listing, Rebroadcaster, on the Endpoints page. This is informational only and cannot be assigned to a notification.
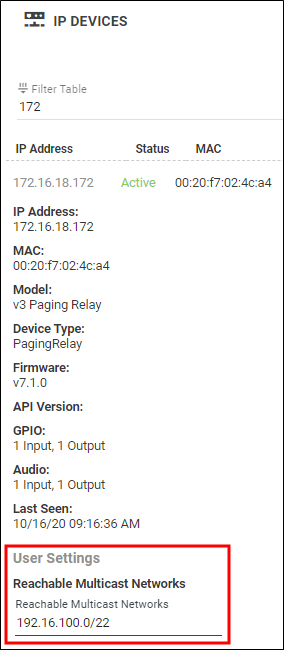
For each individual Paging Relay device, you can configure Reachable Multicast Networks and you can reboot the device from the IP Devices page under Settings.
Tip: The Paging Relay IP Address listed on the IP Device page is linked to the Paging Relay interface.
Most customer environments have their network configured to use standard CIDR /24 (Classless Inter-Domain Routing), which allows up to 254 devices on a subnet. These environments don't need to configure Reachable Multicast Networks. However, some customer environments allow more (or less) devices on a subnet or have multiple multicast networks they want Revolution to reach. In these scenarios, you must configure the Reachable Multicast Network field with the appropriate subnet(s).
Basic Network Setup Scenario
Paging Relay IP address 192.168.100.73 on 192.168.100.0/24 subnet (255.255.255.0 mask) with no multicast routing.
This is the standard network setup that allows 256 devices on a subnet. You do not need to configure Reachable Multicast Network. Leave this field blank.
Different Subnet Size Scenario
Paging Relay IP address 192.168.100.73 on 192.168.100.0/22 subnet (255.255.252.0 mask) with no multicast routing.
The network the Paging Relay is on is configured to allow up to 1024 devices on a subnet.
Configure the Reachable Multicast Network field with the subnet/CIDR.
Multiple Multicast Networks Scenario
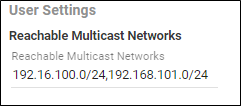
Paging Relay IP address 192.168.100.73 on 192.168.100.0/24 and you want the Paging Relay to also reach 192.168.101.0/24 subnet (255.255.255.0 mask)
You have more than one bridged network you want the Paging Relay to reach. Both subnets are configured with the same CIDR.
Configure the Reachable Multicast Network field with the subnet/CIDR for each subnet, comma separated, no spaces.
Multiple Multicast Networks and Different Subnet Size Scenario
Paging Relay IP address 192.168.100.73 on 192.168.100.0/24 subnet (255.255.255.0 mask) and you want the Paging Relay to also reach 192.168.101.0/22 subnet (255.255.252.0 mask)
You have more than one bridged network you want the Paging Relay to reach. One subnet is configured for 254 devices; the other is configured for 1042 devices.
Configure Reachable Multicast Networks field with the subnet/CIDR for each subnet, comma separated, no spaces. Make sure to indicate the proper CIDR.
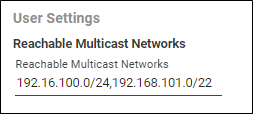
Note: If this is not configured properly, audio included with notifications will not play.
Contact support for help configuring multiple bridged multicast networks. See Contacting Support.
To set Reachable Multicast Networks:
- Go to Configuration > Other Devices > IP Device.
- Click Settings for the Paging Relay.
- Enter the IP addresses, comma separated, no spaces.
- Click Update.
- Repeat for any other registered Paging Relay device that you want to use multiple multicast networks or have a different subnet size.
These configurations are done from the Global Settings page.
Multicast IP Address
You can view the DHCP assigned multicast IP address in Global Settings > Multicast.
Note: Reachable Multicast Networks can also be configured for Revolution, not just for each Paging Relay.
Paging Relay Port
You only need to change the Paging Relay Port if you have manually changed the port in each Paging Relay interface.
Maximum Concurrent Notifications
The Global Settings > Maximum Concurrent Notifications setting limit is set to eight by default. This is the maximum number of concurrent notifications that the Paging Relay can receive from Revolution. If more than eight concurrent notifications are triggered by a SIP line, the sender receives a "busy, please try again" audio message; otherwise, a yellow "busy, please try again" message is displayed at the bottom of the interface.
You can reduce the number of concurrent notifications, but this is not typical.
- To send a notification using an IP device (by pressing a help button, for example) connected to a Paging Relay device, assign the Paging Relay:GPI to the notification as a trigger. In the Notification > Select Triggers section, select IP Devices from the Activator drop-down list and then select the Paging Relay:GPI from the Trigger drop-down list.
- To receive notifications to analog speakers connected to your Paging Relay, assign the Paging Relay - Line Out as an endpoint. You can either assign Paging Relay endpoints individually or include them in a user tag and then assign the tag to the notification as the endpoint.
Assign individually: In the Notification > Endpoint & Contact Selection section, click System Tags. Expand Category > PagingRelay and select each Paging Relay - LineOut you want to receive the notification.
Assign using a tag: First create the tag. See Creating and Using Tags. Then, assign the tag to the Notification > Endpoint & Contact Selection section. Click User Tags and select the tag you created that contains the Paging Relay - Line Out endpoints. - To cause a notification to perform a relay action (lock doors and windows, for example), assign the Paging Relay - Relay as an endpoint. You can either assign Paging Relay endpoints individually or include them in a user tag and then assign the tag to the notification as the endpoint.
Assign individually: In the Notification > Endpoint & Contact Selection section, click System Tags. Expand Category > PagingRelay and select each Paging Relay - Relay you want to receive the notification.
Assign using a tag: First create the tag. See Creating and Using Tags. Then, assign the tag to the Notification > Endpoint & Contact Selection section. Click User Tags and select the tag you created that contains the Paging Relay - Relay endpoints.
The Paging Relay Admin Guide provides use case scenarios and configuration details.
Configure Revolution and your Paging Relays to allow for one-way paging between your Cisco IP phones when the connection to Revolution is disrupted.
Revolution, by default, periodically generates configuration files (Devices files) for each Paging Relay containing a list of Cisco IP phone IP addresses. Revolution writes the information of any Cisco IP phones in one of two ways:
- Those on the same subnet as the Paging Relay.
- Those included in a User Tag associated, through Revolution, with the Paging Relay. (Used when the IP phones are not on the same subnet as the Paging Relay.)
Revolution writes the file every 60 minutes, by default. You can change this frequency with the Paging Relay Generate XML Interval setting in Global Settings > Paging Relay. Revolution writes the file to <ip_address>:8000/config/ with a file name of the form <mac_address>_Devices.xml.
With Autoprovisioning set up, you will be able to dial the Paging Relay to send a one-way page to all the Cisco IP phones listed in the Device file associated with that Paging Relay.
If your Cisco IP phones and Paging Relays are on the same subnet, you should follow the procedure:
If your Cisco IP phones and Paging Relays are on different subnets, you will need to perform an additional procedure:
Set up your paging relays to enable auto-provisioning and the use of the Devices files.
- In Revolution, go to Configuration > Devices > IP Device
- Select the IP Address of a Paging Relay to configure.
- Log in to the Paging Relay.
- Autoprovisioning is enabled by default. You can verify this in the Autoprov section.
- Define where the Paging Relay should find the Devices file:
- Select IP Phones.
- Enable Fetch Config from Other URL.
For Phone Config URL, enter <ip_address>:8000/config/
where ip_address is the address of the Paging Relay.
- Select Reboot to save and reboot the Paging Relay configuration.
- Repeat these steps for the other Paging Relays.
Revolution uses User Tags to populate the Devices files with information about the Cisco IP phones. You cannot use System Tags for this behavior.
-
Follow the instructions at Creating and Using Tags to create a user tag containing all of your Cisco IP phones.
This tag can contain any other endpoints you like, but it must contain all the Cisco IP phones you want to be available if auto-provisioning comes into play. Revolution only writes information about Cisco IP phones to the Devices file.
- Assign the user tag(s) to the Paging Relays
- Go to Configuration > Other Devices > IP Device.
- Select the Settings (gear) icon for the Paging Relay to configure.
- For User Tags for Auto-provisioning (Cisco), select the user tag(s) you created.
- Select Save.
- Repeat these steps for all Paging Relays you want to configure.
Note: If you delete the User Tag, Revolution will also delete the reference from any Paging Relay it is associated with.
Use the Windows IIS Manager to instruct Revolution to serve the Devices files to port 80 instead of the default (port 8000).
- Log in to your Revolution server.
- Open IIS Manager
- From Connections, expand to <Servername> > Sites and right-click UnifiedGui then select Add Virtual Directory.
- In the Add Virtual Directory dialog box
- For Alias, enter config.
- For Physical path, navigate to C:/inetpub/wwwroot and select OK.
- Select OK.
- Revolution periodically generates a
<MAC>_Devices.xmlfile for each Paging Relay, where<MAC>is the machine ID for the Paging Relay. The XML file contains a list of Cisco IP phone IP addresses. - You then have the ability to dial the Paging Relay to send a one-way page to IP phones listed in the
Devices.xmlfile. For example, should Revolution become unreachable, you can use the Paging Relay to reach IP phones listed in theDevices.xmlfile(s).
Are your Cisco IP phones and Paging Relay on the same subnet?
If yes, you don't need to configure anything in Revolution. Revolution automatically generates the Devices.xml file and includes all the phones on the same subnet as the Paging Relay.
Are your Cisco IP phones and Paging Relay on different subnets?
Then you need to assign user tags to Paging Relays, so Revolution knows which phones to include in the Devices.xml file.
User tags can be either static or dynamic. Tags can contain any combination of endpoints, they don't just have to contain Cisco IP phones, but only Cisco IP phones are written to the Devices.xml file.
Have you already created user tags? if not, go to Configuration > User Tag to do that first.
Next, assign user tags to the Paging Relays registered with Revolution.
- Go to Configuration > Other Devices > IP Devices.
- Select Filter and type in paging relay so you only seeing these devices.
- Select Settings for a Paging Relay.
- Under User Settings > User Tags for Auto-provisioning (Cisco), select a User Tag from the drop-down list. Add as many user tags as you need. It doesn't matter if the user tag also contains endpoints that aren't Cisco IP phones; they won't get written to the
Devices.xmlfile. - Click Save.
If you need to assign user tags (phones and Paging Relay are on different subnets):
- You can only assign user tags; you can't assign system tags. (See the User Tags topic for an explanation of the difference between system and user tags.)
- Make sure all the Cisco IP phones you want included in the generated
<MAC>_Devices.xmllist are in the user tags you assign to the Paging Relays. - Removing a tag from a Paging Relay doesn't delete the tag from the system. However, deleting a tag from the User Tags page does delete it from the system and automatically removes it from any Paging Relays it's assigned to.
Revolution regenerates the <MAC>_Devices.xml file for each Paging Relay every 60 minutes. You can change the frequency in Global Settings > Paging Relay > Paging Relay Generate XML Interval. If there's a lot going on in your environment and phones are frequently added/moved/changed/removed, or network outages are common, you may want the Devices.xml file updated more frequently.
Should the Paging Relay become unregistered, you can reboot it from the IP Devices page.
- Go to Configuration > Other Devices > IP Device
- Find your Paging Relay
- Select Settings
 to view details about the device
 - Select Reboot
You can set Revolution to automatically reboot Paging Relays at startup by enabling Paging Relay Reboot on Startup in Global Settings > Paging Relay.
For some older devices, you may need to reboot them from the device interface. Refer to the device documentation for instructions.
When a device is no longer used,
- Unplug or disconnect the Paging Relay device.
- Go to the Configuration > Other Devices > IP Device page in Revolution.
- Click
 delete for the device.
All Paging Relay - Line Out and Relay endpoints are automatically removed from the Endpoints page and from notifications. All Paging Relay IP Device triggers are automatically removed from notifications.
