Monitor General CAP Feeds
Note: Only All Sites Admins have full access to configuration.
Important: Requires an Internet connection to the CAP feed you want to monitor to receive alerts.
Create a CAP trigger for each CAP feed and geographic area you want to monitor. Once the trigger is created, then you can assign it to notifications.
The CAP module provides you with the following module-wide setting:
-
Allow self-signed certificates — The setting, enabled by default, allows for your CAP triggers and CAP services to work with self-signed certificates.
You may want to disable this setting if you want a tighter security behavior.
When enabled, all CAP services should work, as expected. When disabled, you should expect to see the following:
-
For CAP Triggers, they should fail to poll from any CAP feeds with invalid certificates.
-
For CAP Services, they should fail to push to a listening endpoint that has an invalid certificate. See Creating a CAP Service Feed.
These failures will appear when reviewing notifications that are sent with errors. You should see the status: Error - Remote certificate is invalid.
-
- Go to Configuration > Integration > CAP.
- Select New > New CAP Trigger.
-
For Name, enter a descriptive name that helps you identify the area you are monitoring and that this is not an IPAWS or NWS service.
For example, Portland Area Air Quality Alerts.
-
For Available in All Sites:
- Enable to ensure all your site locations have access.
- Disable and select a Site to limit which site has access.
-
For URL, enter the address of the CAP feed to monitor.
For example, EnviroFlash CAP feed address is http://feeds.enviroflash.info/cap/aggregate.xml
Note: If your URL monitors an RSS feed, it must contain at least one item tag with a valid link tag. If not, The CAP module in the System Status page will show as a warning and will include a message similar to the following in the Action Status section "<TriggerName>: Error Polling service(s) failed. If you receive this warning, report this issue with the link tag to the issuer of the RSS feed.
-
For Type, you will typically leave it set to Poll.
Use Push when monitoring private systems. Most CAP emergency alerting systems are public.
-
Select the Index Type as defined by the CAP feed you are monitoring.
For our example, EnviroFlash CAP alerts are XML and ATOM. Therefore, you could select ATOM.
-
Leave Poll Interval Seconds, Resend Interval Seconds, and Dispatch Delay Seconds at the default settings.
Tip: See CAP Timing Controls for information about these settings
- Select Use Basic Authentication in the following scenarios:
- If you set Type to POLL and the CAP feed you are monitoring requires a username and password to receive the feed.
- If you set Type to PUSH and you require a username and password from anyone or any device attempting to send you an alert.
In both cases, the feed uses HTTP Basic authentication implementation.
- Select Next.
- Leave the Filters at the default values, except for Geocodes.
-
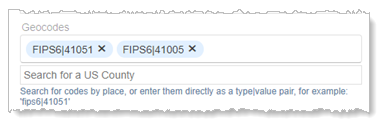
Begin typing the name of the county for the area you want to monitor and select it from the search results list. You can manually enter any NAME|Value pair, as long as there is one character on either side of the pipe character ( | ). For example, Portland, Oregon is in Multnomah County.

-
You can add multiple geocodes. Search for another county and select it.

Revolution stores on its server a database file (<install_dir>/Data/FIPS.db) containing the FIPS codes and checks the cloud for an updated file five minutes after start-up and then daily after that, downloading as necessary.
- Click Next.
- Skip the geodetic map. Click Next.
- Leave the Message template as is. Click Save.
Tip: See the Understanding CAP Filters topic for information on how to narrow the alerts that trigger notifications.
- See Creating Geodetic Areas.if you prefer to draw the area to be monitored on a geodetic map instead of, or in addition to, using FIPS codes. If the incoming IPAWS alert doesn't contain geocodes or geodetic mapping data, and sometimes they don't, those alerts trigger your notifications even if you have geocodes defined.
- See Message Template below for making changes to the message template.
- Go to Manage Notifications.
- Do one of the following:
- Create a separate notification for each CAP service. This allows you to send the emergency alerts to only the endpoints in the affected area. See the CAP Alert Notification for an example.
- Create one notification triggered by multiple CAP services. If you're monitoring more than one geographic area, this allows you to send emergency alerts to endpoints both inside and outside of the affected area. See the National Weather Service Alerts topic for an example.
For details on how to set up notifications, see the Manage Notifications topic.
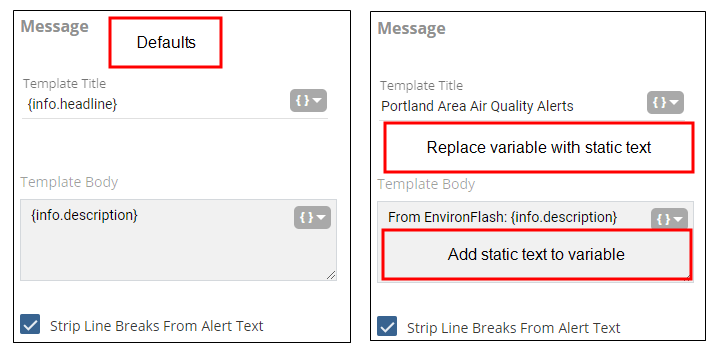
You can
- use just variables to pull in content from the CAP alert
- add static text to the message template in addition to the variables
- replace the existing variables with static text
Check 'Strip Line Breaks From Alert Text' to fit more content on your IP phone screens, if necessary.

To add the variables back, manually type them back in:
- Title = {info.headline}
- Body = {info.description}
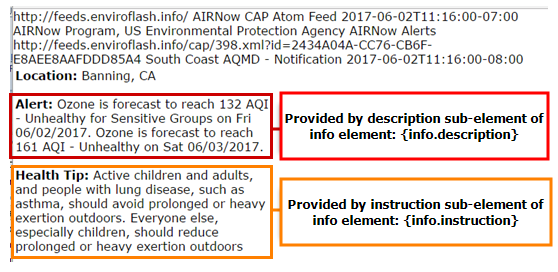
You can also include content from other XML elements included in the CAP alert. Some alerts contain additional information, beyond the description, that may be useful to include in the notification. For example, air quality alerts from our example, EnviroFlash, contain instructions in addition to the air quality description. You may want to pass this information on to recipients.

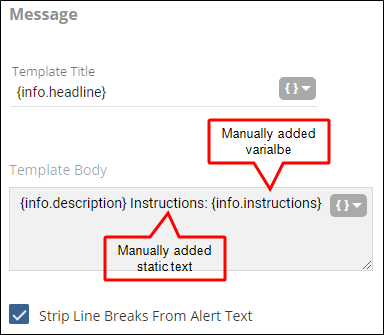
To include the content listed as "Health Tip", manually add {info.instruction} to the Template Body after the {info.description} variable. Otherwise, only the "Alert" content is passed on to your recipients.

To add variables to the message template, you need a good understanding of the OASIS v1.2 CAP protocol. One thing to note is that variable names must match and cannot contain spaces or capitalization. In the image above, you see that Instruction is entered as instruction (lowercase). Another example is that Last Seen should be entered as lastseen (lowercase and no space).
Delete the CAP trigger.
Tip: For multi-site organizations, Site Admins can only delete CAP Services assigned to their site.
All notifications that the trigger is assigned to are automatically updated to remove it.
Note: If you simply remove the CAP trigger as a trigger from notifications, the trigger will still report on the Sent Notifications page, with a Status of "Not Found"
