Creating a CAP Service Feed
Note: Only All Sites Admins have full access to configuration.
The CAP (Common Alert Protocol) service generates a valid CAP XML feed that allows CAP-compliant devices to broadcast notifications.
Our CAP service is based on the OASIS CAP v1.2 and OASIS CAP v1.2 IPAWS protocols. The XML feed generated by the CAP Notifier contains all the required elements and sub-elements. There are also optional sub-elements that you can enter. Consult your vendor documentation for which elements are used and expected values for those elements.
After a CAP service is created, its feed then appears as an endpoint in the Select Endpoint & Contact Selection section when editing notifications. A system tag is also generated for CAP ATOM feeds and CAP RSS feeds. The CAP feed is automatically added to the appropriate system tag.
The CAP module provides you with the following module-wide setting:
-
Custom Hostname — Enter a host name for your CAP feeds such that all URLs in Poll-type CAP services will use that host name when linking to each alert in the main feed and in links to resources (images or sound files) in the alert view.
When left blank, default behavior, the CAP feeds will use the local IP/host name selected in Global Settings > Network; Network Interface Select.
Defining a publicly-accessible host name ensures that your CAP feeds are available in the public domain.
The basic steps are:
I'm going to create a simple CAP service that allows notifications to display on a CAP-compliant device, such as an HD TV.
There are three main areas to configuring:
In this example, each floor of my office building has an HD TV in break room and reception areas. I'm going to create a Fire Drill notification, that is triggered by a scheduled event, and sent to my CAP service to generate a feed, which is monitored by my digital sign vendor, so the notification displays on all of the TVs in my building.
First, I'll create the CAP service.
- Go to Configuration > Integrations > CAP.
- Select New > New CAP Service.
- Enter a descriptive Name for this CAP service that will help distinguish it from other CAP services you may create. (Our example uses Digital Sign.)
- Do one of the following:
-
If this CAP service is a Poll type, leave Type set to Poll and complete the Feed URL Path.
The URL field is partially created for you. You just need to append a unique name to it. The unique name can be alphanumeric and special characters, but no spaces. You will configure the device vendor application with this URL so the application can receive the CAP feed, parse it, and display the notification. (Our example is using Monroe which uses Poll, so I appended digitalSign.)
- If this CAP service is a Push type, populate the Feed URL Path field with either the IP address of the device the CAP Service XML will be pushed to, or the URL the device receiving the CAP XML will listen to (for example: https://abcserver.com/alerts/cap?id=12345). Change Type to Push. (Visix uses Push.)
- Select the Index Type needed by the device vendor. (Monroe and Visix accept either.)
-
Select Use Authentication in the following scenarios:
- If you set Type to POLL and you require a username and password from anyone, or any device, requesting the feed.
- If you set Type to PUSH and whomever or whatever you are pushing the feed to requires a username and password. For devices, this would be supplied to you by your digital device vendor. (Monroe and Visix signs do not require authentication.)
In both cases, the feed uses HTTP Basic authentication implementation.
- Select Next.
Tip: If Revolution is set up for SSL/TSL, the feed you create automatically uses https://<FQDN>/<path you define> for the media.
-
Leave Event Codes and Codes as is.
You can add values if your CAP-compliant device vendor requires it.
-
Leave Message Type at Alert.
You can set a different value if your device vendor requires it.
-
For Categories, select one or more values from the drop-down menu.
Not all CAP services use this field, but it is required in order to generate CAP-compliant XML. Monroe does not use this field. Visix uses this field to indicate which of their templates to use.
-
Enter a name for the Event type. This is whatever you define. There is only one event type defined per CAP service, and it is a required field to be CAP compliant.
Not all CAP services use this field, but it is required in order to generate CAP-compliant XML. Monroe and Visix do not use this field.
-
For Response Types:
- Leave the field blank, this means any response type can be included in the feed.
-
Select None, this means no response types are included in the feed. Some devices receiving the CAP feed require this field be set to None, check your vendor documentation.
Rise Digital Signs required this field be set to None.
- Select any number of response types, reviewing your vendor documentation for support.
-
Leave Urgency, Severity, and Certainty as is.
Each device vendor determines if, and how, these fields are utilized. Consult your vendor documentation to determine if you should alter these fields.
-
Leave Headline, Alert Description, Sender, and Sender Name as is.
The variables, enclosed in braces ( {} ), will be replaced by information associated message title and message body of the notification and the Caller ID/User Name of the sender.
See Here's How This Works below for how these fields are used.
-
Leave Minutes Until Expiration set to 30 (minutes) to define the length of time before the notification expires. Alter this value as necessary.
For Push types, the vendor device uses this value to expire the alert. For Poll types, the CAP service uses this value to expire the alert, specifically removing the alert from its hosted feed upon expiration.
Monroe and Visix use this data to expire the notification.
-
(Optional) Enter Instructions.
Consult the documentation for your CAP-compliant device to determine if it uses this CAP sub-element.
-
Leave Parameters as is.
The prepopulated name|value pair is required for IPAWS compliance. You can add additional parameter name|value pairs. Consult your device vendor documentation to determine how this field is used and acceptable values. (Monroe and Visix do not use this field.)
- Select Next.
| CAP Category | Visix Template |
|---|---|
| Geo | Earthquake Alert |
| Met | Severe Weather Alert |
| Safety | Safety Alert |
| Security | Act of Violence Alert |
| Rescue | Rescue Alert |
| Fire | Fire Alert |
| Health | Pandemic Alert |
| Env | Pollution Alert |
| Transport | Transportation Alert |
| Infra | Cyber Threat Alert |
| CBRNE | Mass Destruction Alert |
| Other | Emergency Alert |
There are four ways to define the geographic area for the alert:
- Enter FIPS geocodes.
- Draw an area on the geodetic map.
- Use both geocodes and the geodetic map.
- Leave both geocodes and the geodetic map blank.
Note: Some CAP-compliant devices require at least one geocode in order to parse the generate CAP XML. (Monroe requires a geocode, Visix does not.) See Geocodes below for more information.
- A CAP-compliant service does not require geocodes or geodetic mapping. When these fields are left blank, the assumed geographic area is NATIONWIDE.
- An IPAWS-compliant service states at least one geocode SHOULD be defined. IPAWS uses SAME|000000 to define NATIONWIDE, which is prepopulated as the default. You can remove this name|value pair and enter a different one. You can have multiple name|value pairs. You can remove the default and leave the field blank; however, this would make the feed CAP-compliant but not IPAWS-compliant.
- For any CAP-compliant devices that REQUIRE at least one geocode be present in order to parse the generated CAP XML feed, you can leave the default value, or remove it and replace it with a different name|value pair.
This example uses FIPS codes.
-
For Area Description enter a brief description of the geographic area. Our example is for Multnomah County Oregon.
Note: If you leave both Geocodes and the Geodetic Map blank, then enter Nationwide as the area description.
-
For Geocodes, begin typing the name of the County for the area you want to monitor and select it from the search results list. Alternatively, you can enter the FIPS code directly, if known. For example, Portland, Oregon is in Multnomah County.
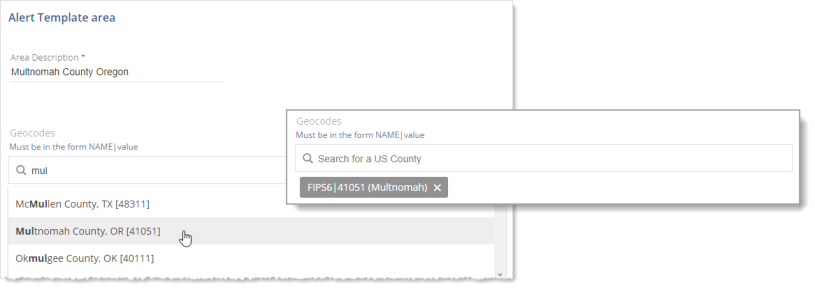
You can manually enter any NAME|Value pair, as long as there is one character on either side of the pipe character ( | ).
You can add multiple Geocodes. Search for another county and select it.

- Select Next.
- In the Map, use the hand cursor and zoom icons to move the map to the area you want to monitor.
-
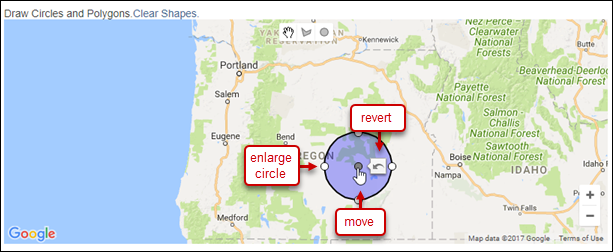
Create a circular area:
- Click the circle icon and draw a circle on the map.
- Click the hand icon to stop drawing circles.
- Move the circle by dragging the circle from the center dot.
- Change the size of the circle by dragging one of the outer dots.
- Remove a circle by double-clicking the center dot.
- Undo a change by selecting the undo icon
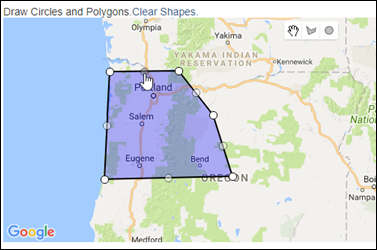
- Create polygonal area:
- Click the polygon icon.
- Click a point on the map to begin the polygon, continue clicking to make your shape, the close the polygon by clicking on the initial dot.
- Click the hand icon to stop drawing polygons.
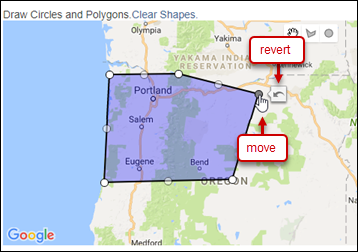
- Resize the polygon by dragging any of the corner dots.
- Add more sides to the polygon by dragging the median dots
- Remove a polygon by double-clicking any of the corner dots.
- Undo a change by selecting the undo icon
Tip: Click the Clear Shapes link to remove all shapes. Once a service is saved, individual shapes cannot be deleted, but you can delete all shapes.
Once you have created the CAP feed, you will:
- Create a notification for it
- Assign a trigger for it
- Assign the CAP feed as the endpoint so your CAP-compliant devices can broadcast the notification.
Tip: You can assign additional endpoints as well.
In our example, we have scheduled fire drills.
- I'll schedule an event that will trigger the fire drill notification.
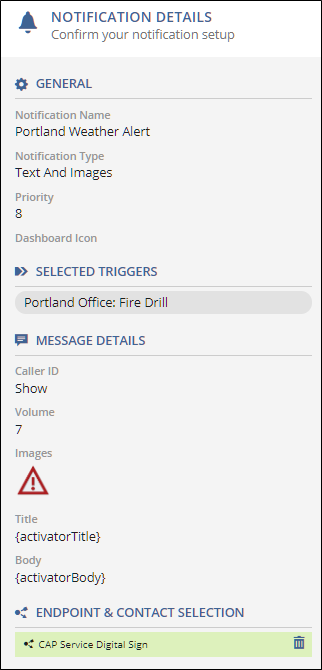
- Then I'll create my fire drill notification, assign the scheduled event as the trigger, and the CAP feed as the endpoint.
- Go to Scheduler > Schedule.
-
Click New Event, enter your values, and click Save.
For details on how to schedule events, see the Scheduler topic.
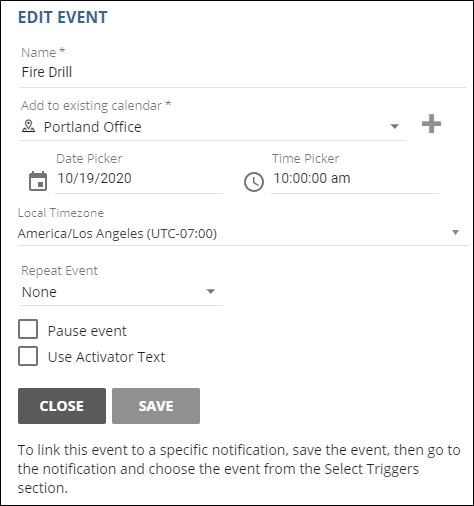
For this example, because it's a scheduled event, you'll likely use a Text and Images or Stored Audio Notification Type. However, you can also use One-Way, Text to Speech, and Recorded. And you don't have to use a scheduled event as the trigger; you can use any trigger.
- Go to Notifications > Manage.
- Select New Notification.
- For General Settings, enter your desired values. For this example, we are using Text and Images for the Notification Type.
- For Select Triggers, select Scheduler as the Activator, select the calendar and event that will trigger the notification (created in the previous step).
- For Message Details, enter any values you require.
- For Endpoint & Contact Selection, look for the CAP feed you created and click on it to select it.
- Save the notification.
For details on how to set up notifications, see the Manage Notifications topic.
Intrado supports the following CAP-compliant devices:
Our CAP module example above uses Monroe One-Net SE digital alert system software.
Here's how we configured the software for our test case. Consult your vendor documentation on how to configure your device.
- Log into One-Net SE.
- Navigate to Setup > Net Alerts and verify CAP decode is enabled.
- Click ADD CAP Client Interface.
- Replace the default HTTP Get Client name with the name of the Revolution CAP feed. (This example uses Syn-Apps Digital Sign.)
- Leave CAP Poll Protocol at WWW HTTP Get (Web URL) and enter the URL path you created in Revolution CAP module.
- Change the Poll Interval in seconds to 10.
- Select CAP alerts with any FIPS codes will be converted to EAS and CAP alerts with any EAS code will be converted to EAS.
- Keep all the other default values.
- Select Accept Changes.
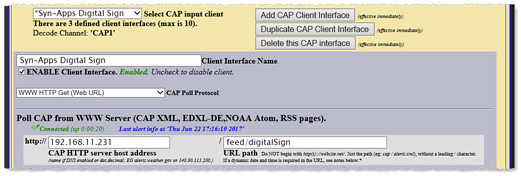
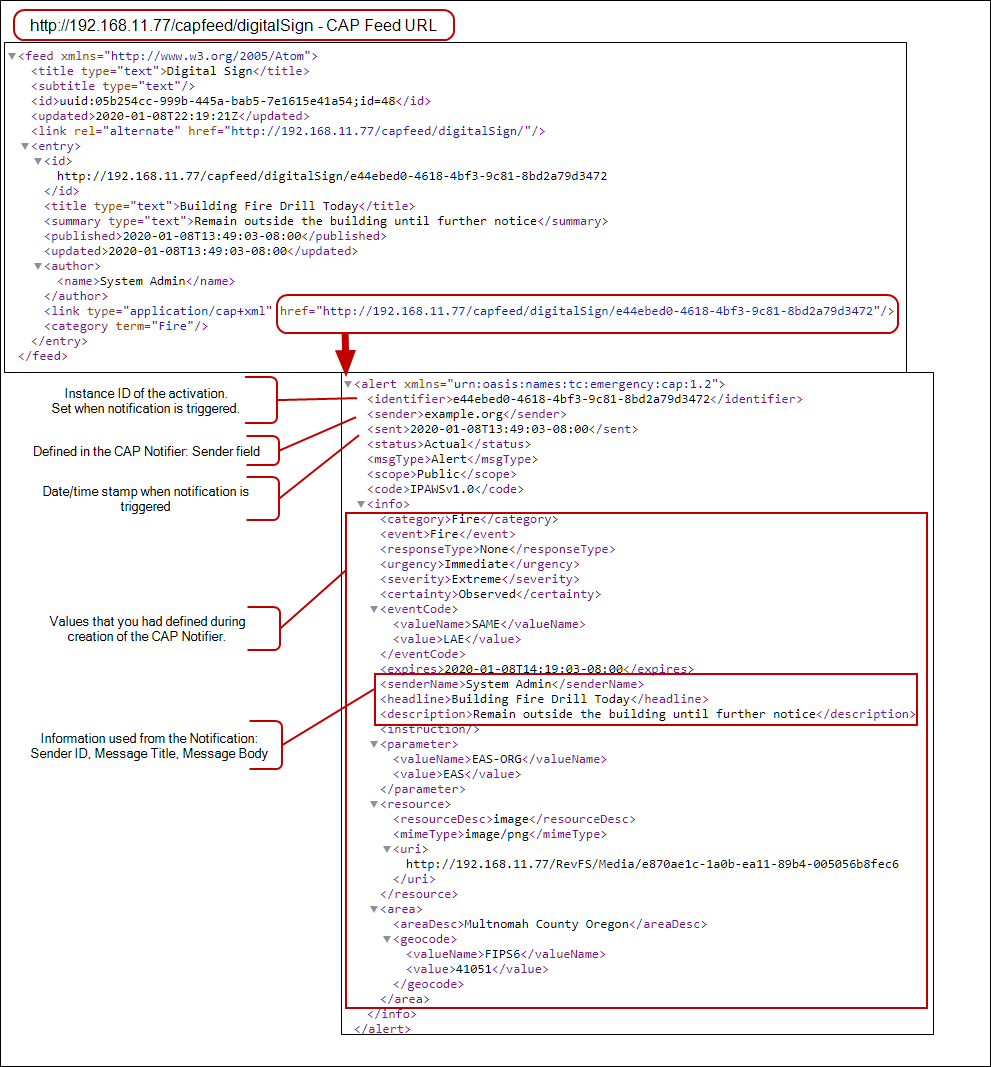
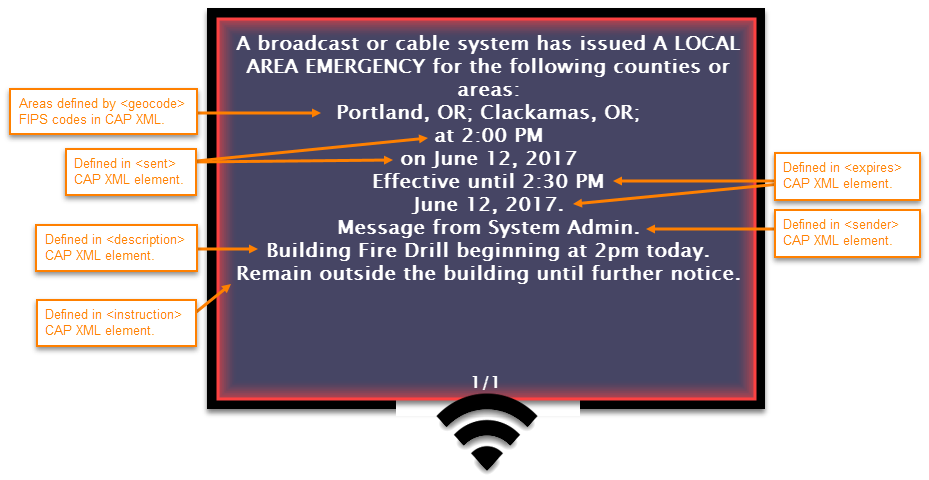
On Jan 7th at 10:00:00 am, the Scheduler triggers the Fire Drill notification. The notification is used to create a CAP feed alert. My digital sign vendor is configured to poll the CAP feed URL I created – http://192.168.11.77/capfeed/digitalSign – which then parses the CAP XML to display the notification on my HD TVs.
To view the generated CAP XML:
- Enter the CAP feed URL in a browser. This opens the index file.
- Copy the CAP feed alert link into the browser to view the alert XML.
Tip: If you need assistance creating a more complex CAP service, see Contacting Support.
Visix only supports pushing XML to the endpoint. This creates a 1-to-1 relationship because the CAP URL must be the IP address of the digital sign. So, if you have three digital signs, you'll need to create three CAP services, one for each sign. Follow the basic CAP service instructions above. Data used by Visix is noted.
Consult your Visix documentation for instructions on configuration needed in the AxisTV One software.
Simply remove the CAP feed as an endpoint in all notifications it is assigned to.
- Edit the notification.
- For Endpoint & Contact Selection, select Unselect to remove the CAP Service endpoint.
- Click Save.
To permanently remove the CAP service, delete it from the Configuration > Integrations > CAP page.
Note: Deleting a CAP service may leave a notification with no endpoints assigned if the CAP service was the only endpoint. You can view tags and endpoints assigned to notifications on the Manage Notifications page by clicking Show in the Tags column.
