SIP Activator
Use the SIP Activator to create SIP line numbers specifically designated for triggering notifications.
For example, you can assign SIP line x1234 to trigger your "Staff Meeting Reminder" notification. Then, just before a staff meeting, you simply dial x1234 on your phone (or any phone) and the notification is sent to all its assigned endpoints.
Important: You must set up the SIP Activator in order to use (one-way) live broadcast or paging notifications and (two-way) intercom notifications. These notifications are triggered by dialing a line number on a phone.
Access:
- Go to Configuration > Phone Systems > SIP.
User Permissions:
- All Sites Admins have full access to SIP Activator configuration
- Individual Site Admins can add, edit, or delete SIP Lines for their site, and view those assigned to All Sites. They can also configure SIP Trunks used for VoIP PBX systems. They do not have access to the SIP Activator Settings tab.
Page Overview:
- Actions tab – Presents a listing of SIP lines and SIP registrations you create.
- SIP Line – Within this section, you can select the Name value of any row to edit that SIP line. You can also double-click the Notification name to edit that notification.
- SIP Registration – Within this section, you can select the Name value of any row to edit the SIP registration.
- Settings tab – Customize how OneAlert manages your SIP environment. See Customizing SIP Settings.
- New button – Choose between Creating a New SIP Line or Creating a Generic SIP Registration.
SIP Activator Flow
- Create SIP Access.
- SIP Trunk setup for Internal PBX Systems – Avaya, Cisco, and Mitel. See SIP trunk setup for internal PBX systems
- SIP Registration for VoIP PBX Systems – 3CX, BroadSoft BroadWorks, CallSprout, and GoTo Connect. See Other VoIP PBX System Setup for the full setup flow.
- Generic SIP Registration – Other systems that do not allow direct registrations with OneAlert. See Creating a Generic SIP Registration
- Create SIP Lines in OneAlert – See Creating a New SIP Line
- Configure OneAlert SIP Activator Settings – See Customizing SIP Settings
- Add SIP Lines as Notification Triggers – Using a SIP Line as a Notification Trigger
This section provides instructions for setting up your SIP environment or points you to other parts of the documentation.
You should have already set up SIP trunks when configuring your phone system to communicate with OneAlert. If you have not already done this, you should revisit the appropriate sections:
- Cisco – Cisco SIP Trunk Setup
- Mitel – Mitel MiVoice Connect SIP Trunk Setup or Mitel MiVoice Business SIP Trunk Setup
- Avaya – Avaya IP Office SIP Trunk Setup
- Microsoft Teams PBX– Basic SIP trunk and PBX configuration
The same SIP line number can be used to trigger multiple notifications. If your environment uses multiple SIP trunks and you define the same range of DNs across those SIP trunks, all notifications assigned the same SIP line number are triggered.
For example, assume you have two SIP trunks, one for each of your two business locations (Portland and Beaverton). You have designated line 100 as your paging line number for both SIP trunks. You then create a one-way notification for the Portland location with only Portland speakers assigned as endpoints and assign SIP line number 100 as the trigger. You also create a one-way notification for the Beaverton location with only Beaverton speakers assigned as endpoints, and then assign SIP line number 100 as the trigger. Any time an end user dials line number 100, both notifications are triggered because both notifications have the same SIP line number assigned as a trigger.
If this is not the desired result, make sure each SIP trunk has a unique DN range set.
Add a SIP registration. See the SIP Registration topic for instructions.
SIP registration is not required for Avaya, Cisco, MiVoice Connect, nor for Microsoft Teams PBX.
If your environment does not allow for a direct registration with OneAlert, you will need a generic SIP registration for each simultaneous call you want to make. To determine how many SIP registrations to add, determine how many simultaneous calls you want users to be able to make at any given time.
For example, my organization does not have more than 10 active calls at once, which indicates I should create 10 generic SIP registrations.
Tip: You'll need information from your PBX vendor to configure settings in OneAlert.
- Select New > New SIP Registration
- For Name, enter a name for the Registration to make it easily recognizable.
- For Registrar URI, enter a string that follows any of the following formats, where URI is provided by your PBX vendor.
sip:<URI> – The most common form, which assumes default port (5060) and transport (UDP) configuration.
For example: sip:registrar.vendor.net
sip:<URI>:<port> – Use this form when you need to specify a port different from the default value of 5060.
For example: sip:registrar.vendor.net:5000
sip:<URI>;transport=TCP – Use this form when you need to use TCP as the transport type, rather than UDP.
For example: sip:registrar.vendor.net;transport=TCP
Note: You cannot combine setting an alternate port at the same time as setting an alternate transport type.
-
For Address of Record, enter the address of record as provided by your PBX system. You can also enter alias, if you preferred.
For example: 4321@registrar.vendor.net, where 4321 is an alias of 2404984321.
- For Register Interval, enter a value based on the guidelines of your PBX system.
- For Username and Password, enter the login information for your PBX system. You can enter an alias if preferred. See SIP Credentials Hierarchy.
-
For Realm, enter a comma-separated list of values provided by your PBX system. This is typically your Registrar URI, without the addition of "sip:".
For example: registrar.vendor.net
- Select Save
For your SIP environment you can set username and password information in several places. The hierarchy is as follows:
- You set credentials for a SIP endpoint – When OneAlert is asked for authentication, it sends these credentials.
- You set credentials for a SIP registration, but they are blank for a SIP endpoint – When OneAlert is asked for authentication, it sends the registration credentials.
- You set credentials for the SIP settings, but they are blank for your SIP registration and the SIP endpoint – When OneAlert is asked for authentication, it sends the credentials from your settings.
Perform this task for each number in the range of SIP line numbers you defined in your communications manager, or just add a subset of numbers to start.
For example, if you defined extensions 1000-1500 your SIP line numbers in Cisco Call Manager, you can individually add all 500 extensions or just 50 to start.
- Select New > New SIP Line
- For Name, enter a name for the SIP Line to make it easily recognizable. It is suggested that you include the extension in the name.
-
For Available in All Sites:
- Enable to ensure all your site locations have access.
- Disable and select a Site to limit which site has access.
- For Extension, enter one of your SIP line numbers. If your SIP Trunk requires an extension, include it in this value.
-
(Optional) Confirm Notification Activation or Security Code.
Both methods require an end user to enter some form of confirmation before activating a notification.
You can use either of these methods, but not both. If you do not alter the defaults, then no confirmation will be required.
-
Enable Confirm Notification Activation, to require anyone using the SIP line to enter a confirmation before triggering the related notification.
The confirmation number, an integer between 0 and 9, is universal for your OneAlert instance and is defined in Global Settings > Notification > Notification Activation Confirmation Input (the default is 1).
Note: The confirmation request plays the Notification Confirmation system media file. This recording asks the user to enter one (1) to confirm. If you change the default value, you should re-record this message. See Media
-
For Security Code, enter a numeric code (minimum three characters) that will be required to activate a notification for this SIP line. This code is specific to this SIP line, unlike when using Confirm Notification Activation.
A value of zero (0) indicates that no security code is required. You can use the same security code for multiple SIP lines. See SIP Line Security Codes
If the end user waits too long, they will receive a message and then the call automatically ends. You can alter this length of time with the Security Code Timeout Seconds field in the SIP Settings tab.
If the end user enters the wrong value, they must hang up and dial the line number again.
-
-
For Activator Text Title and Activator Text Body, enter text that a Notification can use as the values for the Activator Title and Activator Body variables. See Message details – what content do you want to send?
-
Select Save.
You may want your SIP lines protected by a security code. This means that when an end user activates a notification by dialing the assigned line number, a recorded message plays asking that a security code be entered, followed by the pound (#) sign
You should weigh your options here. On the one hand, if you want to control who can send an emergency alert notification, like for a campus lockdown or building evacuation, and you want to make sure these notifications aren't accidentally sent, then a security code is useful. On the other hand, keep in mind that in chaotic circumstances, people may panic and forget the security code, thus delaying getting the emergency notification sent.
Header information of your SIP lines may contain location information. You can relay this information to the contacts and endpoints receiving a notification triggered by the SIP line.
When you are creating or editing a notification, in the Title and Body fields of Message Details, you can use the text variables source.Location and source.Coordinates to include location information that may be present from the SIP trigger.
When you delete a SIP line number, OneAlert automatically removes it from any notifications where it is a trigger. You can still send these notifications from the interface; except for live broadcast (one-way) notifications, which require a line number to send them.
You should take note of any notifications associated with the SIP line in case you need to update the notification with a new trigger or delete the notification altogether.
You can edit SIP Line action properties in a single view and submit them all at once.
-
In the Actions tab, expand SIP Line.
- (optional) Filter the list of actions to narrow down the entries you want to edit.
-
Select the Bulk Edit icon and then Bulk Edit Properties.
-
For each action, you can edit the following properties:
Extension, Security Code
-
Select Apply Changes to finalize your edits.
You can download a CSV file of your SIP Line properties for your own records or to edit and reimport into OneAlert.
-
Go to the Actions tab and expand SIP Lines.
-
(optional) Filter the list of SIP Line actions to narrow down the list to include only those you want to capture in the CSV. If you do not filter the list, you will download information from all SIP Endpoints.
-
Select the download icon.
-
In the resulting dialog box, specify the name and location for saving your CSV file.
You can edit SIP Line action properties by importing a CSV file.
It is suggested that you download action property information from OneAlert to create your base CSV file. See Downloading SIP Line Properties to CSV.
You can use headers within your CSV file to assist in the import, as OneAlert will attempt to match column headers to properties.
The values you select from the CSV will overwrite any existing data.
-
Create a new, or edit an exported, CSV file containing information to add to existing actions.
CSV Formatting Rules
-
Header — (optional) You may include a header that defines the data order.
The header values must match the built-in fields, which are Name, Extension, SecurityCode, ActivatorTextTitle, and ActivatorTextBody
Note that the UI drop-down values are in a more user-readable form, for example different capitalization and spaces.
If you do not include a header, you will still be able to match the data to one of the built-in fields.
-
Required Columns — The CSV must include at least two columns.
One column that identifies what you want to match the data to, which must be Name.
A second column containing another property data.
-
The CSV can include any additional columns, including any information you may not want to import, as you can ignore the information during import.
-
- From the Actions tab, select the Bulk Edit icon then Bulk Update from CSV.
- Use Choose File to load your CSV file.
- The Column Mapping window allows you to define how the columns of the CSV should be used. It will only show the first 10 rows of your table to assist you in the import.
- For Match Data to, select the option Name to match the information you have in your CSV.
- Use the drop-down of the column selectors to define which property the column defines, or whether you want to ignore the column.
- Select Import.
Alter global settings for how OneAlert sets up your SIP environment and interactions.
| Setting | Description |
|---|---|
|
STUN Server (For VoIP PBX systems) |
Enter a server address as supplied by your VoIP PBX. The STUN server allows clients to find out their public address, the type of NAT (Network Address Translators) they are behind, and the Internet side port associated by the NAT with a particular local port. This information is used to set up UDP communication between the client, OneAlert, and the VoIP provider to establish a call. The type of firewall you have set up determines whether you need to configure STUN server. Consult with your network administrator. Note: OneAlert only supports the standard port (3478) for STUN server. |
|
Outbound Proxy Servers (For VoIP PBX systems) |
Enter proxy server information to allow OneAlert to register with your PBX system. This field allows multiple entries of the form: sip:<FQDN | IP> sips:<FQDN | IP> Refer to your PBX vendor documentation for this information. |
|
SIP Port |
Enter a new port value if you need to use something other than the default port of 5060. |
|
Security Code Timeout Seconds |
Enter an integer, in seconds, to define how long OneAlert should wait for the security code associated with a security code before playing an audio message and disconnecting. |
|
Enable TLS |
Define whether uses Transport Layer Security. This requirement is defined by your company security policies, which dictate whether or not you need to enable TLS for transferring data over your network. TLS is the successor to SSL. When enabled, OneAlert checks the server certificate store for a certificate with the friendly name of SIPACTIVATOR. This can be a CA-signed certificate that your company has created and installed. As long as the friendly name is SIPACTIVATOR, it will be used. The certificate is used to encrypt data from OneAlert going across your network. The supported SIP encryption algorithms are:
If OneAlert cannot find a certificate with the friendly name of SIPACTIVATOR, a self-signed certificate is created. You should replace this certificate, but make sure its friendly name is SIPACTIVATOR. Note: The certificate created by OneAlert will expire after one year, which is why we suggest you replace it with one of your own. |
|
Enable SRTP |
When enabled, the SIP module will support Secure Real Time Transport Protocol (SRTP) requests that use Session Description Protocol (SDP) cryptographic negotiation. Incoming calls can be either RTP or SRTP such that OneAlert does not reject unencrypted incoming calls. However, outgoing calls will only allow SRTP. |
|
Quick Record |
When enabled, anyone using a Recorded Notification will be able to begin recording their message immediately after an initial beep when dialing the selected number. The notification is activated after hanging up. When disabled, the user will hear a set of instructions before beginning their recording. |
|
Outgoing Subgroup Outbound Default Caller ID Number Outbound Default Caller ID Name Outbound Default From URI |
These settings are for configuring SIP endpoints. See Creating SIP Endpoints. For Outbound Default Caller ID Number and Outbound Default Caller ID Name, consult your vendor documentation to find out if you need to set these values. If your vendor has no particular requirements for these fields, OneAlert uses the default values. OneAlert sends these values in the SIP packets to identify where the call is coming from. For Outbound Default From URI, you can specify a URI if your SIP endpoints expect a specific value. Otherwise, OneAlert auto-generates the SIP URI, for example: <sip:alice@atlanta.example.com> |
|
Incoming Subgroup Inbound Digest Realm Inbound Username Inbound Password |
These settings are for configuring SIP trunk authorization in your PBX system. If your company security policies recommend additional security measures, you can use these settings to add SIP trunk authentication. (This is not typically required.) The information you enter depends on which PBX communications manager you are using.
If your company does not require additional security measures beyond those set up for your network, leave these fields blank. |
|
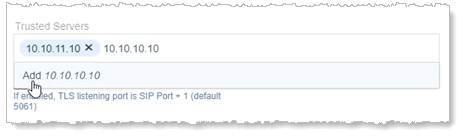
Incoming Subgroup Trusted Servers |
Enter any number of IP addresses to define which servers are trusted. Leave this field blank to accept connections from any IP address.
|
|
Incoming Subgroup Disable Reinvites |
Enable this if your PBX system does not support reinvites. For MiVoice Business, you must enable this setting. |
When you create a notification, you can select one of your SIP lines as a trigger
- Create or edit a notification.
- Expand Select Triggers.
- For Activator, select SIP.
-
For Trigger, select one of the SIP lines you have created. Note that if a SIP line has a bell icon, that means it is already assigned to a notification. Hover over the icon to see which notification.
Typically, you will assign one SIP line number to one notification. However, there are some scenarios where you might want to assign the same SIP line number to more than one notification.
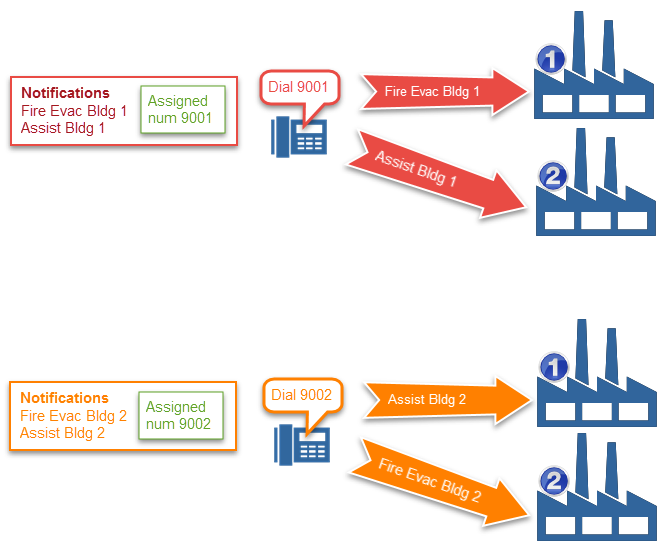
I want to send two different messages, at the same time, to different endpoints. I have two manufacturing buildings near each other. If there is a fire evacuation at one building, I want the second building to come assist.
So, I've created a Fire Evacuation Building 1 notification and a second Fire Evacuation Building 2 notification. I've also created an Assist Building 1 notification and an Assist Building 2 notification. Whenever one of the fire evacuation notifications is triggered, I also want the accompanying assist building notification triggered.
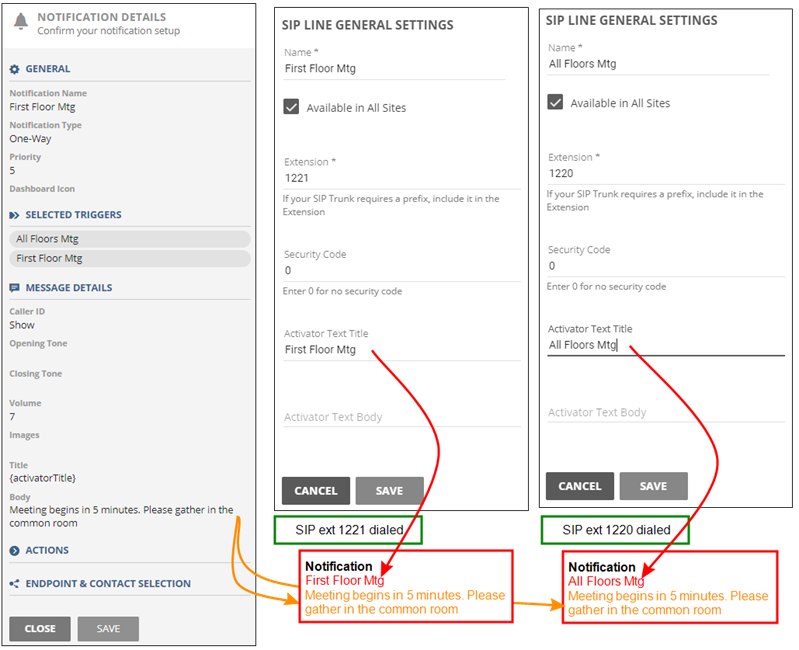
I conduct a live broadcast floor meeting every morning for each floor of my manufacturing plant (3 floors). I have three notifications set up, and each is triggered by its own SIP line number.
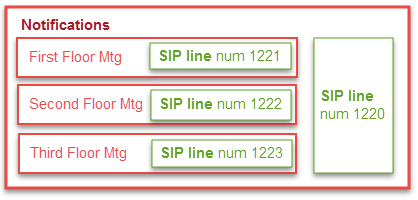
- First Floor Meeting, dial SIP line number 1221
- Second Floor Meeting, dial SIP line number 1222
- Third Floor Meeting, dial SIP line number 1223
But I also conduct a live broadcast meeting once a month for all three floors at the same time. Rather than having to create a fourth notification for this purpose, I use SIP line number 1220 for the all-floors meeting and assign 1220 to all three notifications.
Because I have more than one SIP line number as a trigger for my three notifications, I've chosen to enter title text for each SIP line and pull that in as my notification title. The body text of my notifications is the same, so I'll put that in the notification message body.