IPAWS Alerts
Note: Only All Sites Admins have full access to configuration.
Important: Requires an Internet connection to IPAWS feed to receive alerts.
Use the IPAWS Alert Feed, within the CAP module, to forward IPAWS alerts to your endpoints and contacts.
Notifications from IPAWS (Integrated Public Alert & Warning System maintained by FEMA) are cryptographically signed, which is a CAP requirement. Our CAP Service verifies the signature of all notifications received from IPAWS. Notifications from other CAP feeds that are not from IPAWS do not require cryptographic signature, therefore we don't check for signatures on those.
Create an IPAWS service for each geographic area you want to monitor. Once the service is created, then you can assign it to notifications as a trigger.
- Go to Configuration > Public Alerts > IPAWS
- Select New IPAWS Service.
- For Name, enter a descriptive name that helps you identify the area you are monitoring for alerts. You may want to also indicate this is an IPAWS service, as opposed to other CAP-related services.
-
For Available in All Sites:
- Enable to ensure all your site locations have access.
- Disable and select a Site to limit which site has access.
-
(Optional) Update the General Settings: Poll Interval Seconds, Resend Interval Seconds, and Dispatch Delay Seconds.
Tip: See CAP Timing Controls for information about these settings
- (Optional but Recommended) Enable Use IPAWS Test Mode.
IPAWS has a test feed and a live feed. The test feed allows you to test your connection to IPAWS and that your service is properly setup before you start sending alerts to all your endpoints. While this is an optional step, we do recommend testing your service configuration with a subset of your endpoints. - Select Next.
-
(Optional) Update the Message settings. You can add your own static text to the Message template title and body
- For Template Title, enter any static text along with the variables.
- For Template Body, enter any static text along with the variables.
- Enable Strip Line Breaks From Alert Text if you want to fit more content on your IP phone screens
-
(Optional) Update the Filters as needed.
Tip: See the Understanding CAP Filters topic for information on how to narrow the alerts that trigger notifications.
-
(Optional) For Geocodes, start entering in the name of the US County you want to monitor and the select it from the resulting drop-down. If you leave this field blank you will monitor alerts across the whole of the U.S. You can manually enter any NAME|Value pair, as long as there is one character on either side of the pipe character ( | ).
You can specify multiple Counties. See Mapping Rules: Geocodes and Geodetic mapping.
Revolution stores on its server a database file (<install_dir>/Data/FIPS.db) containing the FIPS codes and checks the cloud for an updated file five minutes after start-up and then daily after that, downloading as necessary.
-
Select Next.
-
(Optional) Select areas in the Map in addition to or instead of the County (FIPS code) method.
Tip: See the Creating Geodetic Areas topic if you prefer to draw the area to be monitored on a geodetic map instead of, or in addition to, using FIPS codes. If the incoming IPAWS alert doesn't contain geocodes or geodetic mapping data, and sometimes they don't, those alerts trigger your notifications even if you have geocodes defined.
- Select Save.
Important: Don't forget to edit the service to disable Use IPAWS Test Mode when you're ready to go live.
- Go to Manage Notifications.
- Do one of the following:
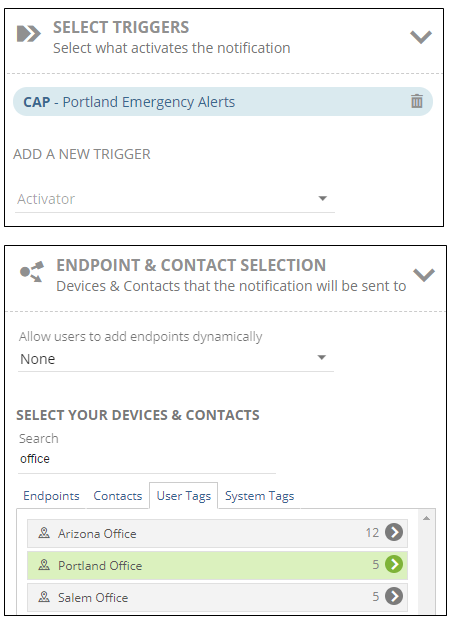
- Create one notification for each CAP service. This allows you to send the emergency alert to only the endpoints in the affected area.
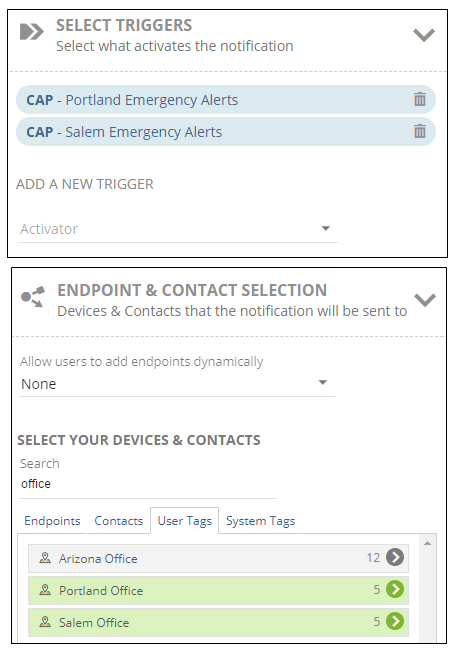
For example, I have offices in both Portland, OR and Salem, OR. I created a Portland area IPAWS service and a Salem area IPAWS service. I only want endpoints in my Portland office to receive Portland IPAWS emergency alerts, and I only want endpoints in my Salem office to receive Salem IPAWS emergency alerts. So, I create a one notification with just Portland office endpoints and with the Portland area IPAWS service as a trigger. And, I create a second notification with just Salem office endpoints and with the Salem area IPAWS service as a trigger. - Create one notification triggered by multiple IPAWS services. If you're monitoring more than one geographic area, this allows you to send emergency alerts to endpoints both inside and outside of the affected area.
For example, I'm okay with both my Portland and Salem offices receiving IPAWS emergency alerts for both areas. So, I only need to create one notification with both Portland and Salem IPAWS services as triggers and assign Portland and Salem office endpoints. - Create one notification triggered by multiple CAP services. If you have multiple CAP services for the same geographic area, you may want to create one notification, to all endpoints in that location, that is triggered by multiple CAP services. For example, in addition to the IPAWS service for the Portland area, I've also created an NWS service for the same area. I can create one notification and assign both the IPAWS service and the NWS service as triggers. Then when an alert is received by either IPAWS or NWS, the notification forwards the alert to all the assigned endpoints.


For details on how to set up notifications, see the Manage Notifications topic. For an example CAP notification, see CAP Alert Notification.
