Configuring Your IP Speakers
IP speakers can be used:
- to play background music
- in conjunction with sensor contact closures
- in conjunction with the night ringer feature
- for direct paging
Have analog speakers you want to use? See Use Analog PA systems.
Note: The following instructions are for speakers running Syn-Apps firmware. If your IP speaker is not covered below, consult the manufacturer documentation on how to configure multicast in your speaker.
Tip: Username and password is typically admin/admin.
Note: These instructions are for an AND IP Speaker Talkback model. Configuration fields may be slightly different between speaker models. Consult your vendor documentation for assistance in configuring multicast for your particular speaker model.
- Launch a browser, navigate to http://xx.xx.xx.xx where xx.xx.xx.xx is the speaker IP address, and log in to the speaker user interface.
- Click Device Settings, and then click Streams.
- In the Permanent Streams section,
- Set the Priority, Latency, Volume, and Audio Channel as desired.
- Enter the IP:Port = Multicast Address:Multicast Port you configured for the Paging Relay > Device Config > Line-in Settings. For example: 239.5.5.5:20480.
- (Optional) Enter a Source IP as desired, or leave blank.
- Click Save Streams Changes at the bottom of the screen.
Note: These instructions are for an Algo 8188 SIP Ceiling Speaker. Configuration fields may be slightly different between speaker models. Consult your vendor documentation for assistance in configuring multicast for your particular speaker model.
- Launch a browser, navigate to http://xx.xx.xx.xx where xx.xx.xx.xx is the speaker IP address, and log in to the speaker user interface.
- Click Basic Settings, and then click Multicast.
- In the Multicast Mode section, click Slave/Receiver.
- In the Slave/Receiver Zone Settings section, check the desired zones.
- In the Multicast Mode section, click Advanced Multicast under the Multicast Mode radio buttons.
- In the Advanced Multicast Settings > Zone Definition section, enter the IP:Port for the zone you selected where IP:Port = Multicast Address:Multicast Port you configured for the Paging Relay > Device Config > Line-in Settings. For example: 239.5.5.5:20480.
- Click Save in the bottom, right corner of the screen.
- Configuration fields may be slightly different between speaker models. Consult your vendor documentation for assistance in configuring multicast for your particular speaker model.
- Although the Atlas user interface has a settings screen, there are some known issues with it. Therefore, Atlas IED speakers must be configured in an XML file.
Important: If you are using the Paging Relay in a standalone environment, use the Configure Atlas IP Speaker in Standalone Environment instructions instead.
- Create a virtual directory on your web server called ipspeaker and point it to where the IPSpeaker.xml file resides on the Revolution server – C:\Program Files (x86)\Syn-Apps\SAAnnounceRevolution.
- Open the IPSpeaker.xml file on the Revolution server.
- Append the following element:
- Save the file.
- Reboot the speaker.
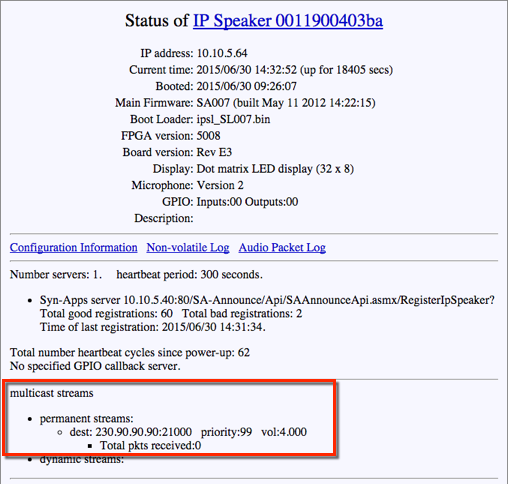
<IPSpeakerConfiguration>

	<PermanentStreams>

		<Channel stream="230.90.90.90" port="21000" priority="99" volume="4" />

	</PermanentStreams>

</IPSpeakerConfiguration>
| Attribute | Values |
|---|---|
| Channel stream | The Multicast Address you configured for the Paging Relay > Device Config > Line-in Settings. |
| port | The Multicast Port you configured for the Paging Relay > Device Config > Line-in Settings. |
| priority | Set a priority between 1-100. 1 is the highest priority. |
| volume | Set a volume between 1-13. 13 is the loudest. |
You should now see the permanent file setting listed on the Speaker Status screen in the multicast streams section.
Tip: (Optional) You may want to update your speaker firmware to the most current version before beginning. See Update IP Speaker Firmware for instructions on updating the IP Speaker firmware.
Note: Configuration fields may be slightly different between speaker models. Consult your vendor documentation for assistance in configuring multicast for your particular speaker model.
- Launch a browser, navigate to http://xx.xx.xx.xx where xx.xx.xx.xx is the speaker IP address, and log in to the speaker user interface.
- Click Multicast Config.
- Check Enable Multicast Operation.
- Enter the following:
- Address = Device Config > Line-in Settings > Multicast Address you configured for the Paging Relay.
- Port = Device Config > Line-in Settings > Multicast Port you configured for the Paging Relay.
- Multicast Group Name = Descriptive name of your choice.
- Click Save and then Reboot.

