Areas
Use geofence areas to limit notifications based on the location of an endpoint and also to group endpoints, using dynamic endpoint tags, based on their location.
You create geofence areas within Revolution in the Configuration > Areas page. They are used as follows:
- Limit mobile notifications to geofence boundaries. See Using Geofence Areas to Limit Notifications.
- Limit any notification to endpoints in a defined area through the use of dynamic endpoint tags. See Create Dynamic Endpoint Tags based on Areas.
Note: Mobile devices limit the number of areas supported. For iOS, they only register up to 20 areas at a time. For Android, they have a limit of 100 areas.
- Go to Configuration > Areas.
- Select New.
- For Name, enter an easy to recognize title for the area.
- Enable Allow Mobile Geofence if you intend to use this area for Mobile notifications.
-
For Available in All Sites:
- Enable to ensure all your site locations have access.
- Disable and select a Site to limit which site has access.
- (Optional) Customize your map view
- Show or hide endpoint icons by enabling or disabling the Phone, Speaker, and Computer options.
- Change the overlay between a Map view (with optional Terrain information) and a Satellite view (with optional location Labels).
-
Narrow down your location by completing Enter a location, which will auto complete as you type, and press Enter to zoom the map to the location.
Note: If you didn't enter a Name before searching for a location, the Name is populated with your selected search string, such as a city name or zip code.
- Move the map to the area you want to select.
- Select the Move icon (
 ).
). - Move the map by dragging to your location.
- Zoom the map with the plus (+) or minus (-) icons, or ctrl-scroll within the map (this also centers the map on your cursor).
- Draw the area.
- Select the Draw icon (
 ).
). - Place the cursor (crosshairs) in the middle of the area you want to map
- Click once at the location to define the center (you'll be able to move it later).
-
Move your mouse to change the size of the circle.
Note: Revolution will set the radius of any area to a minimum of 100 meters for the mobile API. You can create an area of less that 100 meters, but Revolution will report the area with a 100 meters radius.
- Click a second time to finalize the size of the circle.
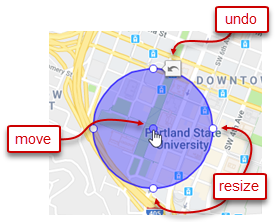
- Adjust your area
- Move the area by clicking and dragging the center dot.
- Change the size of the area by clicking and dragging one of the perimeter dots.
- Undo an adjustment by clicking the undo icon
- Delete an area by selecting Draw Selection again and defining a new area.

- (Optional) You can delete an area by drawing a new circle.
- Click Save.
You can create Dynamic Endpoint Tags that only include endpoints inside or outside a given area based on any location settings of the endpoint. See Creating and Using Dynamic Tags for additional information.
- Go to Configuration > User Tags.
- Select New > Dynamic Endpoint Tag
- For Name, enter an easy to recognize value.
-
For Available in All Sites:
- Enable to ensure all your site locations have access.
- Disable and select a Site to limit which site has access.
- For System Tag, select Area
- For Comparator, select an area you've created or New Area to create a new one. See Defining geofence areas.
- For Boundary, select Inside or Outside to define which endpoints are included.
- (Optional) Add additional criteria to the tag, as necessary.
- Select Save.
When creating your notification, you will then select this User Tag in the Endpoint & Contact Selection section.
