Using the Mobile App
Have you read through the Setting Up the Mobile App topic to understand how the app works?
Here's how to:
To receive notifications on the Honeywell UNP Mobile Application app:
- You must set up the recipients as contacts in UNP.
- You must then send sent an invitation to the contacts to use the Mobile app, which they then use to register their Mobile device.
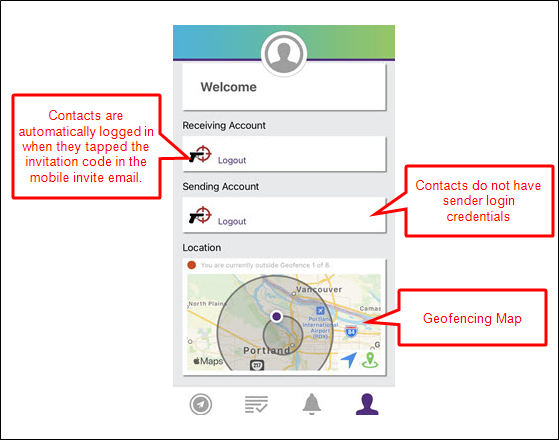
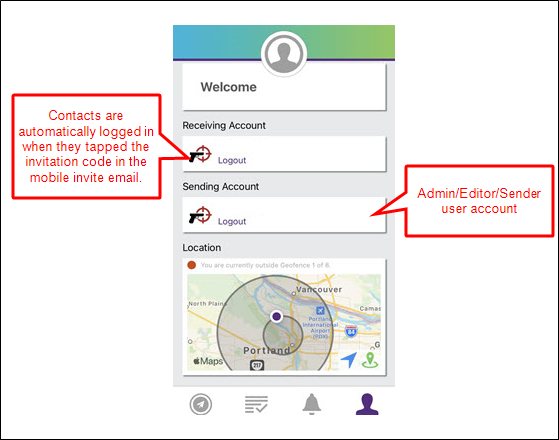
Within the Mobile app, there are two different accounts:
- Receiving Account – When a contact taps on the invitation code in the mobile invite email, the Mobile app automatically logs them into the Receiving Account.
- Sending Account – A contact will not have access to this, as it is reserved for UNP users.
The Mobile app can receive any notification type as long as contacts with registered mobile devices are assigned as notification recipients and the notification explicitly selects Mobile as one of the Contact Methods.
Notification alert sounds and banners are controlled by the mobile device OS, just like any other app. When a user enables notification sounds and banners on the device, they will see on their lock screen that a notification has been received.
Audio recordings attached to the notification automatically play when the notification is opened, even when the device is muted. (This is true for all notifications, regardless of priority level.) Audio attached to notifications cannot automatically play in the background when the notifications are closed. Neither Android nor iOS allow this behavior.
Live broadcast (one-way) notifications are recorded and the audio is forwarded to contacts assigned to the notification when Mobile is selected as a Contact Method. TTS audio is recorded and both text and audio are sent.
If no image is assigned to a notification, the UNP logo is sent with the notification.
Sent Notifications cannot track whether an individual contact received a notification to their mobile device. Sent notifications log as successful when the notification is received by the Mobile module.
Important: When you assign contacts to the notification, make sure you check Mobile as one of the Contact Methods. See the Mobile Client Notification example.
Notifications received on the Honeywell UNP Mobile Application app may include response options. These notifications ask a question, where the app user taps the Respond button and selects a response, which is sent back to and recorded by UNP. Admins can view responses from the Sent Notifications page in the UNP web application or the Sent Notifications tab of the Honeywell UNP Mobile Application app.
See Reply Response for information on adding notification actions to notifications.
Contacts and notifications can be assigned to specific sites. Only contacts assigned to the same site as the notification will then receive those notifications.
You have the option of using geofencing with the Honeywell UNP Mobile Application app. Geofencing allows you to create a virtual geographic boundary with criteria that must be met before a notification can be received by the app.
Note: Google Chromebox does not support location data and geofencing, Google Chromebook does.
Set up UNP and create a notification.
- Defining geofence areas. Be sure to select Allow Mobile Geofence for use in mobile notifications.
- Create a notification. See the Mobile Client Notification example.
- Assign contacts to a notification
- Check Mobile as the Contact Method
- Assign the geofence boundary area, and determine whether the contacts must be inside or outside the boundary.
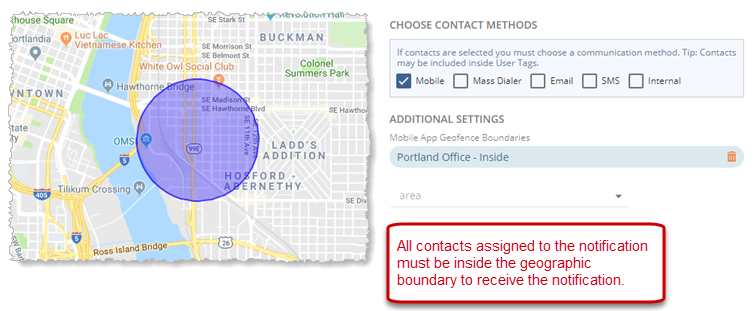
For example, assume you only want your employees who are at the office to receive the notification. By assigning the geofence area, you can still use your Portland Office Contacts tag including all your employees, but only the ones at work at the time the notification is sent will receive it.
Notes about Mobile App Geofence Boundaries:
- Not assigning a boundary – If you do not assign a geofence boundary, all contacts assigned to the notification receive the notification regardless of their geographic location.
- Inside Boundary – When you select an area and set the Boundary to Inside, a contact will receive the notification only if they are inside the boundary area.
- Outside Boundary – When you select an area and set the Boundary to Outside, a contact will receive the notification only if they are outside the boundary area.
- Multiple Areas with Inside Boundaries – When you select multiple areas and each sets Boundary to Inside, then contacts inside any of the areas receive the notification.
- Multiple Areas with Outside Boundaries – When you select multiple areas and each sets Boundary to Outside, you will exclude contacts in all the boundary areas.
Honeywell UNP Mobile Application app users must be aware of the following:
-
Location services must be enabled – Geofencing requires contacts to have location services enabled on their phone and for Mobile app.
For example, iPhone allows users to enable location services in general, but then disable it for individual apps. If location services is not enabled, geofencing registers the contact as unknown and sends the notification anyway.
- Network and GPS connections – Several environmental factors come into play when updating geofence location in the Mobile app:
- whether there's Internet connection and how good that connection is
- whether Wi-Fi is on. We recommend telling your contacts to always use Wi-Fi when using the Mobile app.
- proximity to a cell tower
- if GPS is already being used, the Mobile app can use that data making geofence updates much quicker
You can create triggers that you then assign to notifications. These triggers display as buttons in the Honeywell UNP Mobile Application app to allow users to send notifications from within the app.
You can create two types of Mobile buttons:
- Trigger buttons are only available to UNP users when logged into the Mobile app Sending Account.
- Assistance buttons are available to all contacts logged into the Mobile app Receiving Account.
Trigger and Assistance buttons are configured in the UNP Mobile module.
You can assign a specific site to notifications, trigger and assistance buttons, user accounts, and contacts. UNP users assigned to a specific site only see trigger buttons assigned to their site or All Sites when logged into the Mobile app Sending Account.
All Sites Admins can create triggers for any site. Site Admins can create triggers for their sites.
Contacts assigned to a specific site only see assistance buttons assigned to their site or All Sites when logged into the Mobile app Receiving Account, and they will only receive notifications assigned to their site or All Sites.
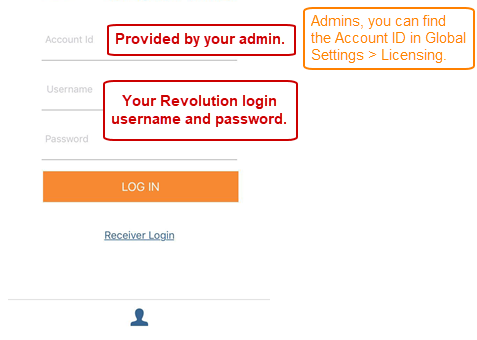
You must log into the Honeywell UNP Mobile Application app Sending Account with the UNP Account ID provided to you by your administrator and your UNP username and password in order to send notifications from your mobile device. Administrators can find the Account ID in Global Settings > Licensing.
Note: Users with the Viewer User Role cannot log in as a sender in the Mobile app.
Tip: Admins, your UNP users must also be set up as contacts and sent the mobile invitation in order for their mobile device to register with UNP as a receiver of notifications.
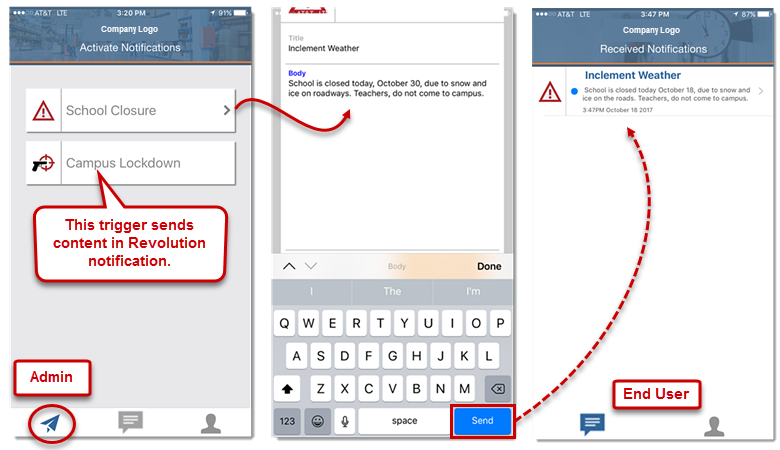
The Activate Notifications page lists your Mobile triggers and are available to send from the Honeywell UNP Mobile Application app Sending Account. When you create a trigger, you decide whether you want your users to be able to enter content on the fly in the Mobile app or always send static content entered in the notification.
UNP users with the Administrator, Editor, or Sender User Roles can trigger notifications when logged into the Mobile app Sending Account. Notifications are not available to users with the Viewer User Role.
When your server is associated with multiple sites and has set up mobile triggers that use multiple site associations, the Activate Notifications screen will show a Site drop down that allows you to filter triggers based on the Site setting of the trigger.

- When you select All Sites, you will see all triggers regardless of their Site setting.
- When you select a specific site, you will only see triggers that have their Site setting limited to that site.
- Go to Configuration > Mobile.
- Select New > New Mobile Trigger.
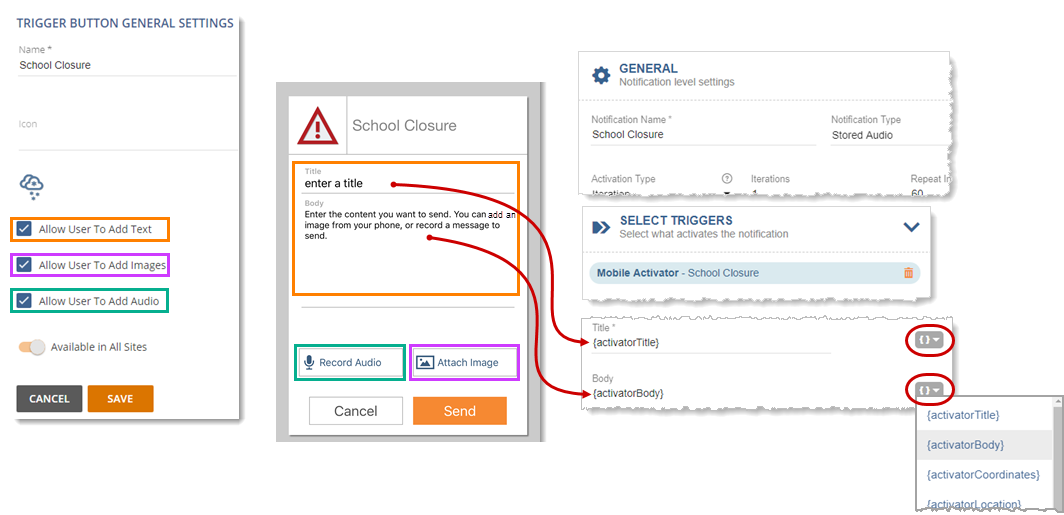
- For Name, enter a value that helps your users identify which trigger is being assigned to a notification. This is also the name that appears on the trigger in the Mobile app.
-
For multi-site organizations, do one of the following:
- If you're an All Sites Admin – To assign this trigger to a specific site, disable Available in All Sites and select a Site from the drop-down list. Or, you can leave it Available to All Sites.
- If you're a Site Admin – This trigger is automatically assigned to your default site. Each Site Admin will need to create their own triggers.
- (Optional) For Icon, use the drop-down to select an icon that appears on the trigger in the Mobile app.
- (Optional) For Security Code, enter numerical string to be required by the mobile user before they can trigger a notification. The string can be between 1 and 10 digits.
- (Optional) Define whether you want your Users to be able to create notification content on the fly.
-
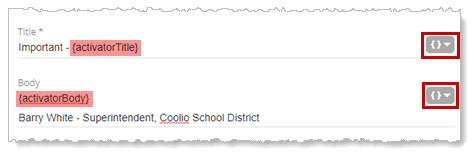
Allow User to Add Text – Users can write content on the fly in the Mobile app. You'll also need to add variables to the Message Details section of any related notification so the entered content is pulled into the notification before it's sent to recipients.
For notifications with the Mobile trigger assigned, you can also include static text along with the activator variables. For example, you could have Important at the beginning of the title and have the principal that authorized school closure after the body content.
-
Allow User to Add Images – Users can attach any image available on their phone.
For example, if this were a notification for maintenance, the user could take a picture of a spill that needs to be cleaned up or something that's broken, and attach that to the notification.
-
Allow User to Add Audio – Users can record an announcement and send it from the Mobile app.
Important: When allowing users to send audio from the Mobile app, the Mobile trigger must be assigned to a notification type of Stored Audio or Recorded. If assigned to any other notification type, the audio from the Mobile app will not play when the notification is sent. Users with the Editor User Role can create new notifications. Make sure to tell them which triggers allow audio so they can create the appropriate notification. Or, you might decide that you only want admins to assign Mobile triggers to notifications.
- Allow User to Add their Location – Users can send their location based on GPS location or selecting their street address.
- Select Save.
Sending Account users can view information about recently sent notifications by selecting the Sent Notifications icon.

This shows the last 50 notifications sent by the server you are connected to. This information is similar to what is found in the UNP web app. See Sent Notifications.
Select a notification to view details about the notification, including:
-
Name of the notification.
-
Date and time it was activated.
-
Success and error information.
-
Response information including a bar graph for each response type (Emergency Responses are red), and all responders are listed at the bottom along with any text response and a map link icon if they sent along their location; the map link will open the location in a map app. See Notification Action Types on creating response options and Response Options Notification for a detailed example.
All contacts can send notifications that have an Assistance trigger assigned to it. These triggers display as a button at the bottom of the app when contacts are logged into the Honeywell UNP Mobile Application app Receiving Account. When you create an Assistance trigger, you decide whether you want contacts to be able to enter content on the fly in the Mobile app or always send static content entered in the notification; the same as for trigger buttons available to UNP users.
For example, I'm an admin at a school. I've created a notification called SOS - Assistance Required. All employees at my school have been entered as contacts in UNP and assigned to the SOS - Assistance Required notification. I've created an Assistance trigger called SOS - Assistance Required. All employees at my school have Honeywell UNP Mobile Application app downloaded to their cellphones. Any employee at the school can send the SOS - Assistance Required notification from their cellphone, which alerts the school security office.
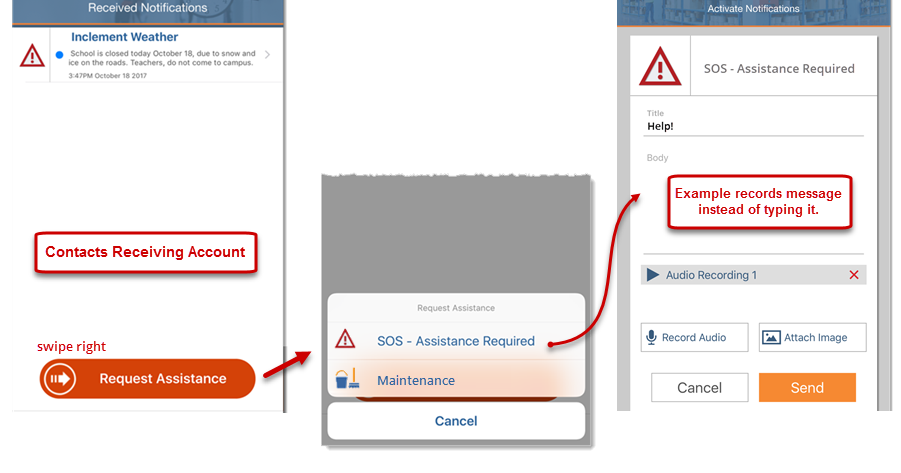
Tip: If no Assistance triggers are configured, the Request Assistance slider button isn't displayed.
When you assign a Mobile Assistance trigger to a notification, you can include variables in the message body that will send back the latitude and longitude coordinates and closest street address of the cellphone – {activatingContact.Coordinates} : {activatingContact.Address}. This can assist rescue and security personnel in locating the person who triggered the assistance notification.
- Go to Configuration > Mobile.
- Select New > New Mobile Assistance.
- For Name, enter a value that helps users identify the type of notification they'll trigger when tapping the assistance button.
-
For multi-site organizations, do one of the following:
- If you're an All Sites Admin – To assign this assistance trigger to a specific site, disable Available in All Sites and select a Site from the drop-down list. Or, you can leave it Available to All Sites.
- If you're a Site Admin – This assistance trigger is automatically assigned to your default site. Each Site Admin will need to create their own assistance triggers.
- (Optional) For Icon, use the drop-down to select an icon to display with the assistance trigger on the Request Assistance list.
- (Optional) For Security Code, enter numerical string to be required by the mobile user before they can trigger a notification. The string can be between 1 and 10 digits.
- (Optional) Check whether you want your contacts to be able to write notification content on the fly, and whether they can include audio, images, or their location. (See the similar step above for creating triggers for more information. It works the same way for assistance triggers.)
- Select Save.
Tip: Keep in mind that if you are using this assistance trigger for an emergency situation where time is critical, you may not want contacts to have to compose the message before sending the notification. In this case, you would not enable allow text, image, and audio. Also keep in mind that you can have coordinates and location data included with the notification message to help identify where the contact is who triggered the notification.
For multi-site organizations: If you have assistance triggers assigned to All Sites and some assigned to individual sites, contacts only see the assistance button assigned to the same site as them. For example, if a contact is assigned to All Sites, that person gets the All Sites assistance buttons. If a contact is assigned to Abernathy, that person gets the assistance buttons assigned to Abernathy.
- Add people as contacts and send mobile invites. See Contacts.
- Assign mobile triggers to notifications.
- Assign contacts as notification recipients, and whether to use geofencing. See the Mobile notification example.
- Review the Notification Basics topic for information on the other notification types, and to learn more about using variables in the Message Details section.

