Avaya IP Office SIP Trunk Setup
Configuration in Avaya IP Office is only necessary to set up a SIP trunk if you're using SIP Activator. SIP Activator allows notifications to be triggered by dialing a SIP line extension number from any supported Avaya phone on the network, which triggers sending the notification(s) assigned to the SIP line.
Important: SIP Activator is required in order to trigger live broadcast/paging notifications.
There are two main steps:
- Verify your SIP Trunk Channels license is valid.
Go to License > SIP Trunk Channel and verify Status is Valid. - Obtain your LAN IP address.
Go System > LAN1 > LAN Settings to get the IP Address.
Note: IP Office allows SIP Trunks on LAN1 and/or LAN2.
There are five basic steps:
- Click IP Office > System.
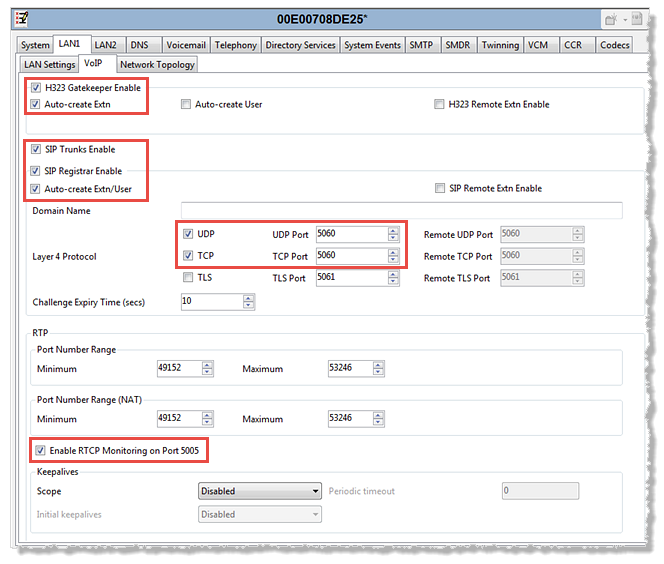
- Click the LAN1 tab > VoIP tab.
- Verify the following are enabled (checked):
- H323 Gatekeeper Enable
- Auto-create Extn
- SIP Trunks Enable
- SIP Registrar Enable
- Auto-create Extn/User
- UDP
- TCP
- Enable RTCP Monitoring on Port 5005
- Click OK.
There are four tabs to configure:
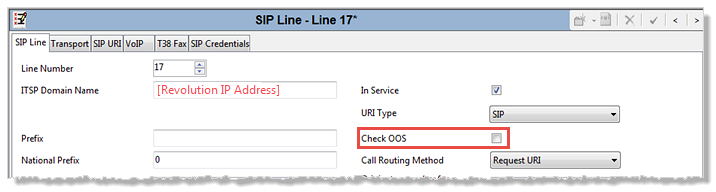
- Right-click IP Offices > Line and select New > SIP Line. (IP Office auto-generates the next available SIP line number.)
- Enter the Revolution server IP address in the ITSP Domain Name field.
- Keep all of the default values, except for disabling Check OOS.
- Click OK.
- Click Transport tab.
- Enter Revolution IP address in the ITSP Proxy Address field.
-
Keep all default settings and click OK.
Revolution can use UDP or TCP Layer 4 Protocol, but not TLS.

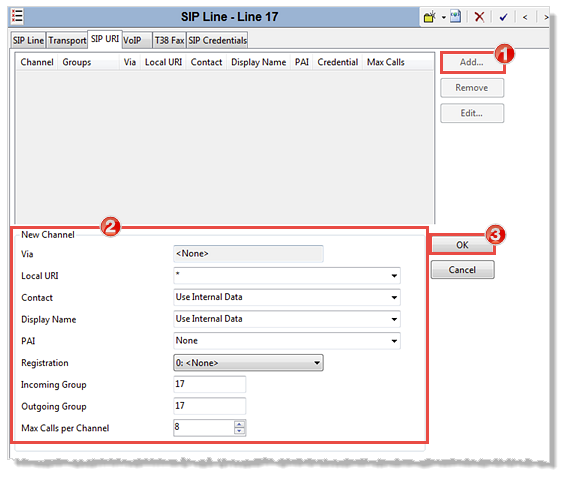
- Click SIP URI tab.
- Click Add.
- Select * from the Local URI drop-down list to use wildcard matching. (If your organization requires additional security measures, you can configure SIP trunk authentication from the user agent (in this case Revolution). Select Use Credentials Authentication Name instead of * and see SIP trunk authentication below. SIP trunk authentication is not a typical scenario.)
- Select Use Internal Data from the Contact and Display Name drop-down lists.
- Select None from the PAI drop-down list.
- Select 0: <None> from the Registration drop-down list.
- Enter the new SIP line number you're creating in the Incoming Group and Outgoing Group fields. (Our example's new SIP line is 17.)
- Set Max Calls per Channel to whatever number of calls you want to support. (Our example uses 8.)
- Click OK.
Note: You only need to configure this if your organization's security policies require SIP trunk authentication from a user agent (in this case Revolution).
In Revolution:
- Go to Configuration > Phone Systems > SIP.
- Leave Inbound Digest Realm blank.
- Enter a name of your choosing for Inbound Username and Inbound Password.
- Click Save.
In Avaya IP Office, when configuring your SIP line
- Click the SIP Credentials tab.
- Enter the Revolution
- Username in the Authentication Name field
- Password in the Password field
- Click OK.
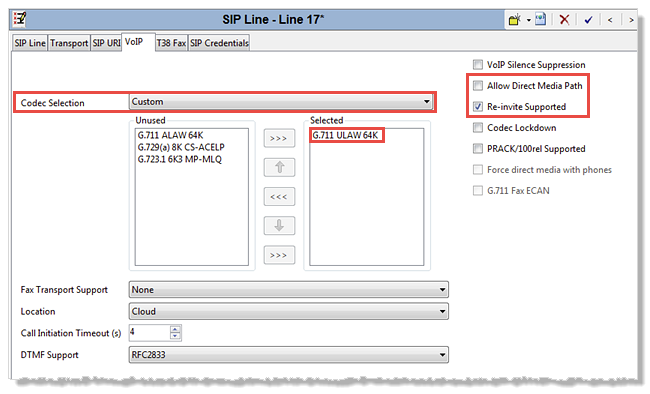
- Click VoIP tab.
- Select Custom from the Codec Selection drop-down list.
- Click the appropriate G.711 in the Unused column and move it >>> to the Selected column.
- Disable Allow Direct Media Path.
- Enable Re-invite Supported.
- Keep all other defaults.
- Click OK.
There are two tabs to configure:
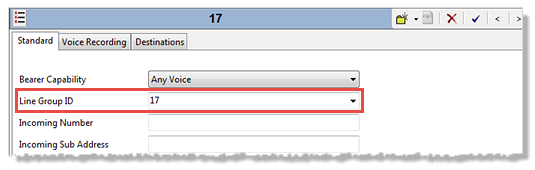
- Click IP Office > Incoming Call Route and select New.
- Select the new SIP line number from the Line Group ID drop-down list. (Our example's new SIP line is 17.)
- Keep all other defaults.
- Click OK.
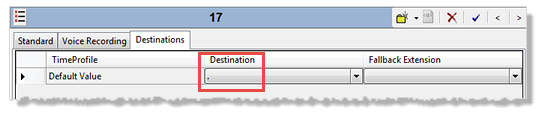
- Click the Destinations tab.
- Type a period in the Destinations field or select it from the drop-down list. (This allows any incoming digits.)
- Click OK.
There are two parts to configure:
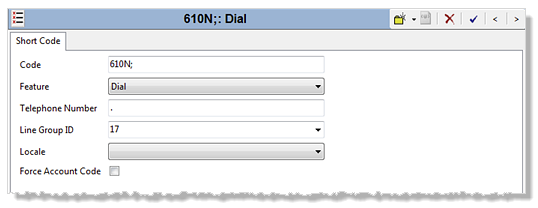
- Right-click IP Office > Short Code and select New.
- Enter a number and an N variable in the Code field, for example 610N;. The number of N variable(s) you use determines how many SIP lines are available:
- 610N; – This means you can enter SIP lines in Revolution that range from 6100-6109. You get 10 SIP lines.
- 61NN; – This means you can enter SIP lines in Revolution that range from 6100-6199. You get 100 SIP lines.
- If you need 20 SIP lines, create two new short codes:
- 615N; – This gives you SIP lines 6150-6159. First 10 SIP lines.
- 616N; – This gives you SIP lines 6160-6169. Second 10 SIP lines.
- Select Dial from the Feature drop-down list.
- Type a period in the Telephone Number field. (This allows the system to match any number.)
- Select the new SIP line number from the Line Group ID drop-down list. (Our example's new SIP line is 17.)
- Leave Locale blank.
- Leave Force Account Code disabled (unchecked).
- Click OK.
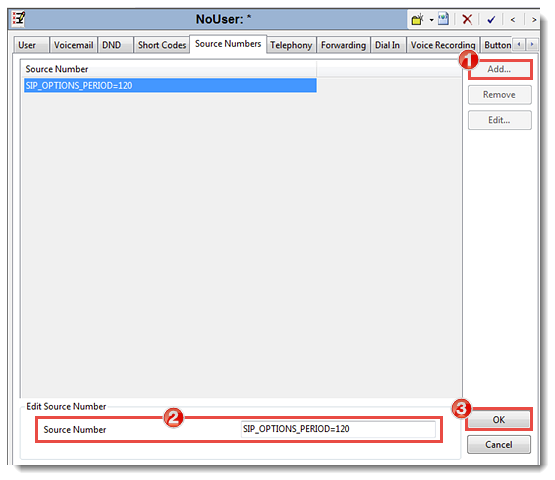
- Click IP Office > User > Source Numbers tab.
- Click Add.
- Enter SIP_OPTIONS_PERIOD=120 in the Source Number field.
- Click OK.
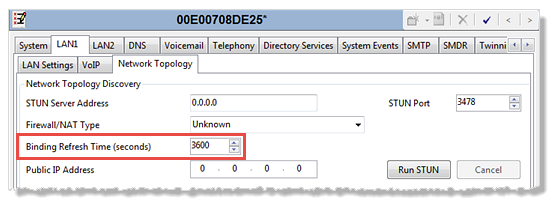
- Click IP Office > System.
- Click the LAN1 > Network Topology tabs.
- Set the Binding Refresh Time (seconds) to 3600. (This is 1 hour.)
- Click OK.
Create SIP lines in Revolution SIP module for the extensions you designated in IP Office. In our example, we're using 610N for the short code, which sets the SIP line range. So, in Revolution, I'll create SIP Lines for 6100-6109. See SIP Activator.
Assign SIP activators and lines as notification triggers. Review the Notifications Basics topic.
