Static IP Setup
- Static IP setup should be performed by your network administrator. All the steps here must be completed.
- If you are using the Paging Relay with Revolution in redundancy mode, you cannot use a static IP address because the Paging Relay will only be able to register with one Revolution server. Redundancy requires two servers; therefore you must use DHCP option 72 to register with multiple Revolution servers.
There are two scenarios that require you to set up the Paging Relay with a static IP address:
- You're not using a DHCP server.
- You have a DHCP server but are required to use a static IP address.
Tip: If you can use a DHCP provided IP address, follow the Easy Setup instructions instead.
Did you check network requirements?
The basic steps are:
- new network subnet mask = __________________________________________________
- new default gateway subnet IP address = ________________________________________
- DNS server IP address = _____________________________________________________
- (Optional) hostname = _______________________________________________________
- Revolution IP address = ___________________________________________________
- (Optional) Virtual Local Area Network (VLAN) ID and priority = ________________________
Note: You don't need the Revolution IP address if you're using Paging Relays in a standalone environment
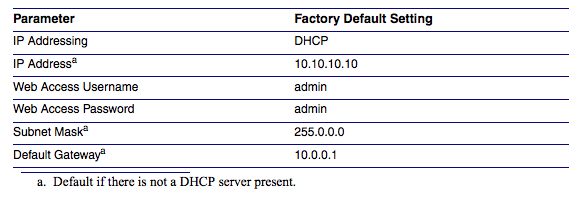
The Paging Relay ships with these defaults:

Note: Skip this if you're using a DHCP server but require the Paging Relay to be configured with a static IP address.
- Plug a computer with NIC into the same switch as the Paging Relay.
- Log in to the computer.
- Launch a command prompt.
- Enter ipconfig /all.
- Write down all the information for the primary NIC.
- Navigate to the Properties of the computer’s NIC.
- Double-click on TCP/IPv4.
- Enter the information gathered from the command prompt as a static address.
- Click Advanced.
- Enter a secondary IP address in the Paging Relay's range, for example: 10.10.10.25 with a subnet mask of 255.0.0.0.
- Click OK until all windows are closed and you are back to the desktop.
- Do one of the following:
- If you are using a DHCP server, enter the DHCP assigned Paging Relay IP address in a web browser. (You can look it up in the DHCP table.)
- If you are not using a DHCP server, enter the Paging Relay default IP address 10.10.10.10 in a web browser on your network to open the Paging Relay interface in a web browser on your network.
- Log in using the default username=admin / password=admin.
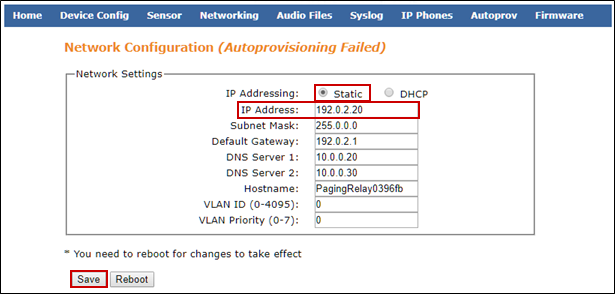
- Click Networking.
- Click the Static radio button.
- Enter a unique IP Address for the Paging Relay.
- Populate remaining fields.
- Click Save, and then click Reboot.

Note: Skip this if you're using Paging Relays in a standalone environment.
Log into Revolution, go to Configuration > IP Devices, and verify that the Paging Relay is listed and its Status is Active.
Configure the Paging Relay with the Revolution server IP address
You can click on the Paging Relay listed on the IP Devices page to open its interface.
- Log in to the Paging Relay interface (admin/admin).
- Click the Device Config tab.
- Enter the Revolution server IP address in the SA-Announce IP Address field.
- Click Save.
Review the Paging Relay topic in the Revolution Help for information on using the Paging Relay with Revolution.
