Poly Notifier
Revolution supports the following Poly phones:
- Edge Series Business Media Phones - We have tested with E220, E350, E400, and E550. Any phone with the same firmware as those tested should also work.
- VVX Series Business Media Phones – We have tested with 410, 500, and 1500 phones. Any phone with the same firmware as those tested should also work.
- CCX Series Business Media Phones – We have tested with the 500, and 600 phones. Any phone with the same firmware as those tested should also work.
- SoundPoint IP Phones – We have tested with 335 and 450 phones. Any phone with the same firmware as those tested should also work.
Revolution supports the Poly VVX and CCX Business Media Phones and the Poly SoundPoint IP phones. All phones support audio and text, but only CCX and VVX support images. Configure your phones in the Poly module.
The following limitations apply:
- Audio is supported on all phones running firmware v4.0 or later.
- The CCX and VVX phones support images.
- Poly phones do not support Revolution's two-way (intercom) notification type. Do not assign these phones as endpoints for Direct Two-Way notification types.
- Your Poly phones must also be registered to your PBX system.
Once configured in Poly, phones register with Revolution as endpoints. You can then assign these endpoints to Revolution notifications to receive notification text and images (images are limited to CCX and VVX phones).
Tip: Use the Poly Master Configuration file so you don't have to configure each phone individually.

-
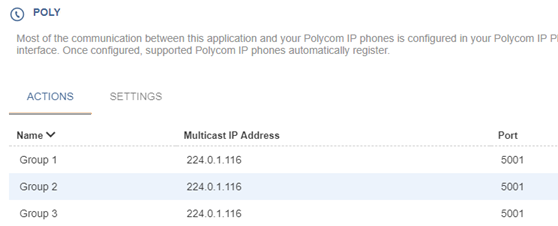
Receiving Audio Only – To receive audio attached to Revolution notifications, you'll create a Poly Paging Group in the Revolution Poly module, for each group that the registered phones belong to.
For example, I have 20 Poly phones assigned to Poly groups 1, 2, and 3. So I create groups 1, 2, and 3 in Revolution. Poly phones utilize their groups to receive audio. Each Poly phone is subscribed to a group.
-
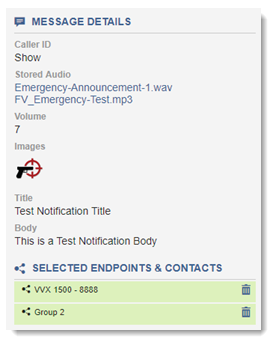
Receiving Text, Images, and Audio – To receive text, images, and audio assigned to a notification, you'll assign both the registered Poly phone and the Poly Paging Group to which it belongs.
Tip: Create user tags for your Poly phones and groups to make it easier to assign them to notifications.
Notification Behavior
When the notification is received by the Poly phone, the audio plays first followed by the text and image.
One thing to keep in mind is that all phones subscribed to Group 2 in Poly also receive the audio from the notification. In Poly, typically multiple phones are subscribed to the same group, therefore in Revolution you'll want to create User Tags that match phones with groups, so your end users know how to assign endpoints to notifications. You should only assign one Poly User Tag at a time to a notification that contains audio.
For example, I've created three tags – one with phones in my Engineering department, one with phones in my Marketing department, and one that contains all my Poly phones and groups.
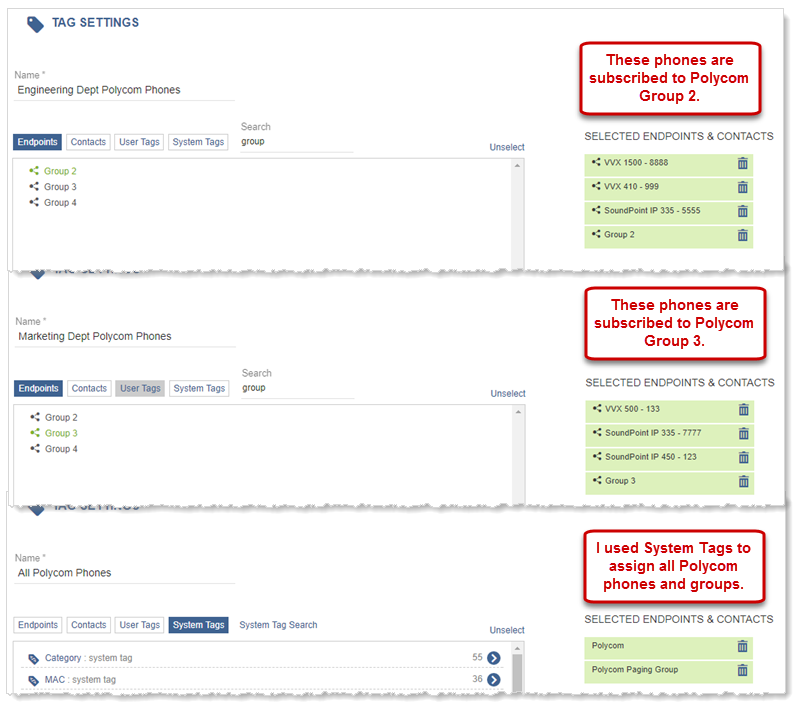
Now, when my users need to assign Poly phones as endpoints, and they want text, images, and audio received, they simply choose the appropriate tag.
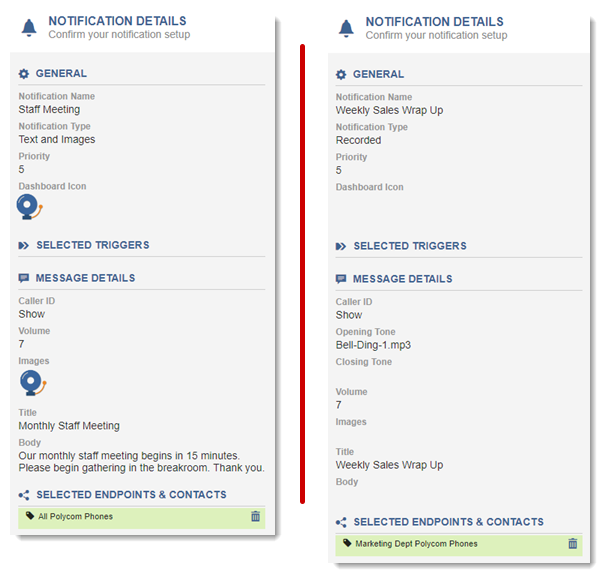
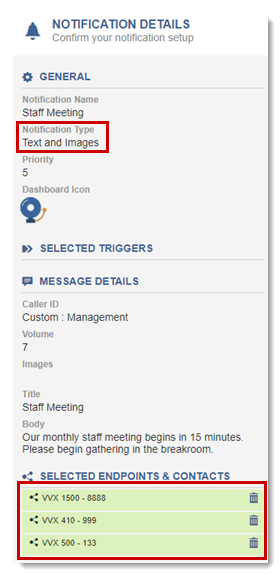
For text and image notifications, I can just assign the registered phones since no audio can be included for this Revolution notification type.
Poly and Priority Levels
Each Poly Paging Group may be set to one of three priority levels – Normal, Priority, and Emergency. You can only set one Priority group and one Emergency group.
By default, in Poly, groups 1 through 23 are set to Normal, group 24 is set to Priority, and group 25 is set to Emergency.
You cannot unsubscribe from a Priority and Emergency group.
A Priority page interrupts Normal pages or active calls. An Emergency page interrupts Normal pages, Priority pages, and active calls and plays at near maximum volume even if Do Not Disturb (DND) is enabled.
There are three basic steps:
- Sending only audio to Poly phones – Configure Revolution Poly module so phones can receive audio.
- Sending all elements (text, images and audio) to Poly phones – Send notifications to Poly IP phones. This includes creating user tags that contain the desired phone endpoints and group endpoints. Assign user tags to notifications so your Poly phones receive text, image, and audio.
To send Revolution notification audio to your Poly IP phones, add your Poly groups to Revolution Poly module. Once configured, Poly groups appear as endpoints that can be assigned to Revolution notifications. (See Configure Poly IP Phones to send text and images to your phones.)
- Go to Configuration > Phone Systems > Poly.
- Select New > New Paging Group.
- For Multicast IP Address and Port, these fields will prepopulate with the default Poly values. If you are using different values in Poly (set through Poly > Paging/PTT Configuration), make sure those values are entered here.
-
For Group Number, enter a value equal to the Poly group number + 25, so group 1 is entered as 26.
Tip: Revolution also supports using Poly channels. Enter the channel number in the Group Number field as is; do not offset channel numbers by 25 as you do for group numbers.
-
For Route to Networks, enter comma-separated list of the networks in CIDR notation that you want Revolution to use to relay audio streams when sending notifications with audio. Each network entered must have its own Paging Relay in order to use the Paging Relay's multicast for audio streams.
For example, 192.168.1.0/24, 192.168.2.0/24
Note: If you specify one network, you must include all networks that contain Poly phones even if they do not require a Paging Relay.
- Select Save.
- Repeat this process for each Poly group you want to use in Revolution.
Important: All multicast IP addresses and ports used across Revolution must be unique.
To send Revolution notification text and images to your Poly IP phones, configure your phones to register with Revolution. Once phones are registered, they appear as endpoints and can be assigned to notifications.
To receive audio to your Poly phones, see Configure Revolution Poly module so phones can receive audio.
You also have the option of configuring all your Poly IP phones at once using the Poly Master Configuration file. Consult your Poly vendor documentation on how to do this.
Note: Your Poly IP phones should already be set up to register with a SIP server. This is the typical customer environment.
There are three areas to configure:
Note: Below is a generic configuration. Configuration may be different depending on which PBX system you're using. Consult with your PBX vendor for the appropriate setup.
- Log in to your Poly phone web interface. (http://<phone.ip.address>)
- Click Settings > Applications.
- In the Telephony Event Notification section, select Add and enter http://<Revolution.ip.address>/PolycomListener. Line Registration should select automatically. Select it if it doesn't.
- Under Phone State Polling:
- Set Response Mode to Requester.
- Enter a User Name and Password. This is whatever you want it to be. (For example, intrado/intrado)
- Under Push:
- Set Allow Push Messages to All.
- Enter the same User Name and Password you entered for Phone State Polling. (intrado/intrado)
- Select Save.
Your Poly phones must be registered with a SIP server. Typically, this is already done. If it isn't:
- Go to Settings > Lines.
- Expand SIP Server 1.
- Enter the SIP server IP address in the Address field.
- Enter the Port.
- Set the Expires rate to the frequency you want your endpoints to update in Revolution. For example, the default of 3600 means that Poly phones will only update on the Endpoints page in Revolution once an hour. Setting the rate to 300 would update the Endpoints page every 5 minutes.
- Set Register to Yes.
- Leave the remaining fields at the defaults.
- Select Save.
- Go to Settings > Paging/PTT Configuration.
- Under Group Paging Configuration:
- Set Group Paging to Enable.
- Leave the other settings at the default.
Important: This setting is required so your Poly phone can receive audio sent with Revolution notifications. Make sure your Poly IP phones are up to date on their firmware. Otherwise, audio may not work.
- Click Save.
This sets the credentials you defined in the Poly phone web interface. See Application Settings above.
- Go to Configuration>Phone Systems > Poly
- Select Settings.
- Enter the Username and Password you entered for the Poly State Polling User Name and Password. (intrado/intrado)
- Select Save.
Polycom phones will be required to use HTTPS after upgrading Revolution to version 2025.1.
-
Under the Poly module, go to Settings > General Settings.
Note: Users should select the Use HTTPS check box. Users should also enable Allow Self-Signed Certificates under Advanced Settings.
- To send just text and images from a notification to Poly phones, assign the registered Poly phones as endpoints. (See Send Text and Images to Poly IP Phones above if you haven't already configured this.)
- To send just audio from a notification to Poly phones, assign the Poly group you created in Poly module. Poly uses groups to send audio. (See Send Audio to Poly IP Phones above if you haven't already configured this.)
- To send all three elements of a notification to Poly phones, it's easiest to create user tags that contain the desired Poly IP Phones and Poly groups. Users then assign the appropriate user tag(s) to notifications as endpoints. (See User Tags for instructions on creating them.)
- Poly phones display on the Endpoints page with the next system refresh. To update the Endpoints page immediately, click the Refresh Data Button in Status > System Status > Poly Module.
- Create User Tags to pair registered phones with paging groups.
- Create notifications and assign the appropriate User Tags.
- Configure Poly numbers to monitor and trigger notifications, for example, have a notification trigger when 9-1-1 is dialed. See Dial Monitoring for Poly for details.
