Tokens for cloud service integration
Note: This topic is specific to General Token creation. Refer to Connecting to Social Media Services and Connecting to Collaboration Tools for information about creating tokens for those applications. See Creating an OAuth Token for information about using this type with outgoing webhooks.
Tokens allow cloud services to integrate with Revolution.
For example, let's say you're a college campus that offers personal-carry panic buttons to on-site students. Students can press the panic button, which triggers the assigned notification. Or let's say your manufacturing company uses an application to report safety concerns and accidents. This app can integrate with Revolution to send a notification to your phones, desktop client, speakers, etc., along with sending the emergency alert native to its app.
- In Revolution, you create an authorization token and provide it to Company XYZ. (Company XYZ will tell you how.) This allows Company XYZ to communicate with your Revolution. (I created a token called Company XYZ.)
- You also create a trigger in Revolution associated with the auth token you created. Then you assign the trigger to the notification(s) you want sent. (I named my trigger and notification XYZ Safety App. I have on-site safety personnel assigned as contacts in the notification. And I have the speakers in my building assigned as endpoints.)
- Your end users use the safety app to report an accident. The app notifies the nearest 9-1-1 call center and triggers the Revolution XYZ Safety App notification. (The notification is sent to my safety personnel's desk phones and cellphones, and the notification plays across all the speakers in the building.)
- At this time, cloud services can trigger notifications but not receive them.
- You only need to supply the cloud service provider with one auth token, but you can create multiple triggers associated with it. (Let's say Company XYZ also makes the personal-carry panic buttons. I want a different notification sent when the safety app is used than when the panic button is used. So, I create one trigger (with the XYZ auth token assigned) for the safety app and assign it to my safety app notification, and I create another trigger (with the same XYZ auth token assigned) for the panic button and assign it to the panic button notification.)
Contact your Sales representative to find out if cloud services your organization uses are integrated with Revolution.
There are three main steps:
The Revolution admin generates an authorization token and provides it to the cloud service provider. This allows the cloud service provider's product to communicate with your Revolution.
- Go to Configuration > Integrations > Token.
- Select New.
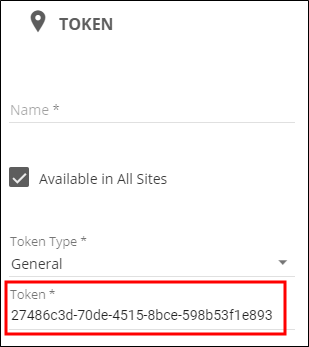
- For Name, enter a descriptive name for the authorization token.
- For Available in All Sites, enable to allow use of the authorization token for all of your sites or disable to specify a specific Site. If your permissions are limited to single site, Revolution automatically assigns this to your site.
-
For Token Type, select General.
Refer to Connecting to Social Media Services and Connecting to Collaboration Tools for information about creating tokens for those applications.
For OAuth, see Creating an OAuth Token.
-
For Token, you will see that Revolution has populated the field with an alpha-numeric string for you to use.

- Select Save.
You can now submit the authorization token string to your cloud service provider, following their processes for communicating with Revolution.
- Go to Configuration > Integrations > Cloud Service Trigger.
- Select New > New Cloud Service Trigger.
- For Name, enter a descriptive name to identify what cloud service this trigger is for.
- For Available in All Sites, enable to allow use of the trigger for all of your sites or disable to specify a specific Site. If your permissions are limited to single site, Revolution automatically assigns this to your site.
- TheTrigger ID field will be populated with a unique string after saving your service. It will also appear in the list of Cloud Service Triggers. You can use this ID with the Revolution API. Use the copy icon to easily transfer the information to your clipboard.
- For Token, select the authorization token you created, or select Create New.
-
(Optional) For Icon, select an icon for scenarios where the cloud service supports displaying it in their product.
For example, a safety app may support displaying an icon, where as a panic button would not.
- (Optional) Determine whether you want the users of the cloud service to be able to write notification content on the fly, and whether they can include audio and images.
- Allow User to Add Text – Cloud service users can write content on the fly. You'll also need to add variables to the notification Message Details, so that the content is pulled into the notification before it is sent to recipients.
- Allow User to Add Images – Cloud service users can attach any image available to them from the product.
-
Allow User to Add Audio – Cloud service users can include an existing audio available to them from the product or make a recording, if the product allows it, and include it with the notification.
Important: When allowing audio to be sent, cloud service trigger must be assigned to a notification type of Stored Audio. If assigned to any other notification type, the audio from the cloud service will not play when the notification is sent.
- Select Save.
Tip: You'll need to know whether the cloud service supports adding text, images, and audio from within their product.
You may repeat these steps to create additional triggers associated with this authorization token
For example, my organization is using both the safety app and personal-carry panic buttons from Company XYZ. I want separate notifications triggered for each. So, I create two triggers, one for the safety app and one for the panic buttons.
As with any trigger, you must assign it to a notification.
- Create the notification you want sent when triggered from cloud service.
- General – Complete this section as you would like. However, you should note that cloud service triggers only support the following notification types: Direct One-Way, Direct Two-Way, Stored Audio, Text and Images, and Text-to-Speech.
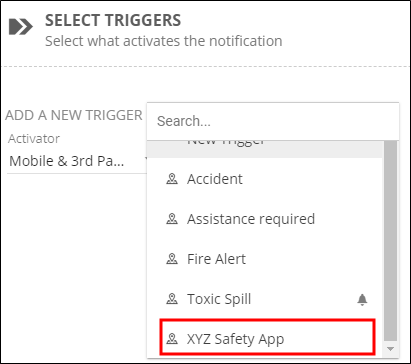
Select Triggers – For Activator, select Mobile & 3rd Party. Then for Trigger, select the trigger you created previously.

Message Details – Complete this section as you require, but for Title and Body, consider the following:
- If you are not allowing the cloud service users to enter content on the fly, or the product does not support it, you will need to enter the content you want sent.
- If you are allowing the cloud service product users to enter text on the fly, you will need to specify, at a minimum, select the following from Add Text Variable:
- Title – Global > Activator Title, which adds {activatorTitle}
Body – Global > Activator Body, which adds {activatorBody}
These variables use contents entered from the cloud service.

You can also add any static text or other variables.
Endpoint & Contact Selection – Select whatever endpoints and contacts you want to receive the notification.
Create as many cloud service triggers and notifications as you need.
For example, I have one trigger and notification for use with the XYZ Safety app and another trigger and notification for use with the XYZ panic button.
-
If you want to temporarily stop receiving notifications from the cloud service product, remove the cloud service triggers from your notifications.
Tip: Make note of which notifications you're removing them from so you can add them back when you're ready.
-
If you no longer want notifications triggered at all from a cloud service, delete the authorization token, and then delete the triggers associated with it. Deleted triggers are automatically removed from notifications.

