Configure Your Mitel Phones
Note: Only All Sites Admins have full access to configuration.
Refer to the PBX Compatibility Matrix for the most recent information.
Mitel Supported IP Phones
| Mitel PBX System |
6910 6920 6930 6940 6970 |
6867 6869 6873 |
420 480 485 |
Configuration Instructions |
|---|---|---|---|---|
|
MiVoice Office 250 |

|
|||
|
MiVoice Office 400 |
|
|
||
|
MiVoice Connect |
|
|
Configure your Mitel IP phone custom text file | |
|
MiVoice Business |
|
|||
|
MiVoice 5000 |
|
|
Configure your SIP phones | |
|
MX-ONE |
|
|||
|
Clearspan |
|
|||
|
MiCloud Office / Telepo |
|
Behaviors to be aware of:
- When a notification with audio is sent to a Mitel phone while that phone is in an active conversation, the audio is played and can be heard by the person on that phone. For example, if Jane and Bob are on the phone and a notification with audio is sent to Jane's phone, Jane will hear the audio, Bob will not.
- When a two-way notification (intercom) is activated and the receiving Mitel phone is in an active conversation, the two-way notification is not initiated.
Limitations
- 6800 series phones do not support two-way and direct two-way notification types.
- 6900 and 6800 series phones do not support busy detection.
- Only 6800 and 400 series phones support notification volume settings.
- 400 series phones do not support the option on a two-way notification type to initially mute the mic.
- 400 series phones do not support PAPI until customers upgrade from ShoreTel Director to MiVoice Connect.
- 480/480g and 420 phones don't support images.
- 420 phones don't use soft keys and therefore don't support sending response options in notifications.
These legacy phones are compatible with UNP.
| Mitel IP Phone Legacy Models | Configuration Instructions | Notes |
|---|---|---|
|
265, 565, 565g |
These phone models do not support Phone Services |
|
|
560, 560g |
These phone models do not support images. |
|
| 655 |
|
|
|
5304, 5312, 5324 |
Supports only text; two lines up to 20 characters each. Title will be on the first and Body on the second. For high importance, when showing a notification devices will flash their button lamps red and beep. For low importance, devices will not illuminate button lamps and will not beep. Does not support responses. |
|
|
5320(e), 5330(e), 5340(e) |
Supports text and images. For high importance, when showing a notification devices will flash their button lamps red and beep. For low importance, devices will turn on button lamps green (no beep). 5320 and 5330 allow up to two responses. 5340 allows up to four responses. |
|
|
5360 |
Supports text and images. For high importance, when showing a notification devices will flash their button lamps red and beep. For low importance, devices will turn on button lamps green (no beep). Allows up to four responses. Supports font color |
|
| 67xx |
Only 6700 series phone models support notification volume settings. 6700 series phones do not support busy detection. |
Configure Communication with Mitel IP Phones
MiVoice Business customers
These instructions are for Mitel MiVoice Business - versions 8.0 SP3 PR3 and newer.
If you've set up a SIP endpoint, UNP will call the phone number set up in the notification.
Here's how this works:
- Add MiVB Page Groups and SIP phones as UNP SIP endpoints, so that you can dial them. See SIP endpoints for instructions.
- When a Page Group SIP endpoint is assigned to a notification, all devices included in the Page Group receive the notification.
- Two-way notification types (intercom) from phone to phone, requires each SIP phone (caller and receiver) to be entered as an individual SIP endpoint, not as part of a Page Group.
This allows you to send audio that will start playing on the phones in the paging group.
-
In MiVoice Business,
-
Define a direct page primary code, such as **3.
-
Create a page group by assigning it a value, such as 1001, and assigning phones to the group.
You will reference these values when creating a SIP endpoint in UNP. See your MiVB documentation for more detailed instructions.
-
-
In UNP, create a SIP endpoint for the MiVB page group.
Go to Configuration > Phone Systems > SIP, and select New SIP Endpoint.
Set up the endpoint as you desire, but for SIP URI, enter a string similar to the following:
sip:**31001@192.0.2.0;transport=TCP
where **31001 is what you defined in the first two steps and 192.0.2.0 is the IP address of your MiVB trunk switch.
See SIP Notifier for more information.
-
In UNP, create a notification and select the MiVB Page Group SIP endpoint you created.
MiVB Communications Manager
- Go to Configuration > Phone Systems > Mitel
- Select New > New MiVB Communications Manager
- For Name, enter a value that will help you identify this call manager.
-
For Server, enter the IP address or host name for the MiVoice Business server.
Note: If you have redundant MiVoice Business systems, you must add all servers in a comma-separated list.
- For Username and Password, enter the credentials for the MiVoice Business Server.
To ensure that your 69xx phones receive audio in addition to text and images from your notification, you must follow these procedures for setting up MiVoice Business, UNP static streams, and UNP notifications.
MiVoice Business System Administration Tool
Within this tool, you will configure Mass Audio Notification to enable audio content from UNP on your 69xx phones.
-
Go to Voice Network > Mass Audio Notification.
-
For Multicast Address and Multicast Port, enter the IP Address and port number for multicast broadcast.
Note: You will use these values to set up a static stream notifier.
-
Select Save.
UNP Static Stream Notifier
Within UNP, you will create a Static Stream Notifier to send the audio content to the 69xx phones.
-
Go to Configuration > Static Stream
-
Select New Static Stream.
-
For Name, enter a string to make the stream notifier easily recognizable.
-
For IP Address and Port, enter the values you used when setting up Mass Audio Notification in the MiVoice Business System Administration tool.
-
Select Save.
UNP Notification
When sending notifications to Mitel 69xx phones, set up your endpoints as follows:
-
To send just text and images, assign the registered Mitel phones as endpoints.
-
To send text, images, and audio, your must assign the Mitel phones and your static stream as endpoints. It is easiest to create user tags that contain the desired Mitel 69xx phones and static streams. Users then assign the appropriate user tag(s) to notifications as endpoints. (See User-created tags.)
MiVoice Connect and ShoreTel Director customers
These instructions are for Mitel MiVoice Connect – versions 15.0 and newer and ShoreTel Director – versions 12 - 14.
6900 series phone configuration file must be created as follows.
- Use a standard text editor to create the file on the Mitel MiVoice Connect server if possible, or create it elsewhere and move it to the server.
- Save the text file as startup.txt.
- Change the file extension from .txt to .cfg.
- Move startup.cfg to C:\Inetpub\ftproot\phoneconfig on the Mitel MiVoice Connect.
- Reboot the 6900 series phones so they will pull down the startup.cfg file.
xml application post list: <server ip>
action uri poll:http://<server ip>/MitelRegistrar/?dn=$$SIPUSERNAME$$&ip=$$LOCALIP$$
action uri poll interval: 60
where <server ip> is the actual IP address of your UNP server
400 series phone custom files are located in C:\Inetpub\ftproot\phoneconfig.
| Mitel IP Phones | Custom File Name |
|---|---|
| 485g | custom_IP485g.txt |
| 480g | custom_IP480g.txt |
| 480 | custom_IP480.txt |
| 420 | custom_IP420.txt |
- Mitel 400 series phones have a global custom.txt model file. We do not recommend doing the trusted server configuration in the global file. Use the custom.txt file for each individual phone model.
- ShoreTel Director does not support 400 series phones.
Non-400 series phones custom files are located in C:\Inetpub\ftproot.
| Mitel IP Phones | Custom File Name |
|---|---|
| 655 | swecustom.txt |
| 565 / 565g | s6ccustom.txt |
| 560g | s6gcustom.txt |
| 560 | s6custom.txt |
| 265 | s36custom.txt |
For each phone model, you need to add the UNP server IP address as a trusted server.
-
For 400 series phones, add a new line using the following format, specifying your UNP server IP address:
trustedServers = 123.123.12.123
Note the uppercase "S" in trustedServers and the use of the equal sign (=).
-
For non-400 series phones, add a new line using the following format, specifying your UNP server IP address:
Trusted Servers 123.123.12.123
Note the multi-word, initial-cap form of Trusted Servers and the lack of an equal sign (=).
In both of the above cases, for multiple trusted servers (redundancy/failover) use this format for specifying your IP addresses
"123.123.12.123,456.456.45.456"
Note that the addresses comma-separated, with no space, and are enclosed double-quotation marks (").
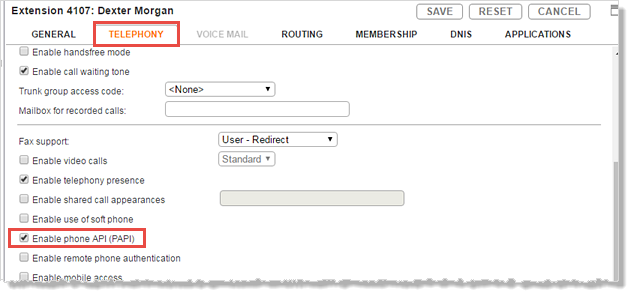
For MiVoice Connect
- Select the
 wrench icon > Users > Users.
 - Select a user name.
- Select the Telephony tab.
- Select Enable phone API (PAPI).
- Select Save.
For ShoreTel Director
- Select Administration > Users > Individual Users.
- Select a user name.
- Select Allow Phone API.
- Select Save.
Connect Communications Manager
- Go to Configuration > Phone Systems > Mitel
- Click New > New Connect Communications Manager.
- For Name, enter a value that will help you identify this call manager.
- For Server, enter the address, or Fully Qualified Domain Name, for the Mitel server.
- For Advanced Settings, you should only alter the default values if you are not using the default Mitel server port (4308) or username/password credentials (st_configread/passwordconfigread).
- Select Save.
Mitel MiVoice Office 250
This section describes how to set up your UNP environment to work with Mitel MiVoice Office 250.
Note: These instructions only go over setting up UNP. To set up MiVoice Office 250, you should review the Mitel document, Configuration Guide for MiVoice Office 250.
- Create a new SIP Registration – Follow the instructions in Add a SIP registration, taking note of these specific instructions:
For Registrar URI, enter the registrar server URI in the format: sip:domain.com, using the UDP transport. For example.
sip:<domain>;transport=UDP
For Address of Record, enter the registration address of record in the format user@domain.com, where user is the SIP extension number defined in the Users and Services Configuration form of the MiVoice Office 250 System Administration tool. For example:
1001@<domain>
- For Registration Interval, refer to the guidelines in the MiVoice Office 250 System Administration tool.
- Configure your SIP Settings – See Customizing SIP Settings for detailed information.
- For Inbound Digest Realm, leave the field blank
- For Inbound Username and Inbound Password, enter your Mitel credentials.
- For Pin Timeout Seconds, set this to your desired duration.
- For STUN Server and Outbound Proxy Servers, leave these fields blank.
- For SIP Port, only update this if your Mitel server is not using the default port.
- For Trusted Servers, leave this field blank unless your company security policies require servers to be listed.
- For Transport Layer Security, set this according to your company security policies. Refer to your Mitel documentation for information about how they support TLS.
- Enable Disable Reinvites.
- Create your SIP lines – See Creating a New SIP Line. You can assign any lines you create to notifications.
- Create SIP endpoints – See Creating SIP Endpoints, taking note of these specific instructions:
For SIP URI, enter the SIP URI for the device, where the IP address is specific to your MiVoice Office 250, and you must define the transport type as TCP. For example
sip:1234#<ip_address>;transport=TCP
- Create static streams for multicast configuration – See Configure UNP Static Stream You can then use this stream as and endpoint for your notifications.
Mitel MiVoice MX-ONE
This section describes how to set up your UNP environment to work with Mitel MiVoice MX-ONE.
Note: These instructions only go over setting up UNP. To set up MiVoice MX-ONE, you should review the Mitel document, Configuration Guide for MiVoice MX-ONE.
- Create your SIP lines – See Creating a New SIP Line. You can assign any lines you create to notifications.
- Add SNMP Activator for an emergency call – See Configure UNP Mitel Dial Monitor Trigger (SNMP Trap), where Monitored Number is your Mitel MiVoice MX-ONE emergency number (refer to your PBX documentation). You can then use this SNMP activator to trigger notifications, by selecting this activator as the Trigger in the Notification.
- Create static streams for multicast configuration – See Configure UNP Static Stream You can then use this stream as and endpoint for your notifications.
Mitel Clearspan customers
You'll need to update these files – startup.cfg, <model>.cfg, and <mac>.cfg – to configure XML push requests so your IP phones can receive text, images, and audio. Consult your Mitel documentation.
Example Syn Apps XML Push Notifications:
xml application post list: 10.0.10.10
action uri startup: http://10.0.10.10/MitelRegistrar/?dn=$$SIPUSERNAME$$&ip=$$LOCALIP$$
action uri registered: http://10.0.10.10/MitelRegistrar/?dn=$$SIPUSERNAME$$&ip=$$LOCALIP$$
Follow the instructions below to configure your SIP phones.
Other Mitel PBX systems customers
| Mitel SIP Phone Models | |
|---|---|
| 565g‡ | 69xx - unless used with MiVoice Business |
| 565‡ | 68xx - unless used with MiVoice Business |
| 560g* | 67xx |
| 560* | |
| 655 | |
Configure each phone with the UNP IP address so the phone can register as an endpoint.
Tip: You may be able to make these changes in your PBX communications manager. Consult your vendor documentation. If not use these instructions.
- Log into the phone's web interface.
- On the Configuration Server page, enter the UNP server IP address in the XML Push Server List (Approved IP Addresses) field.
- On the Action URI Configuration page, enter the following in the Poll field and set the Interval between 60 and 300 seconds depending on how frequently you want the phones to register.
- Make sure the interval is shorter than the UNP Endpoint Inactive Timeout set in Global Settings.
- If you have hundreds (or thousands) of phones, a longer interval is better (15 minutes).
- Save your changes.
- Reboot your phones.
http://<unp_ip>/MitelRegistrar/?dn=$$SIPUSERNAME$$&ip=$$LOCALIP$$
All Mitel customers
MiVoice Business page groups and SIP lines display on the Endpoints page as soon as they're added as UNP SIP endpoints.
MiVoice Connect, Mitel Clearspan, and ShoreTel Director phones display on the Endpoints page with the next system refresh and can then be assigned to notifications. To update the Endpoints page immediately, go to System Status > Mitel Module and select Refresh Data.
Other configurations
You can configure your Mitel PBX system to monitor when an emergency number is dialed. These numbers then display as triggers on the Mitel module page and can be assigned to notifications to trigger an alert when the number is dialed. For example, you can monitor 9-1-1. When it's dialed from a phone on the network, an emergency alert notification is sent to security and reception to notify them that an incident has occurred. See the Dial Monitoring topic for details.
- Go to Configuration > Phone Systems > Mitel
- Select Settings and update the following as needed.
Cache Update Interval – Determines how frequently UNP pulls in new data from MiVoice Connect or ShoreTel Director.
The value entered here must be less than the value configured in Global Settings > Endpoints > Endpoints Inactive Timeout Minutes.
- Enabling Emergency Number Monitoring – Allows you to monitor designated MiVoice Connect or ShoreTel Director numbers and trigger an assigned notification when the number is dialed. For example, when 9-1-1 is dialed an emergency notification is triggered. See Configure Mitel numbers to monitor for details.
- Populate Location – Define how UNP uses location information from the call manager. See Set location information .
Directory Import – Enable this when using dial monitoring to ensure UNP can provide information, other than the DN, from unsupported models and SIP devices. The information is available from the endpoint directory. See Directory Tab. This is also beneficial for locations using hot desk functionality, where users can log in to different phones, ensuring their information is available.
- Advanced Settings – You should not make changes to these settings unless specifically instructed to do so by support.
If you're using UNP SIP Activator to trigger notifications, you'll need to first configure a SIP trunk in your Mitel communications manager. See the Mitel MiVoice Connect SIP Trunk Setup topic (also for ShoreTel Director customers) or the Mitel MiVoice Business SIP Trunk Setup topic.
Important: SIP Activator is required in order to trigger live broadcast/paging notifications.
Mitel IP phones support extension reassignment, sometimes referred to as extension mobility, where a user can reassign their extension to a new phone.
UNP detects this change on the next refresh of the Mitel information. You can force a refresh using the following steps:
- Go to System Status > Mitel Module.
- Select Refresh Data.
The following screen captures show how the Mitel endpoints change after Thomas Anderson reassigns his extension to a new phone.

Follow this procedure to set up your Mitel 53xx devices to work with UNP. Refer to Legacy Phones for a list of supported 53xx devices and their limitations.
Note: This procedure requires the Mitel App Packager, which is part of the Mitel HTML Toolkit. The procedure is written based on the MiVoice Business PBX.
-
Download the application source files from the server where UNP is installed.
C:\Program Files (x86)\Syn-Apps\ShoreTelNotifier\Mitel53xx\PhoneApps.zip-
Unzip the archive file.
-
Run the PowerShell script update_app_host.ps1.
-
At the prompt, enter the IP address of your UNP server.
This script updates the various files to include your IP address in preparation for the next steps.
-
-
Run the Mitel HTML App Packager.
-
For each model group, use Browse for Directory to select the directory containing the files you edited.
-
Select Generate to produce a SPX file (spx.package) in the same directory.
-
-
From MiVoice Business System Administration Tool:
-
Go to User and Devices > Advanced Configuration > Phone Applications Update.
-
Select Upload App.
-
Select Choose File and navigate to the SPX file you generated.
-
Repeat for each model group.
-
-
Go to User and Devices > User and Services Configuration.
-
Locate and select a device you want to update from the list.
-
Select the Phone Applications tab.
-
For HTML Infrastructure Enabled, select Yes.
-
For Notification Application1, select your package.
-
Select Save Changes. Your device will now be able to poll the UNP server to receive notifications.
-
Repeat for any other devices.
Note: From this User and Services Configuration page, you could do a bulk update of your devices. First, Export a CSV of the data. Second, manually change the entries for your devices as follows: Set the HTML Infrastructure License column to Yes and the Notification Application1 column to the name of your SPX package. Third, Import the CSV you just edited. See your Mitel documentation for additional information about this process.
-
-

