Dial Monitoring
UNP supports dial monitoring with Cisco, Mitel, and Poly PBX systems.
Some PBX systems allow you to monitor certain numbers dialed and then perform an action.
A good example of this is monitoring 9-1-1 calls. You can configure UNP to trigger a notification when 9-1-1 is dialed from any phone on the network.
For example, you could set up a notification that sends an alert to your front desk receptionist and security personnel when 9-1-1 is dialed.
The basic flow is to:
- Configure the numbers you want to monitor, specific to your PBX system:
- Configure Cisco numbers to monitor
- Configure Mitel numbers to monitor
- Configure Poly numbers to monitor
- Add the dial monitor as a trigger to a notification
- Create the notification as you normally would
- Use text variables within the Message Details to easily provide available information
| Module/Trigger | Dial Monitor | Module/Trigger | Dial Monitor |
|---|---|---|---|
| Avaya |
|
Mobile |
|
| CAP |
|
Poly |
|
| Cisco |
|
SIP |
|
|
|
SNMP Traps |
|
|
| IP Device Inputs |
|
Input Streams |
|
| Mitel |
|
Webhook - Teams and Slack |
|


Follow these three steps to configure Cisco numbers to monitor:
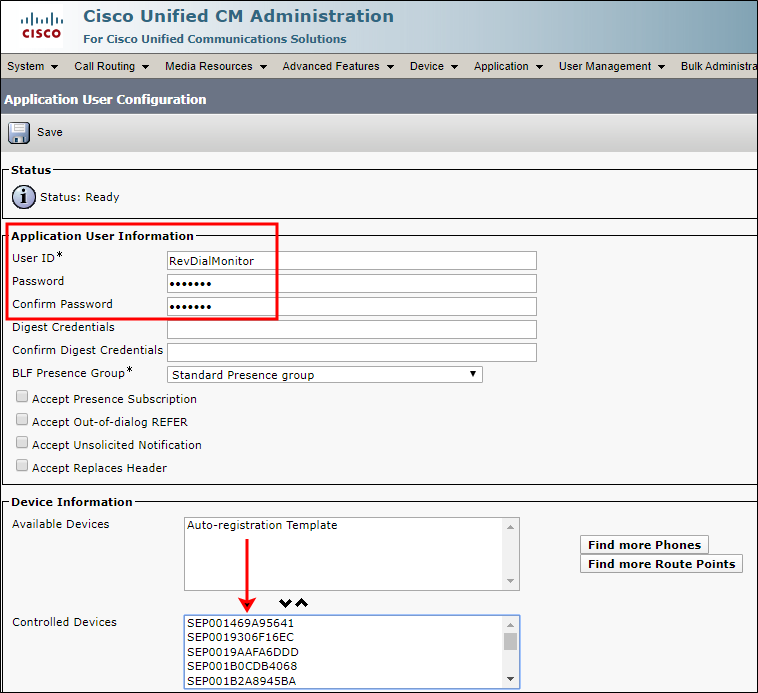
Create an Application User account for dial monitoring within CUCM. These steps are for CUCM v10.5; steps may be slightly different for other versions.
- Log in to your CUCM.
- Click User Management > Application User.
- Click Add New.
- Enter a User ID that helps you identify the purpose of this account. Our example uses RevDialMonitor.
- Enter and confirm a password.
- In the Device Information section, move the phones from Available Devices to Controlled Devices.
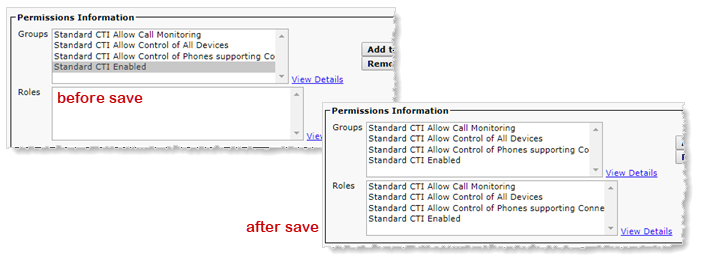
- In the Permissions Information section, click Add to Access Control Group.
- Select the following:
- Standard CTI Allow Call Monitoring
- Standard CTI Allow Control of All Devices
- Standard CTI Allow Control of Phones supporting Connected Xfer and conf
- Standard CTI Enabled
- Click Save. Permissions are automatically copied to the Roles box.
You will reference the User ID and password in UNP.
and select Add Selected.
The Groups box is now populated.
Important: Cisco Notifier must be configured with the JTAPI Provider before Cisco Activator is configured for the Dial Monitor. This is a licensed feature. If you don't see the New JTAPI Provider link, you're not licensed for this feature. Contact your sales representative.
Follow the Configure JTAPI instructions in the Configure Your Cisco Phone System topic.
Did you configure a JTAPI Provider in Cisco Notifier? This must be done previous to this step.
Create a dial monitor for each number you want to monitor.
- Go to Configuration > Phone Systems > Dial Monitoring.
- Click New > New Cisco Dial Monitor.
- Enter a descriptive Name for the number to be monitored that helps you identify it when adding it as a notification trigger. Our example uses emergency number monitor.
- Enter the number to Monitor.
You can specify wildcard characters (? and *) to enter a dial pattern. Our example uses ?11, which means that any time 911 or 411 is dialed the notification this trigger is assigned to is sent.
Here's how wildcard characters work:
- ? matches on one character, as in our example, ?11 matches on 911 and 411
- * matches on multiple characters. For example, 9* matches any number dialed beginning with a 9. So this would trigger the notification when 9-1-1 is dialed but it would also trigger the notification when extension 9801 is dialed. It wouldn't trigger the notification when 411 is dialed.
- The remaining fields are all optional. Typically, you would leave these blank when monitoring emergency numbers. But you can monitor any number or number pattern, not just emergency numbers. In this scenario, you may want to only monitor these numbers when dialed from specific DNs, Calling Search Spaces, Partitions, or Device Pools.
- Click Save.
Calling DN or Pattern allows the use of ? and * wildcard characters; Calling Search Space, Partition, and Device Pool do not. Those fields must match exactly what is configured in CUCM.
When any of these fields are populated, the monitored number only triggers the notification when there is a match on the fields.
Repeat for each number or number pattern you want to monitor.
Note: Cisco Dial Monitoring is a licensed feature. Each line being monitored counts towards your license. Once you reach your license limit you will not be able to add any new ones. If you are using the Status module and have configured a notification to be sent out for license status, Cisco Dial Monitor is not part of this because reaching this license limit does not affect the Cisco Module.
This creates the triggers you then assign to notifications.
If you're using Mitel Emergency Services and want a UNP notification triggered when an emergency number is dialed, you'll need to configure SNMP Trap messages for the SIP trunk in the MiVoice Business.
SNMP Configuration
Make sure SNMP Agent is enabled. You can keep all the default SNMP Configuration values. (SNMP is enabled by default.)
Trap Forward Attributes
| Field | Setting |
|---|---|
| IP Address | Enter the IP address of your UNP server. |
| Comment | Enter Unified Notification Platform so you know what IP address will be receiving trap messages. |
You can use the default values for other fields.
If you configured SNMP, follow the instructions in the this topic on how to set up SNMP triggers to send notifications when UNP receives an SNMP trap message from MiVoice Business.
There are two steps to configure Mitel numbers to monitor:
The program was included with your UNP installation.
- On your UNP server, go to
C:\Program Files (x86)\Syn-Apps\ShoreTelNotifier\DialMonitor. - Copy DialMonitorInstaller to your Mitel communications manager server.
- Double-click DialMonitorInstaller to install the program. There are no configuration options during setup.
This program listens for the numbers being monitored. When a monitored number is dialed, the program sends a command to UNP to trigger notifications that the monitored number is assigned to.
In your Mitel communications manager,
- Go to Administration > System > Sites > [your site] > General.
- Add the number(s) you want to monitor to the Emergency Number List. (911 may be included by default.) Our example uses 911, but you can monitor any number, and more than one number.
- Use the Mitel default values.
On the next phone refresh (occurs every 15 minutes), the number(s) configured display on the UNP Mitel module , or you can Refresh Data for the Mitel Module from System Status. This creates a new trigger that you can now add to notifications. Any time the number being monitored is dialed, the notification is triggered.
There is no required configuration in UNP. Numbers to monitor are configured in your Mitel communications manager, pulled into UNP, and displayed in the Emergency Numbers section. They are then available as triggers to assign to notifications. Any time the number being monitored is dialed, the notification is triggered.
- If you have more than one site configured in Mitel, emergency numbers are pulled in from all sites configured and display with the site name included, for example, 911 Dialed (Headquarters @ 10.10.0.10) and 911 Dialed (Other Site @ 10.10.0.11).
- All numbers are initially assigned to All Sites.
- You can edit numbers to change their display name and site assignment.
- You cannot change the number being monitored in UNP. Changes must be made in your Mitel communications manager.
- To stop monitoring a number, remove it in your Mitel communications manager. On the next UNP phone refresh, the UNP Mitel module page is updated and the trigger is automatically removed from any notifications it's assigned to.
Important: If the Dial Monitor Service program is not installed, or is not running, on your Mitel communications manager server, notifications cannot be triggered. Emergency numbers configured to monitor in Mitel MiVoice Connect are still pulled into Mitel Activator, but without the Dial Monitor Service program installed, UNP doesn't know when a monitored number is dialed.
Disable Using Mitel Dial Monitoring
If you don't want to use the Dial Monitoring feature in UNP, or your security policies prevent you from installing the Dial Monitor Service program on your Mitel server, go to Configuration > Phone Systems > Mitel > Settings and disable Enable Emergency Number. This prevents an error message from displaying in UNP when there's no link to the Dial Monitor Service. Emergency numbers configured in your Mitel communications manager still display on the Mitel module page, but will not be monitored by UNP.
There are two steps to configure Poly numbers to monitor:
For each Poly phone's configuration, enable Configured Telephony Notification URL > Outgoing Call. Other configurations were already done when you configured your Poly phones to register with UNP.
- Go to Configuration > Phone Systems > Dial Monitoring.
- Click New > New Poly Dial Monitor.
- Enter a descriptive name to identify the dialed number you'll be monitoring. Our example uses 911.
- Determine if this trigger is Available in all sites.
For multi-site organizations, do one of the following:
- If you're an All Sites Admin – To assign this trigger to a specific site, disable Available in All Sites and select a Site from the drop-down list. Or, you can leave it Available to All Sites.
- If you're a Site Admin – This trigger is automatically assigned to your default site. Each Site Admin will need to create their own triggers.
- Enter the number to monitor. This can be any number you choose. Our example uses 911.
- Click Save.
This creates a new trigger that you can now add to your notification. Any time the number being monitored is dialed, the notification is triggered.
Repeat these steps to monitor additional numbers.
Any time the defined number is dialed, from any phone in the network, the notification is sent.
For this task you will create a standard notification. These instructions will focus only on the Select Triggers and Message Details sections.
- Select Triggers
- Activator: Select Cisco, Mitel, or Poly depending on the type of dial monitor you just created.
Note: If you're using Mitel MiVoice Business, follow the SNMP instructions instead to configure dial monitoring.
- Trigger: Select the descriptive Name you used.
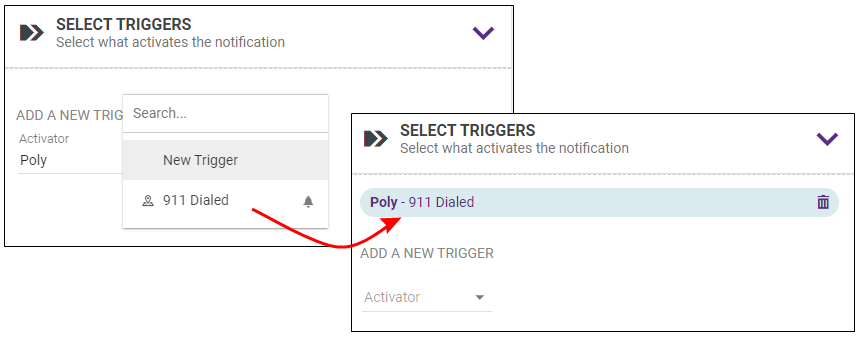
- Activator: Select Cisco, Mitel, or Poly depending on the type of dial monitor you just created.
- Message Details
- Complete the fields as desired.
-
Title and Body: Use the Add Text Variables icon to include variables that can help you identify where the monitored number was dialed from, such as the Caller ID.
Tip: If you add the string "911" to your Title or Body, be sure to add spaces between the digits, such as "9 1 1". This will ensure text-to-speech does not read the string as nine-hundred-eleven.
-
This table highlights common choices from the Add Text Variables drop-down. All other variables have help text to explain their functionality.
Variable
Drop-down path
Description
Mitel MiVoice
ConnectCisco Poly {callerID}
Global > Caller ID
Name and DN for the calling phone, which was provided by the calling phone, as shown as Default Name on the endpoints page.

{trigger.name}
Trigger > Name
Cisco and Poly: Name of the UNP Dial Monitor trigger.
Mitel MiVoice Connect: Name of the dial monitor trigger as shown in the Mitel module page. Defaults to the dialed number, Mitel Site name, and the IP address of the Shoregear switch.
{source.description}
Source > Description
Source phone model, name, and DN
{source.DN}
Source > Endpoint DN
Primary DN from source.
{source.DNs}
Source > Endpoint DNs
List of all DNs from source; comma-separated
{source.site}
Source > Site
The UNP site that the dialing endpoint is associated with
{source.name}
The UNP endpoint name of the dialing phone. Typically the same as the CallerID
{source.location}
Source > Location
Source hub location field from the CUCM device information

{source.CiscoGeolocation}
Cisco Only > Endpoint Geolocation
Geolocation of the activating endpoint (if populated in the CUCM device information. See Configuring CUCM Geolocation)
{source.CiscoLocation}
Cisco Only > Endpoint Location
Location of the activating endpoint (if populated in the CUCM device information.)
{source.CiscoDisplay}
Cisco Only > Endpoint Line Display
Primary Line Caller ID of the activating endpoint (if populated in the CUCM device information.)
{source.CiscoExternalNumber}
Cisco Only > Endpoint External Number
External primary number of the activating endpoint (if populated in the CUCM device information.)
{source.MitelSite}
Mitel Only > Endpoint Mitel Site
Mitel site name
{source.MitelUserGroup}
Mitel Only > Endpoint Mitel User Group
Mitel user group name of the dialing phone
{source.JackNumber}
Mitel Only > Endpoint Mitel Jack Number
Jack number associated with the dialing Mitel phone
Note: {activatingContact.Coordinates} and {activatingContact.Address} are only used for notifications assigned to our Mobile app assistance buttons.
Note: For Mitel MiVoice Business put {activatorTitle} in the notification title and {activatorBody} in the notification body and configure the message in the SNMP template
In this example, any time 9-1-1 is dialed, this notification is sent.
Note: The notification is only triggered when the number being monitored is dialed by itself so there's no confusion if the monitored number is dialed as part of a full phone number.
You can add the same dial monitor trigger to more than one notification. For example, I may want to have to separate notifications to my reception desk and security office so I can include two different sets of instructions or company protocols. In this case, I create two notifications and assign the same dial monitoring trigger to both.
JTAPI is required to monitor phones for:
- specific numbers dialed, such as 9-1-1
- busy detection
You can monitor phones for when emergency numbers are dialed and then trigger a notification to alert emergency personnel.
Busy detection prevents notifications from playing on your phone when you've set your phone to do not disturb or you're on a call. The exception to this is when the notification is an emergency priority.
Two ports are required for each JTAPI Provider so a range of ports needs to be available.
If you have multiple CUCM servers that are not clustered, each server needs its own JTAPI Provider configuration. However, if the servers are clustered, you only need one JTAPI Provider.
- Log in to UNP.
- Go to Configuration > Phone Systems > Dial Monitoring.
- Select New > New Cisco JTAPI Provider.
- For Name, enter a value that helps you identify what this JTAPI Provider is for.
- For Hostname, enter your CUCM IP address.
- For Username and Password, enter the Application User ID and Password you created in CUCM. Our example in Configure Cisco numbers to monitor created RevDialMonitor.
- For Starting Port, enter the first port for the designated range. Two ports are required for each JTAPI Provider so a range of ports needs to be available.
-
For Observed Lines, enter the extensions you want to monitor.
The value entered here determines which phones are monitored for emergency numbers and busy detection, depending on which features you have enabled.
-
0 (zero) – monitor all lines up to your license limit.
Best practice is to only use this setting if your JTAPI Provider license is at or above your total CUCM extensions.
Here's how this works: Each time the phone cache updates, UNP receives a list of all extensions from CUCM and adds them to the JTAPI monitor list until the license limit is reached.
The license count is only incremented for unique phones, so a maximum of one license per phone monitored is used. If your JTAPI license is for 100 and you have 150 phones, only the first 100 phones in the CUCM list are added to the JTAPI monitor list, 50 are not, which means these phones are not monitored.
You'll receive an error status and the event is logged. Lists from CUCM come to UNP unordered, so the lines being monitored can change with each phone cache update.
- Specific extensions – You can enter individual extensions you want monitored, a range of extensions to monitor, or a combination of both. The list is comma-separated, for example: 2300,2400,2500,3000-5000.
- This list cannot contain duplicate extensions. 1005,1000-1010 results in an error because 1005 is included in the 1000-1010 range.
- Ranges cannot be listed in reverse order. 3000-1000 results in an error; 1000-3000 is valid.
- Make sure your JTAPI Provider license is enough to cover all the extensions you want to monitor. Go to System Status > Cisco Module to see your JTAPI Endpoint license usage and limit.
- Select Save.
- Go to Configuration > Phone Systems > Cisco.
- Select Settings.
- Scroll to the bottom of the page and select Use JTAPI for Busy Detection.
- Select Save.
When you upgrade to a new version of your CUCM, you must do the following to ensure your JTAPI provider also updates:
- Upgrade CUCM.
- Delete your existing JTAPI Provider (Configuration > Phone Systems > Dial Monitoring).
- Restart your Cisco Module (System Status > Cisco Module)
- Recreate a new JTAPI Provider, see Create a JTAPI Provider.
If you do not follow this process, you may receive the error:
"Unable to create provider – Incompatible Protocol version – check your JTAPI provider settings."

