Installing UNP on a Virtual Appliance
The following instructions are for setting up and using Unified Notification Platform notification software as a Virtual Appliance (VA) running a VMware OVA (Open Virtualization Archive) or Microsoft Hyper-V VHD.
- Have you reviewed system requirements?
- We recommend the following when joining the Windows Server to a domain or installing secondary software such as anti-virus software:
- Wait until after the UNP software has been configured and tested before joining the server or installing secondary software.
- Backup the OS prior to joining the server or installing secondary software.
UNP VA can be downloaded as a VMware or a Microsoft Hyper-V VHD file. Both files contain the UNP product as well as a 180-day Windows Server evaluation license (see Upgrade to a production license after eval period).
Choose the virtual appliance best suited to your particular environment.
- Follow the VMware OVA instructions to deploy UNP VA to a virtual Windows 2016 environment on a host Windows Server 2012 R2, 2016, and 2019, using:
- VMware ESXi 5.5 (or newer)
- Follow the Hyper-V VHD instructions to deploy UNP VA to a Hyper-V 2012 R2, 2016, or 2019 host
- Wait until after the software has been configured and tested before joining the server or installing secondary software.
- Backup the OS prior to joining the server or installing secondary software.
Important: We recommend customers download and run the CheckSum program prior to installing the OVA to verify the UNP OVA file you’ve downloaded is not corrupt or incomplete.
- Go to the following web page:
- Download the CheckSum Zip File and unzip it to c:\
- Download the proper VMWare OVA file and move it to c:\
- Run the Checksum.bat file that matches your downloaded OVA version.
- Compare the checksum output to the checksum listed in C:\MS File Checksum\Checksum Value for Intact OVA.txt to verify they are the same.
- Deploy the OVA, as described in Deploy the OVA.
Deploy the OVA
Deploy OVA to VMware ESXi 5.5 or newer
Note: Use the Chrome or Firefox browser with the vSphere Web Client. Internet Explorer has a 4 GB file size upload limit, therefore deploying the OVA file will fail with IE.
- Launch and connect to the VMware vSphere Client.
- Click File > Deploy OVF Template.
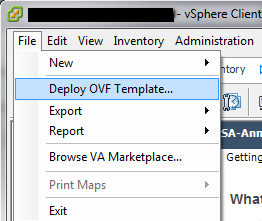
- Browse to the downloaded .ova file and click Next.
- Click through the deployment steps and select your desired configuration options.
Log Into the VM
Power on the VM and log in. First time setup prompts you to create a password.
Important: We recommend customers download and run the CheckSum program prior to installing the VHD to verify the UNP VHD file you’ve downloaded is not corrupt or incomplete.
- Go to the following web page:
- Download the CheckSum Zip File and unzip it to c:\
- Download the proper Hyper-V VHD file and move it to c:\
- Run the Checksum.bat file that matches your downloaded VHD version.
- Compare the checksum output to the checksum listed in C:\MS File Checksum\Checksum Value for Intact Hyper-V Zip File.txt to verify they are the same.
- Unzip the VHD file and deploy the VM as described in Create a Hyper-V VM
Create a Hyper-V VM
- Click Start > Administrative Tools > Hyper-V Manager.
- Click Action > New > Virtual Machine.
- Enter UNP in the Name field on the Specify Name and Location screen, and click Next.
- On the Specify Generation screen, select Generation 1 for 2016 virtual appliances and below or Generation 2 for 2019 virtual appliances, and click Next.
- Enter 4096 as the Startup memory on the Assign Memory screen, and click Next.
- Select the appropriate Hyper-V - Virtual Switch for the desired NIC on the Configure Network screen, and click Next.
- Select Use an existing virtual hard disk on the Connect Virtual Hard Disk screen.
- Browse to the appropriate vhdx file in the folder where you downloaded the UNP VHD file, and click Next.
Note: You may have moved the VHD file to wherever you created the VM. - C:\Revolution_Server_2016\Virtual Hard Disks\Revolution_Server_2016.vhdx
-
Click Finish on the Summary screen.

-
Update the number of processors for the VM
By default, the Manager resets the number of processors used to 1, so you will need to update this value.
- Right-click on the VM and select Settings.
- Select Hardware > Processor
- For Number of virtual processors, select 2.
Log Into the VM
Power on the VM and log in. First time setup prompts you to create a password.
Upgrade the Windows License to a Full Version
You will need to update the license to a full version to continue past the trial period. See Upgrade to a production license after eval period.
- Do one of the following:
- If you're already logged in as an administrator, double-click on the executable.
- If you're not logged in as an administrator, right-click on the executable and select Run as administrator.
- Click Next until you get to the license window.
- Enter your Account ID in the Account ID field and copy in the Authorization ID supplied to you.
- If you have more than one network card, those additional IP addresses are listed in the IP Address drop-down list. Select the appropriate IP address to use.
- (Optional) You only need to change the Port number if you're not using the default.
- Click Next.
- (Optional) You only need to change the SQL instance if you already have the appropriate SQL database installed on this server and want to use it instead of the default. (See Database Requirements.) If this is the case, select your SQL instance from the drop-down menu and enter your login credentials.
- (Optional) Change the Write and Read Passwords. You can leave the default passwords.
- Passwords should be different from one another.
- Passwords must follow standard Microsoft password policy:
- be at least 8 characters in length
- contains at least 1 lowercase and 1 uppercase letter
- contains at least 1 number (0-9)
- contains at least 1 special character (! @ # $ % ^ *)
- You don't need to remember these passwords. They are used by the system.
- Enter UNP user interface admin login credentials.
- Click Install. The installer may display that it's skipping parts of the installation. This occurs when the installer detects that the proper .NET or SQL is already installed.
- Reboot the server when install completes. Windows Services default to using delayed start and will take a few minutes to come up.
- Reboot IP speakers on the network that you want to register to UNP.
The install wizard unpacks appropriate files and prompts for license agreements.
Note: If you need to lock down your SQL server instance to only allow local access, follow the SQL Server Lockdown instructions.
Contact Support for any additional questions.
- Double-click the desktop icon to open the UNP web interface, log in with the credentials you created during install, and begin configuration.
- If your organization utilizes multiple network cards, set the IP address to use for UNP in Global Settings > Network.
- If your organization is licensed for the Redundancy feature, complete configuration on the primary server before installing UNP on the secondary server.
After the evaluation period, you need to switch the MS Windows Server OS and UNP product to their respective production licenses. (If you installed UNP using a production license, you only need to switch the MS Windows Server OS to its production license.)
Windows Server 2019, 2016 and 2012 R2
Important: When you switch from a Windows evaluation license to a production license, Windows changes the UNP system key. UNP displays a warning banner, the System Status goes into a license red state, a reminder message is attached to text and image notifications, and an audio tone is included with any notifications that includes audio to let you know the system is in a grace period. The grace period lasts two weeks so you have time to contact Support to get a new system key. Should the grace period expire without a new key, you will be unable to use UNP until the system key is reset.
You must contact Microsoft Support to obtain a Product Key to update the 180-day evaluation license to a production license.
Once you’ve obtained the Product Key:
- Open the Administrator PowerShell window.
- Enter DISM /online /Get-TargetEditions.
- Note the following return info:
- Target Edition : ServerStandard
- Target Edition : ServerDatacenter DISM
- Do one of the following:
- If you have a Standard product key, enter
DISM /online /Set-Edition:ServerStandard /Productkey:XXXXX-XXXXX-XXXXX-XXXXX-XXXXX /AcceptEulawhere XXXX is the product key you obtained from Microsoft.
Note: A Standard product key works best for UNP. - If you have a Datacenter product key, enter
DISM /online /Set-Edition:ServerDatacenter /Productkey:XXXXX-XXXXX-XXXXX-XXXXX-XXXXX /AcceptEulawhereXXXXis the product key you obtained from Microsoft. - Reboot the computer as directed by the screen instructions.
- Call UNP Support to reset your UNP system key. See Obtain your SystemKey
UNP
Note: If you installed UNP using a production license, you only need to switch the MS Windows Server OS to its production license.
To move from a trial license to a regular license, contact Sales to receive an updated license. UNP automatically updates your updated license on the next refresh cycle.

