IP Devices
Once your IP device is plugged into your network, it gets its IP Address from a Dynamic Host Configuration Protocol (DHCP), and auto-registers to UNP via the DHCP Option 72 WWW server value. (See System Requirements > DHCP Option 72 for more information.)
- You can find a list of supported IP Devices at: Syn-Apps website > Solutions > Products > Compatible Endpoints.
- To update the IP Devices page immediately, in UNP go to System Status > IP Device Module and select Refresh Data Button.
- To open the firmware interface of a device, go to Configuration > Other Devices > IP Device and select the IP Address of a device.
Note: If your IP device has stopped working properly, first reboot the device to force re-registration with UNP, and then if that does not work, you should upgrade the device to the latest firmware.
Here's what you can do from the IP Devices page:
By default, UNP checks every 15 minutes for IP device heartbeats. When UNP does not receive a heartbeat it changes the status of the device to inactive. You can change the default value:
- Go to Global Settings > IP Device
- For IP Device Inactive Interval, enter a time value in minutes.
You can configure each speaker to use a percentage of the speaker's maximum volume. See Endpoints > Volume.
From the Configuration > Other Devices > IP Device page you can configure Paging Relays to reach additional multicast networks or networks that are not using standard 254 device CIDR setup (Classless Inter-Domain Routing). See the Paging Relays topic.
Note: An empty ipspeaker.xml file is provided for your convenience. Consult your speaker manufacturer's documentation on how to configure the file. Typically, this file is used to configure your speaker clock.
- Log in to the UNP server.
- Open Windows IIS Manager.
- In the Connections pane, expand your local host > Sites.
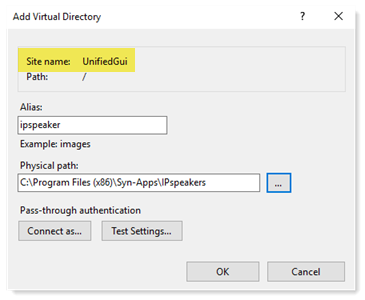
- Right-click on UnifiedGui and select Add Virtual Directory.
- Enter IPspeaker as the Alias.
- For the Physical path, create or select an existing folder for the ipspeaker.xml file and click OK.
- Open File Explorer and put a copy of your ipspeaker.xml file for your legacy IP speakers into the c:\Program Files (x86)\Syn-Apps\IPspeakers folder you just created. Consult your speaker documentation to find out where the ipspeaker.xml file is stored.
- Verify the ipspeaker.xml file is present. Browse to
http://<IP address>/<folder name>/ipspeaker.xmlwhere<IP address>is your UNP IP address and<folder name>is the name of the folder where you copied the ipspeaker.xml file to (IPspeaker for our example). - Download the ipspeaker.xml file and verify its contents are correct. This also verifies the speaker will be able to download the XML file.
Tip: We recommend creating a new folder in c:\Program Files (x86)\Syn-Apps called IPspeakers. Browse to c:\Program Files (x86)\Syn-Apps > click Make New Folder > type IPspeaker > click OK.
Should the IP device become unregistered, you can reboot it from the IP Devices page. For example, if the status column shows Unknown.
- Go to Configuration > Other Devices > IP Device
- Find your Device
- Select Settings
 to view details about the device
 - Select Reboot
For some older devices, you may need to reboot them from the device interface. Refer to the device documentation for instructions.
From the IP Devices page, you can delete a decommissioned device once its been removed from the network and has registered as inactive, or you can use the bulk delete function. See Decommissioned Hardware for more information.
Bulk deleting devices
- Once devices are totally removed, wait for the UNP system heartbeat (minimum 3 minutes) so the device registers as inactive.
- Go to Configuration > Other Devices > IP Device.
- Click Filter and type inactive in the search field.
- Click
 Edit.
Edit. - Do one of the following:
- Select the header check box to select all devices in filter results.
- Select the check box for individual devices.
- Click Delete IP Devices, and then click Delete Selected.

