IP Device Activator
Note: Only All Sites Admins can edit or delete IP devices. Site Admins can only view configuration.
Notifications can be triggered when an IP device is set off, such as a panic button or a door opening.
For example, I'm a small business owner and am not always in the front of my store. I want to make sure I know when a customer has entered. So, I have a "Customer Entered" notification set up that plays a simple chime whenever the door to my business opens. This is accomplished by setting up a sensor at the door of my business. When the door opens, the sensor is triggered, which then triggers my notification to play the chime.
IP devices can also receive notifications, such as IP speakers. These display on the Endpoints page.
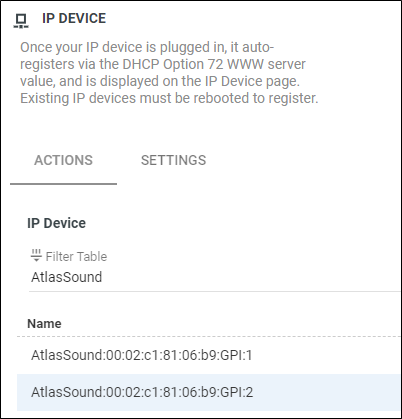
Notifications can be triggered by an IP device input. There are many types of IP devices – buttons, strobes, Paging Relays, etc. Once your IP device is plugged into your network, UNP gets its IP Address from a Dynamic Host Configuration Protocol (DHCP), and auto-registers to UNP via the DHCP Option 72 WWW server value.
Many IP devices will work with UNP, however there are several companies that certify their devices through a partner program. You can see a complete list of Certified Endpoint Partners on our website.
IP devices with multiple GPIs display multiple times on the IP Device page. For example, my IP speaker has two GPIs, so it displays on my IP Device page twice.
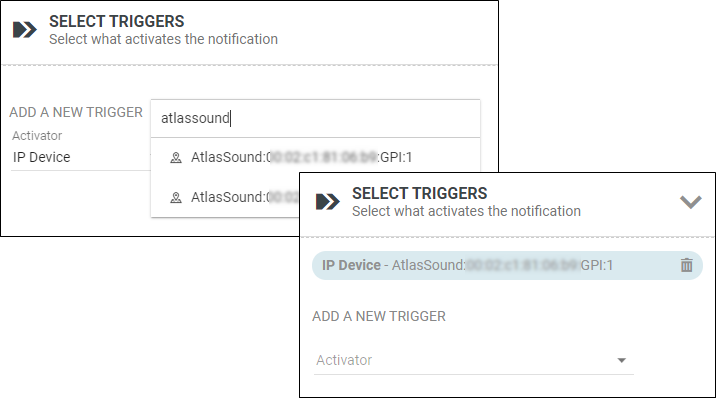
All instances of your IP Devices are available in the Select Triggers section when creating or editing a Notification, which allow you to assign the device as a trigger.
Once UNP registers your devices, you can further edit information about each device.
-
Go to Configuration > Other Devices > IP Device.
-
Select the Actions tab.
-
Filter (
 ) for the IP Device you want to edit.
 -
Select the IP Device Name to open the General Settings page for the device.
-
For Available in All Sites:
- Enable to ensure all your site locations have access.
- Disable and select a Site to limit which site has access.
-
Name – Change the name UNP uses to identify your device. By default, UNP uses information provided by the device to uniquely identify it. You can change this name to be more descriptive for your environment. You will see this name on this page and when selecting triggers for your notifications.
Renaming an IP Device: Configuration > Other Devices > IP Device; Filter for and Edit device; Name field.
Note: A bit about Paging Relays. Each Paging Relay has a GPI, GPO (Relay), and Line Out. GPI is a trigger; Relays and Line Outs are endpoints. You can only change the name of GPIs.
-
Activate On – Set the activation rule for the IP Device; will it trigger when opened, closed, or both.
Setting activation rule for an IP Device: Configuration > Other Devices > IP Device; Filter for and Edit device; Activate On field.
For example, assume you have several emergency alert stations around your college campus and that each station has a panic button and an IP speaker. You could create a high-priority notification called Panic Alert that sends a message to your security phones and sends an audio file to the IP speaker announcing that "Security is on the way". In this case, you need to decide if you want the IP device to trigger when the panic button is pushed down (pin closed) or when the panic button is released (pin open).
-
Location – Enter a name for the location.
This value is used for the source.location text variable in notifications.
-
Location Map – Use the map to select the latitude and longitude of the device.
Setting location information for an IP Device: Configuration > Other Devices > IP Device; Filter for and Edit device; use the Location field and Location Map.
-
Enter a Location – Use this to narrow down the map.
-
Drop Pin – Select this to place a movable pin at the center of the map, which you can move to refine the location.
As you move the Pin around, the Latitude and Longitude boxes will adjust. You will need to manually enter any Elevation data.
UNP uses this location information in many ways, including as text variable data within your notifications (source.latitude, source.longitude, and source.elevation), to set various area restrictions, and passed to outgoing webhooks. See Create your sites for additional information about how UNP collects location information from endpoints.
-
-
Define how often you want UNP to poll for new IP devices and update the list of devices displayed.
- Go to Configuration > Other Devices > IP Device
- Select the Settings tab.
- For IP Device Polling Interval, set the value, in minutes.
Tip: Polling does not remove inactivate or retired devices.
See the Stored Audio Notification example.
Important: You should not make changes to these settings unless specifically instructed to do so by Support.
-
IP request timeout – If your network is slow, you may want to allow more time for UNP to connect with speakers. The default setting is 5 seconds.
-
Rate Limit Count and Rate Limit Time – Most customers will never need to adjust these settings. We recommend using the default settings unless you are trying to reach large numbers of endpoints (several thousands) in as short a time as possible. Adjusting these settings allows UNP more time to connect to endpoints to send notifications. The default settings are 150 and 500, respectively
The settings work like this – within x amount of time, process n number of notifications to endpoints, where x=Rate Limit Time and n=Rate Limit Count.
-
Less rate time / higher rate count – decreases the chances of UNP connecting to all assigned endpoints within the given time frame.
-
More rate time / lower rate count – increases the chances of UNP connecting to all endpoints within the given time frame.
-
When you no longer need to use a device:
-
Unplug or disconnect the device.
-
Manually delete it from the IP Device page.
The device is no longer available to assign as a notification trigger and is automatically removed from notifications it is assigned to.

